ESP8266 Wifi Module

In this article we describe briefly the ESP8266 wifi chip from Espressif

ESP8266

This lower power SOC  contains a 32 bit RISC MCU and a wifi module. At the Espressif web site we can find the detailed informations about the ESP8266

ESP8266 Resources

The device datasheet is available in the following pdf document

ESP8266 Datasheet

The ESP8266 modules are available individually or in a development platform; the last system simplifies its usage as the development kit contains all the hardware to use rapidly the soc device; we are already ready to load the firmware and use the device.

On internet various web sites describe home automation or iot projects using this soc.

A reference site for the ESP8266 is

ESP8266 Forum

In the forum we can find the various systems utilized to develop applications for the ESP8266. The most relevant tools are

  • Arduino Ide

Arduino IDE

ESP8266 Arduino github

  • Espressif SDK

SDK Forum

ESP8266 SDK

  • PlatformIO

PlatformIO

  • Nodemcu

Nodemcu at esp8266.com forum

Nodemcu

Nodemcu github

We can buy the ESP8266 module from various internet online websites, for example ebay, as a single module

ESP8266 on ebay

or as a development kit

ESP8266 Development Kit

Different ESP8266  AI-Thinker modules are available

AI-Thinker

We’ll use the Nodemcu development kit. This kit contains the AI-Thinker ESP-12/ESP-12E modules. In the ebay search we have as results  ESP8266 ESP-01 modules too and development kits from other vendors.

On the Nodemcu github we can find the development kits we’ll use afterward. There are two versions

  • Nodemcu V1 (ESP-12E) development kit

Nodemcu devkit V1.0

  • Nodemcu  V0.9 (ESP-12) development kit

Nodemcu devkit V0.9

At the following link we can find the description of the different AI-Thinker modules and as obtain informations about the flash inside the device

ESP8266 Modules

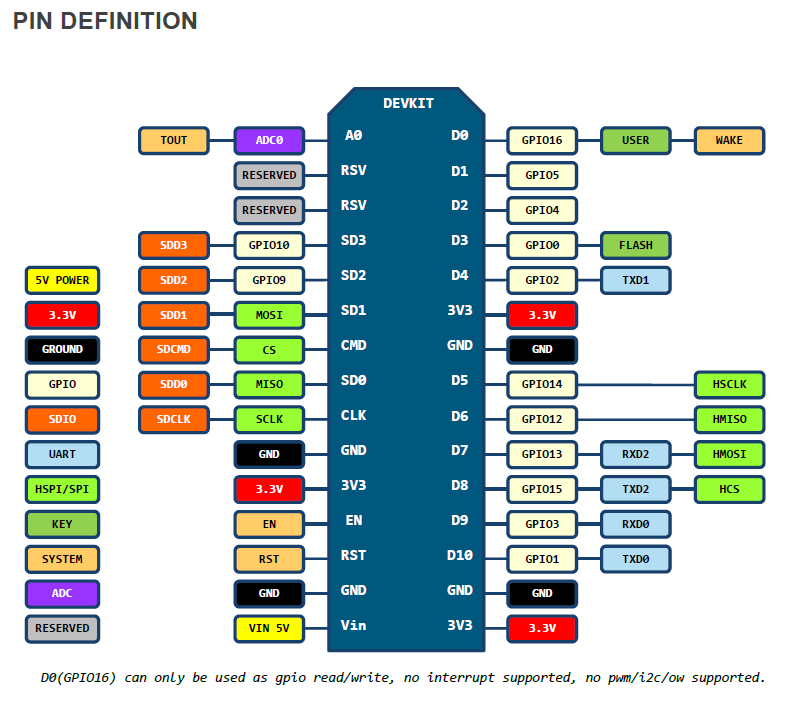
From the Nodemcu github

Nodemcu Devkit

the pins available in the devkit 1.0  are the following

In next articles we’ll describe how to obtain the Nodemcu firmware, how to load it on the device, how to compile it and we’ll show some example using the LUA scripting language utilized by the Nodemcu firmware

Lua

with the LUA software modules available for the ESP8266

Nodemcu documentation

In the next article we’ll describe the Nodemcu firmware

Nodemcu Firmware

Building openwrt package

In the previous article

Building OpenWrt firmware

we described how to build the OpenWrt for the TP-Link TL-MR3420 V1 router. Now we show how to build a package, vsftpd, and install it using the shell command window

As for the firmware building execute

and access the section for this package, i.e.  Network->File Transfer, and enable it as moduleOpenWrtModulovsftpdSave the settings  in the .config file and execute

At the end of the task the package is available in the packages folder under the router platformOpenWrtModulovsftpdCompilatoTransfer the file on the router as root using scp (WinScp on windows) into the folder /tmp. In this case don’t update the packages repository using the web interface (if done reboot the device); log on to the router  using ssh as root and execute the command

OpenWrt offers many packages that allow you to greatly enhance the functionality of the device, but some packages require more resources, so you can install them on routers with more powerful hardware.

Building OpenWrt firmware

After the brief description of OpenWrt system in the previous article

OpenWrt

we describe now how to build the firmware for our router.

We use as tartget device the TP-Link TL-MR3420 router version 1.

This model is in the list of the supported OpenWrt devices; here is the specific documentation for this device

TP-Link TL-MR3420

From the documentation we know that the SOC is an Atheros AR7241. This information will be used in the configruation phase of the buildin envinronment.  As a preliminary operation also download the original firmware of this router from the link

Original Firmware

In the page TP-Link TL-MR3420 we find the links to two differents versions of the OpenWrt firmware:

  • Firmware used to install OpenWrt: openwrt-15.05.1-ar71xx-generic-tl-mr3420-v1-squashfs-factory.bin.
  • Firmware used to update OpenWrt: openwrt-15.05.1-ar71xx-generic-tl-mr3420-v1-squashfs-sysupgrade.bin

If we have the original firmware in our device we must utilize the first one, while in the case of updates we use the second one..

We now execute the operation described in the link

OpenWrt Building

in the Debian envinronment installed in previous article

Debian Envinronment

In a shell command window we install the prerequisites as non root user (sviluppo in our case)

We create a folder OpenWrt under the home user folder (sviluppo in our case) and clone the repository. In this build we choose the stable branch 15.05

At the end of the git task, execute

We are now ready to build the firmware of the TP-Link TL-MR3420 V1.

Execute the command

and we choose as target Target System AR7xxx/AR9xxx as described in the following screenshotsOpenWrtmenuconfigWith the following choices we change the options

  • y: we buil it.
  • m: we build it as module.
  • n: we skip it.

At the following link

OpenWrt Building

we find all the documentation about the building.

In the Target System with enter we can choose our Target PlatformOpenWrtmenuconfigAtherosWe have to install the base packages to admin the system, so we access LuCI OptionOpenWrtmenuconfigLucithen CollectionsOpenWrtmenuconfigLuciCollectionsand at the end the luci package; with this option the system installs an http server tooOpenWrtmenuconfigLuciCollectionsBaseWe choose as modules some cryptographics packages in the kernel modules sectionsOpenWrtmenuconfigKernelModulesthen Cryptographic Api modulesOpenWrtmenuconfigKernelModulesCryptoApiand at the end the following modules merged into the firmware fileOpenWrtmenuconfigKernelModulesCryptoApioptionsYou should save the configuration in a file in order to use it again later. Finally save the configuration in the .config file.

We can now exit the menuconfig and execute the following command in the shell command window

This task checks for the prerequisites.

To build the firmware we execute

in verbose mode.

At the end of the task we can find the firmware in the atheros platform under the bin folder. In our case our images are highlighted in the following screenshotOpenWrtFirmwareWe can now flash the firmware.

WARNING: Before installing the firmware verify the recovery process of your router in the event of a problem, i.e how to start in recovery mode, flash via tftp, use JTAG, etc. The image installation on the device is at your own risk. We accept no responsibility if the installation leads to  malfunction or block of the device.

The OpenWrt web site describes all the vaious options to build the firmware and packages. In the next article

Building OpenWrt package

we’ll describe how to build and install from a shell window command the vsftpd package.

OpenWrt firmware

In this article we describe briefly OpenWrt

OpenWrt

As stated in the above link OpenWrt is a linux distribution for wireless devices. It is available for different routers as listed in the following page

OpenWrt Supported Devices

The firmware is an open source one, it is modular with the possibility to use various packages.

At the following link we find the documentation about packages and the opkg command

Packages

After the OpenWrt firmware installation we can login using the ssh protocol in a unix shell command and check the installed packages, installable package and so on.

The command

shows the available packages for the device.

This command works if the list of the repositories is available in the opkg.conf file,

OpenWrt packages repositories

but the same operation is available trhrough the web interface

First we log on to the router with a browserOpenWrtLoginWe access to the Software sectionOpenWrtSoftwarepngWe press the Update lists buttonOpenWrtSoftwareUpdateListThe list is loadedOpenWrtSoftwareListNow we search for a package, for example vsftpdOpenWrtSoftwareUpdateListAfter the search we can proceed to the installationOpenWrtSoftwareInstallvsftpdWe can find it among the installed packagesOpenWrtSoftwarevsftpdInstallatoIn future articles we will describe how to build the image for your router along with an additional package

Building OpenWrt firmware

Building Armbian image for Orange PI PC

We treat now the bulding of the image Armbian for Orange PI PC. From the developer’s github

Armbian Github

we find the steps to do the task.

From the Armbian site

Building Armbian

the supported building envinronment is Ubuntu. In our test we use Ubuntu 16.04.1 LTS x86-64

Ubuntu

and our Debian 8.5 envinroment used for the other tasks described on this site. With Ubuntu the compile.sh script installs all the required packages to build the image.  On the Armbian web site we can find also various compilation options..

Using Debian 8.5 as host, we have to exectute some prerequisites tasks described below. In the case of issues execute the building on Ubuntu..

First we install the cross compilation envinronment in Debian

https://wiki.debian.org/CrossToolchains

We have to create the file  crosstools.list in /etc/apt/sources.list.d

Edit this file and add the line

Save the file and add the repository key using curl. We install the curl package

and add the key

Now we are ready to install the packages and architecture as listed below

At this point the procedure is the same on Ubuntu or Debian. We create a folder called armbian under orangepi folder in the home folder of the linux system; in our case the user is sviluppo

We clone the repository with the following command in a shell command window in the armbian folder

To build the image execute

When requested enter the root password and for our image select the options described below.

  • Full OS image

fullosimage

  • Orangepipc board

orangepipc

  • default kernel

defaultkernel

  • Debian stable image

debianstable

  • Image with desktop envinronment

debiande

We find the image under the folder output/images ready to be transferred on a micro sd card as described in previous article

immagine

Enigma2 package compilation

After the enigma2 compilation

Enigma 2 image compilation

we show how to create a package.

In the recipes-local folder

we create a folder for our package, for example testpackage, and a subfolder files

In the file testpackage.c, in the files folder, we insert the test code

We have to create the Readme.txt in the files folder and the LICENSE file  in the testpackage folder. The Readme.txt file contains informations about the application. For the LICENSE, without information at the moment, we have to generate the hash to insert into the bitbake file.

md5sum command creates the md5 file for the LICENSE

Now we are ready to create the bitbake testpackage_0.1.bb file in the testpackage folder; here is the content of this file

We are now ready to compile the testpackage. We use the Zgemma envinronment to compile the files, as described below

The package is available in the folder shown below

To install the package on the Zgemma H2H we have to trasfer the  testpackage_0.1-r0_mips32el.ipk file on  ZGemma H3 in the /tmp folder and execute in a shell, accessible using the telnet application, the following command

To force the installation use

The executable is available in the /usr/bin folder; the execution gives us the expected output

OpenATV Enigma2 image compilation

In this article we describe how to generate an OpenATV image, based on the Enigma 2 framework

Openatv

 Atfer the compilation envinronment installation, described in this previous article

Debian envinroment setup

we can proceed as described below.

Execute the logon into Debian envinronment with the development user (sviluppo in our example). In the home directory create the enigma2 folder

 Install the following packages

Modify the shell as bash executing

and choosing the NO option.

Create under openatv an enigma2 folder

At this step let’s create a folder sources; this folder will contain all the sources for the various set-top boxes we would like to compile

Using the git command we clone locally the oe-alliance repository

After this task enter into build-envinronment folder and execute

Now we modifiy the source dowload folder editing the site.conf file and changing the parameter as described below from

to

We are ready now to proceed to the image compilation.

From the build-envinronment to generate, for example, the image for Airdigital Zgemma H2H set-top box execute

For the Xtrend ET10000 set-top box

At the end of the process we’ll find the image ready to be uploaded on the set-top box in the deploy folder for each machine type; in the case of the Zgemma H2H the folder is

immaginezgemma

The zip file contains for the Zgemma H2H the file to be unzipped on the usb pen and uploaded on the device.

WARNING: The image installation on the device is at your own risk. We accept no responsibility if the installation leads to  malfunction or block of the device.

Beaglebone development board

In this article we describe briefly the Beaglebone Black development board. What said is applicable also to its derivatives (Green, Enhanced) for most of the information

Beaglebone Black Board

From the above link  there is a comparison chart between the various models.

The card is the result of an Open Source project with all its elements distributed on site

Beaglebone Black Design Files

Below are the main features of the BeagleBone Black Rev. C (other versions differ with respect to Black).

CPUTexas Instruments Sitara AM3358BZCZ100, 1GHz, 2000 MIPS
Graphics EngineSGX530 3D, 20M Polygons/s
Memory512 MB DDR3L 800Mhz
On Board Flash4Gb, 8bit Embedded MMC
Analog Pins7
Digital Pins65 (3.3V)
PMIC (Power management integrated circuits)TPS65217C PMIC and one additional LDO (Low Dropout Regulator)
Debug20 pin JTAG CT Iopional, Serial Header
PowerMini USB,DC Jack, 5V DC via Expansion Header
Indicators1 Power, 2 Ethernet, 4 Led User controllable
USB client PortAccess to USB0, client mode via mini USB
USB Host PortAccess to USB1, socket type A, 500 mA LS/FS/HS
Serial PortAccess UART0 via Header 6 pin 3.3 V TTL
Ethernet10/100 RJ45
SD/MMC ConnectormicroSD 3.3 V
User InputReset Button, Boot Button, Power Button
Video Output16b HDMI, 1280x1024 (MAX)
AudioVia HDMI, Stereo
Supported Interfaces4x UART, 8x PWM, LCD, GPMC, MMC1, 2x SPI, 2x I2C, A/D Converter, 2xCAN Bus, 4 Timers,2 PRUs
Weight39.68 grams

From the link

Beaglebone Black Wiki

there is a complete description of all the features and sofware compatibility. The System Reference Document, available as a link in the site mentioned above, can be downloaded from the link

System Reference Beablebone Black

The card being Opensource and with many outputs and built-in controls lends itself very well to prototyping of IOT systems, Automation, Home Automation. The hardware functionality expansion can be executed by the usage of expansion cards called Capes

Beaglebone capes

The main linux distribution for the BeagleBone Black card is Debian. On the Debian distribution for BeagleBone it is also available  Cloud9

Cloud 9 Interface

that allows you to interact easily with the hardware on the BeagleBone Black. In subsequent articles we describe the installation, creation of the image and various uses of the card.

Here is the link to the software and hardware features of the card; in particular the page shows the input/outpuy pin of the BeagleBone Black

Beaglebone Black software and hardware

The card can be purchased by following the links listed on the website

Beaglebone Black Purchase

from online retailers or electronics stores.

Remote desktop setup for Armbian on Orange PI PC

To enable the remote desktop for Armbian on Orange PI PC execute the logon to the system, for example using an ssh client

loginDelete, if installed, the packages

Install the following packages

Now we are able to login on Armbian using the remote desktop. Start the remote desktop client entering the Orange PI PC IP address

Remote Desktop ConnectionExecute the login with the user created at the first boot of Armbian, for example user1

Remote Desktop_LoginWe now have the access to the XFCE desktop remotely

Remote_Desktop

Armbian Boot on Orange PI PC

After the creation of the micro sd card with the Armbian image for Orange PI PC

Armbian image on micro sd

we can boot the Orange PI PC with the card inserted in the card slot. At the boot the first operation is the partition increase on the card, then the system requires the root password change from the default, 1234, to a new password. The next operation is the creation of a normal Debian user, for example user1; we provide the main required informations like username, password and letting the default  for the other fields. After these steps the system opens the XFCE graphical interface with the default resolution. To change the resolution execute the following command

It shows a list with all the available options; to enable a 1080p60 resolution execute

 To change the locales configuration execute the following command choosing the language to use

while to modify the keyboard layout use the following command

Blog about embedded devices