Tag Archives: arm

Remote debug on Beaglebone

In the previous article we have prepared the environment with Eclipse for cross building for BeagleBone

Cross building for Beaglebone

Now we shall configure Eclipse and BeagleBone to debug the code directly on BeagleBone.

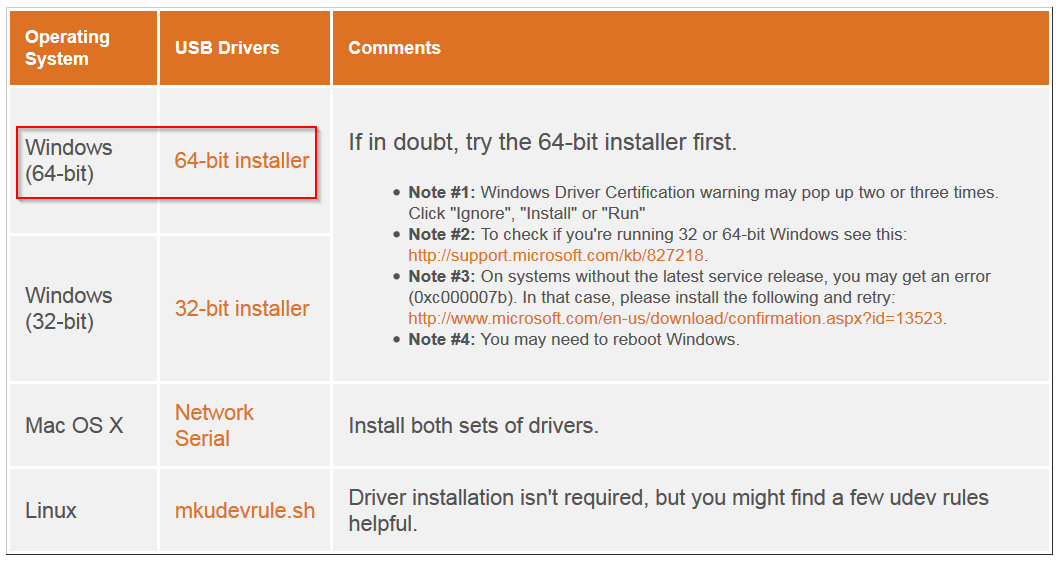
On BeagleBone install gdbserver

On the Debian system with Eclipse install gdb-multiarch

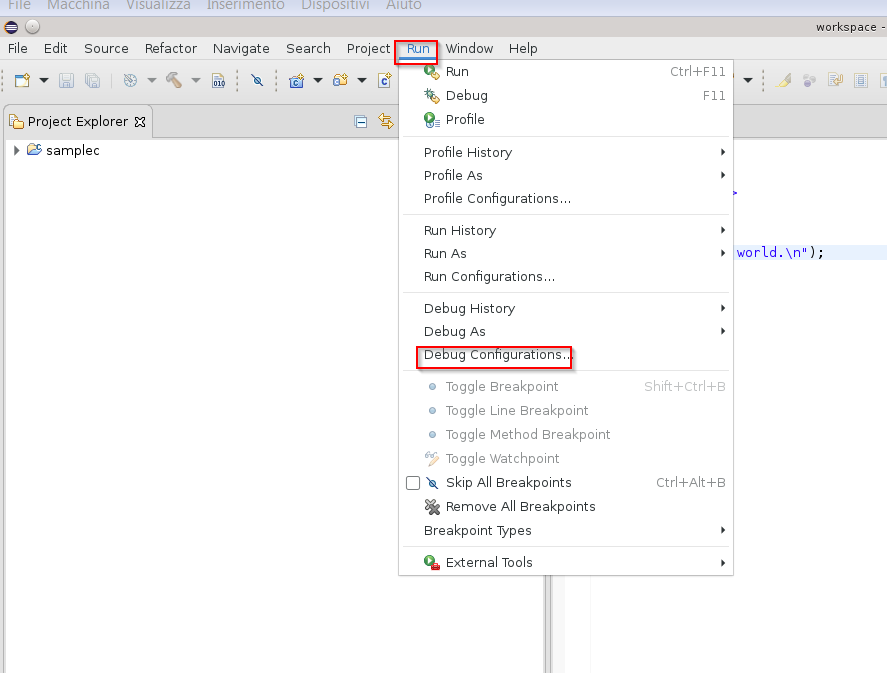
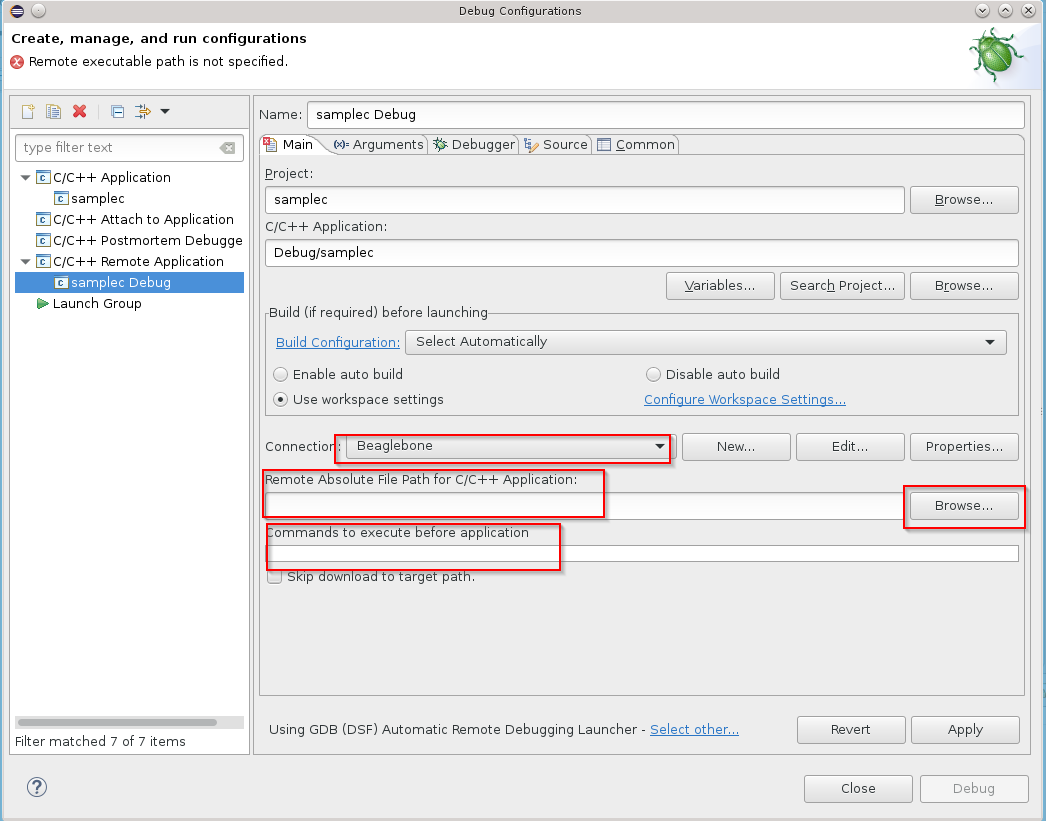
From Eclipse access to Run-> Debug Configurations

debug configurations
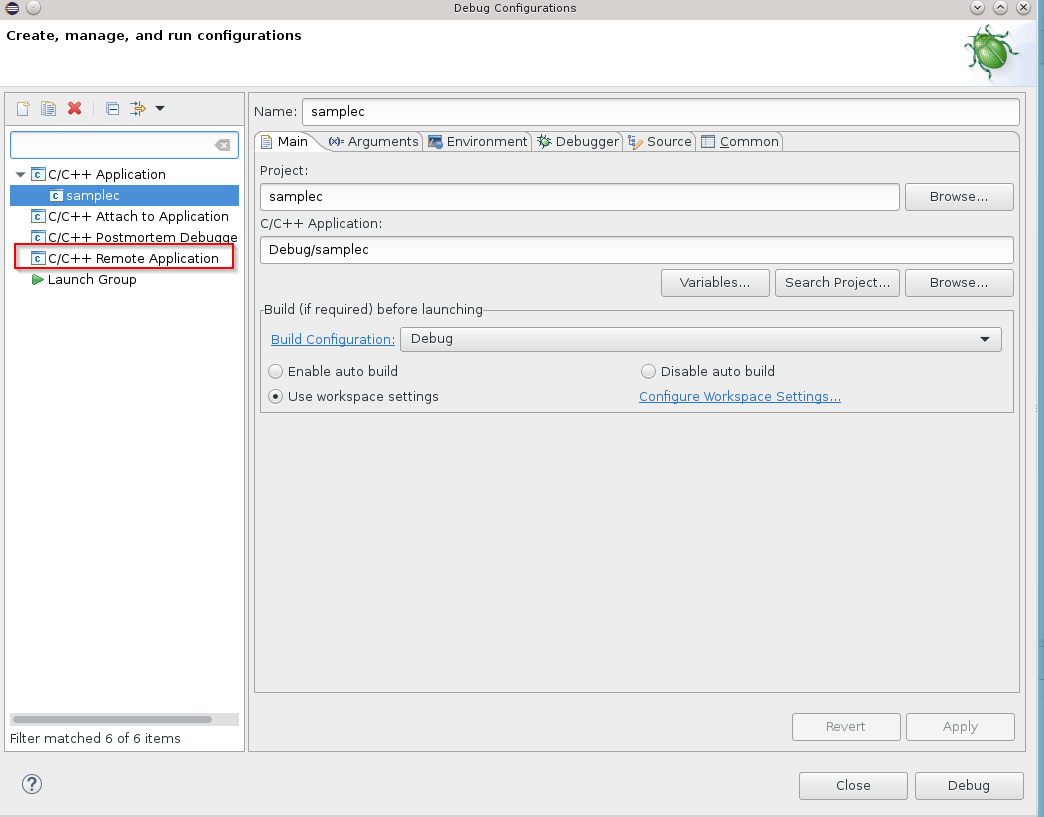
Double-click C++  Remote Application to set parameters

Remote debugger configuration
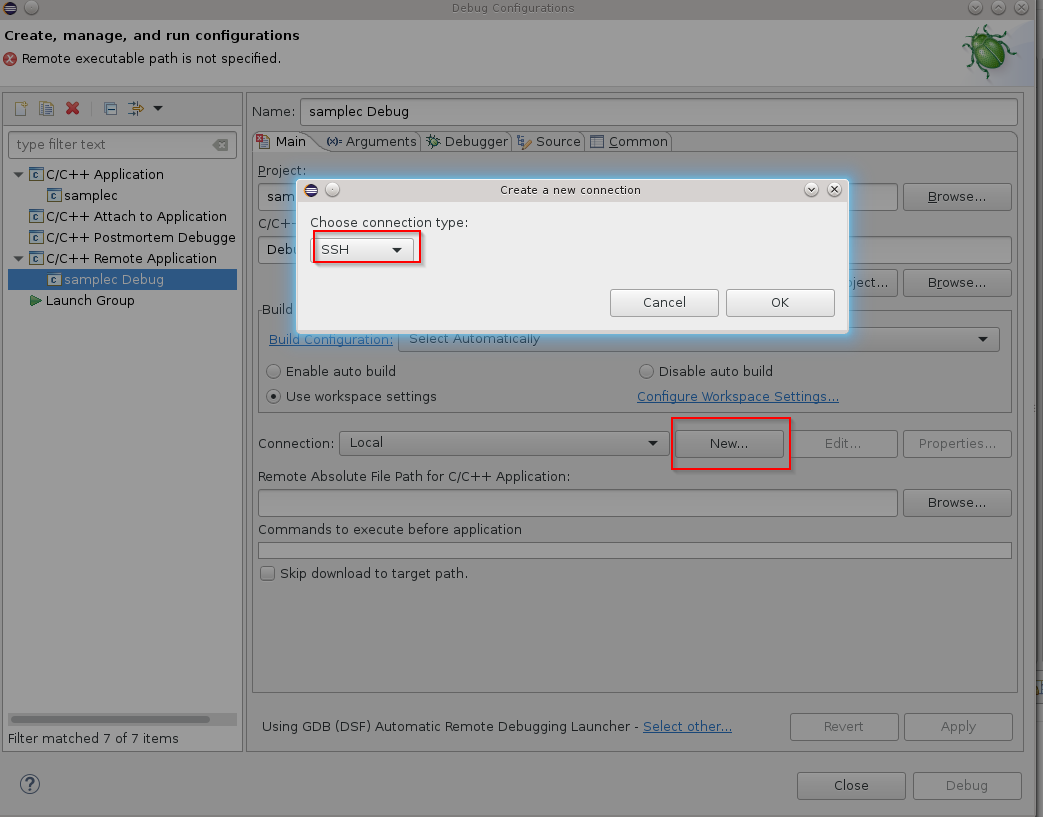
At the next window, create a new ssh connection with the New button

New connection
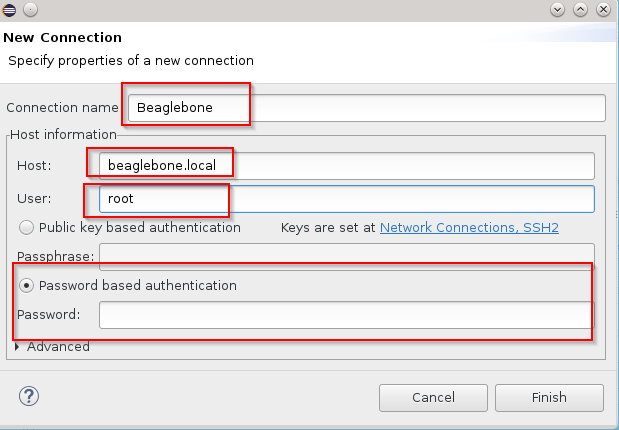
Enter the parameters for the connection

Connection parameters
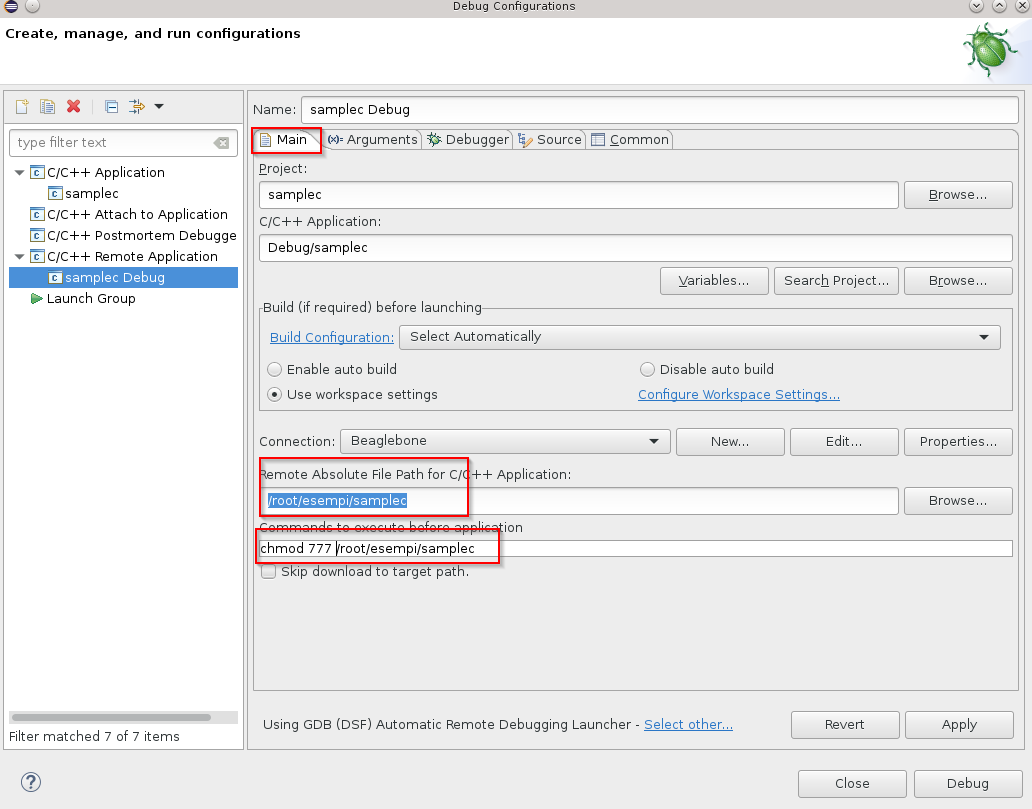
Set the remote destination folder for the file  and execution management; with the browse button choose where to copy the files, and with the field “Commands to execute before application” will give execute permissions to the file

Remote foldersIn our case we create a folder esempi under /root on the  BeagleBone where to debug remotely

main debug settingsSet the multarch debugger in the Debugger Tab and other startup parameters and gdb command line settings

Debugger multiarch settingsSet the port of the remote debug server installed on BeagleBone in the Gdbserver Settings Tab

debug server settings
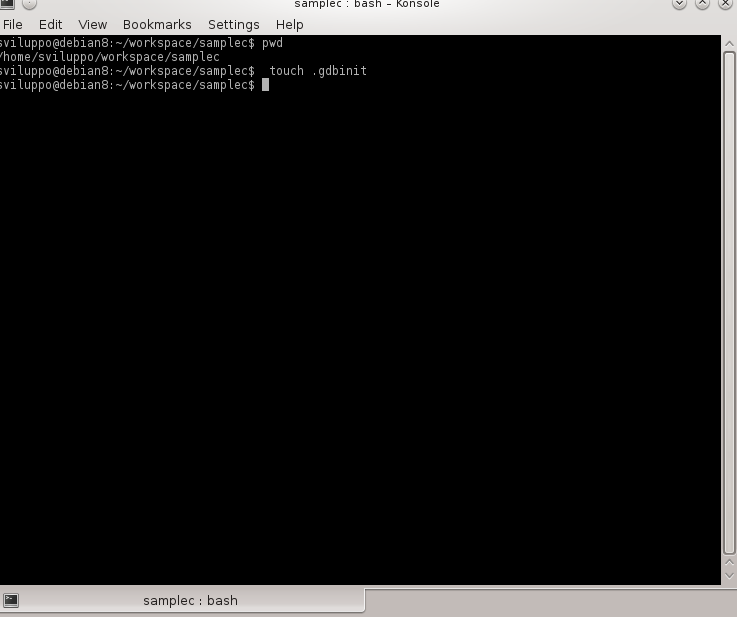
Create .gdbinit files in the project folder with the command

touch debug
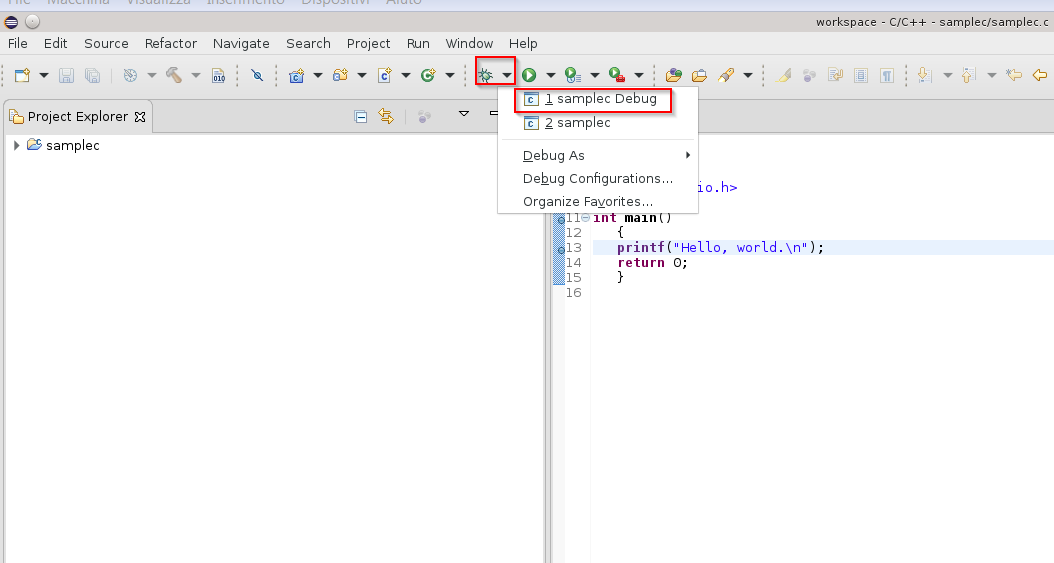
To start debugging run the configuration we set

debug run
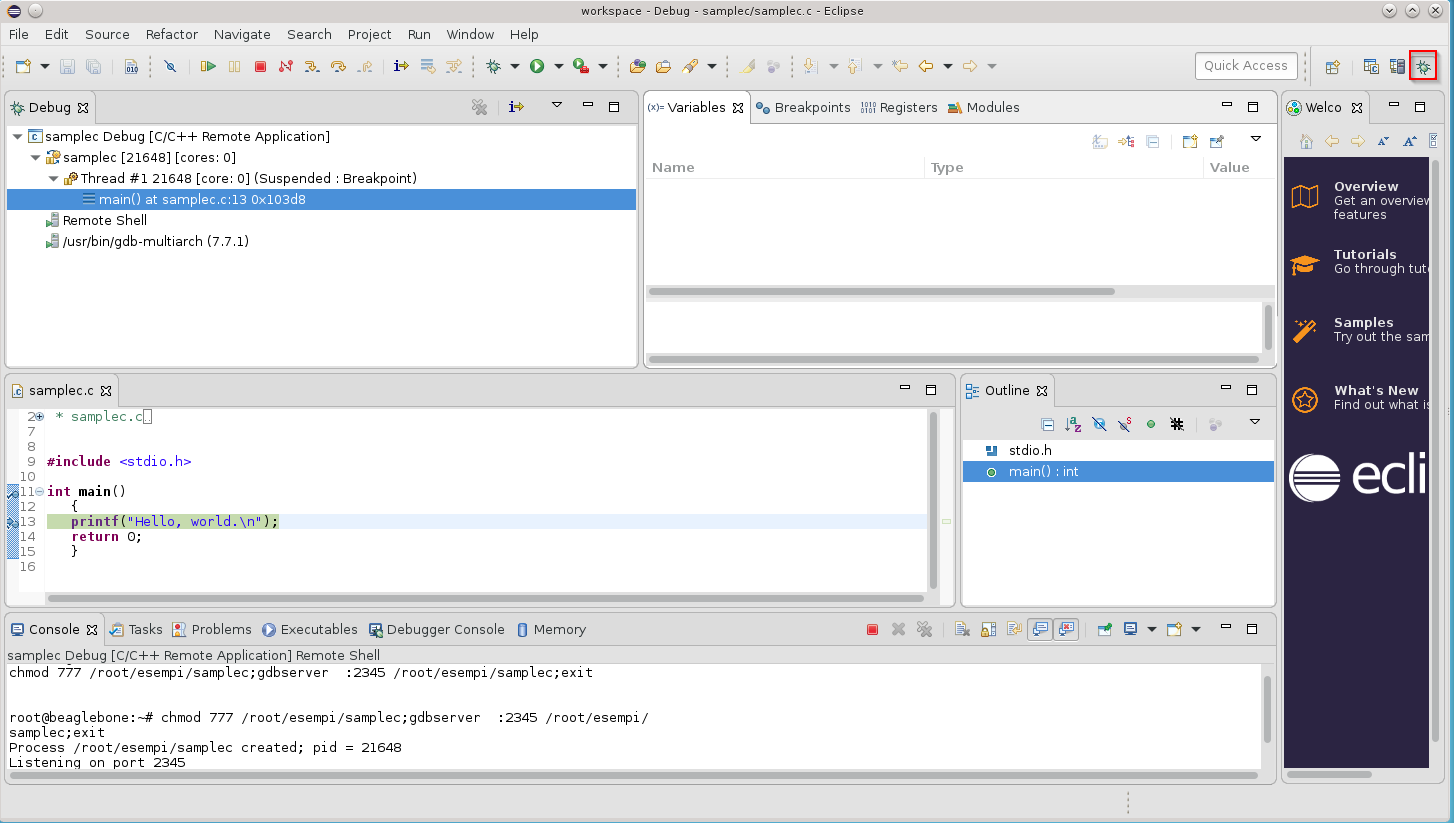
Eclipse connects with BeagleBone and performs remote debugging  opening the Debug Perspective

debug perspective

Cross building for Beaglebone

In the article on the Debian environment we prepared the linux machine for the development of embedded systems

Debian development envinronment

In the article on building an image for the Orange PI PC we installed the cross build tools for armhf environment

Building Armbian for Orange PI PC

Starting from the clean image of the Debian envinronment we list the steps required to install the cross compiling environment. We log on Debian Desktop as sviluppo/ password.

As a preliminary step we install  the cross toolchains in Debian

https://wiki.debian.org/CrossToolchains

Create the file crosstools.list in the /etc/apt/sources.list.d folder

and add the line

Save the file and add the key of  the repository embedian.org

Install the following packages and add the armhf architecture

We install at this point the Eclipse IDE for Cpp downloading the IDE for Linux 64bit

Eclipse IDE

Unzip the eclipse package under / home /sviluppo.

Install the jre java

Add the line at the end of the file

Run the following commands

Run Eclipse from the eclipse folder to start the IDE

eclipseAs a first example we create a simple program in C for BeagleBone.

Create a new project in C, by inserting the following data

new projectSelect both configurations

project configurationEnter the cross compiler prefix and path

crosscompiler prefixPress Finish.
Add to the project a source file in C

C source fileInsert the following simple code

Proceed with the build by selecting the project with the right mouse button and choosing Build Project

project build Transfer the generated files on BeagleBone. You can use scp or ftp.

Give execution permissions to the file and run it

The result is of course the text inserted in the code

sample run

Development tools on Beaglebone

In the previous article we have installed and updated to the latest Debian image our BeagleBone

Debian sd card setup for Beaglebone Black

We also enabled the network services to access the board using the hostname.

After these changes we can access the Beaglebone using the following address in the the browser

http: //beaglebone.local

The web interface presents several examples of code executed with bonescript, javascript library based on node.js framework

Node.js

You can perform these simple examples to begin to interact with the board. There are also links to the development tools such as Cloud9, Nodered and informations about these development tools

toolsClicking on Cloud9 we access at the section dedicated to this tool. It is shown how to create a simple example and to run at boot the code placing it into the autorun folder in the IDE interface. From this section we can access to the Cloud9 ide available on port 3000 of the Beaglebone site

Cloud9

For more information about the tool, refer to the site

Cloud9

Accessing to the Nodered section we find  the link  to the web page about the basic informations about Nodered

Getting stared with Nodered

and the link to the Nodered ide, running at 1880 port of the web server running on BeagleBone

Beaglebone Nodered

Nodered beaglebone

In the web page about the first steps for Nodered there are examples with which to start using the tool. From the web site https://nodered.org we can have more informations about the tool.

In addition to tools in javascript on BeagleBone there are C/C++ compilers, Python interpreter and the possibility  to add additional development tools.

From the home page of the our BeagleBone board web interface, http: //beaglebone.local, we find the informations about all available headers and functions. The following image shows the  expansion headers

cape headers

In next articles we will show some code examples with the development board.

Debian sd card setup for Beaglebone Black

In the previous article we started up the development board Beaglebone Black / Green.

Startup of the Beaglebone

Let’s look  how to install an updated image of Debian for BeagleBone. As a first step we have to access the site which contains the Beaglebone  images

Beaglebone images

We download, having a BeagleBone Black Rev. C, bone-debian-8.6-lxqt-4gb-armhf-2016-11-06-4gb.img.xz. Unpack the 7zip image and load into a micro sd card with Win32DiskImager, as done for the Orange PI PC

SD card setup for Orange PI PC

If we wanted to load that image on the internal flash, we must edit the /boot/uEnv.txt files on a Linux system and uncomment the line

In that case, when we start the board the system will rewrite the operating system present on the internal flash with the version loaded on the micro sd card. We do not follow this road in order to do all the tests on the sd card leaving the internal partition unmodified. So let’s connect our Beaglebone to a network router. We insert the micro sd card and startup the development board. In some boards we need to press of the USER / BOOT button

 beaglebone black

because the operating system boots from micro sd card; with our board it is not necessary to perform this operation. We have to log on Beagleone now; the avahi-daemon service is already active on the Beaglebone and Linux systems resolve the address by hostname; Windows, instead, needs tha samba service activated to solve the Beaglebone hostname; installing samba we obtain the hostname recognition with the protocol netbios from Windows. If you are using a Windows machine to work with the Beagelbone you must first check the ip assigned by the network router to the  BeagleBone. From a Linux system, for example, connect to the Beaglebone using ssh as debian / temppwd and the beaglebone hostname

ssh BeagleboneIn Windows we need to install the samba service first to have the same functionality. Proceed at this point with the updating and samba installation

After the updates and samba services activation, we are ready to show examples with our BeagleBone and we are able to connect to it using the beaglebone and beaglebone.local hostnames. In the next article we will see tools already available on the board and how to add more features.

We can install the ftp service too, as we could use it in next articles

 To deactivate and activate it use the following commands

Startup of the Beaglebone development board

In a previous article we have given a brief description of Beaglebone Black board and its variants.

 Beaglebone development board

The BeagleBone in this review comes with 4GB of space on board, and with the operating system already installed.

We can access the BeagleBone, in our case the Black, without using the Ethernet network, but connecting it to a PC through the mini service USB connection as specified on the BeagleBone site

Getting started with Beaglebone

After connecting the BeagleBone Black to the PC via the USB cable we find  another removable  device to the existing disks

Beaglebone removable diskRunning start.htm we start an interface similar to the one available on  the  getting-started web site

getting startedWe proceed to the installation of network-over-USB drivers for the  operating system, Windows 64-bit in our case

driver network over usbProceed to download the file and run it, providing the permissions required by Windows

beaglebone driver installerAt the end the window with the performed operations is shown

beaglebone driver installer summaryUsing Firefox or Chrome we access to the following address http://192.168.7.2; we access in this way to the web server, running on Beaglebone board, through network over  USB

beaglebone web siteThe page shows how to update the system, login to the IDECloud9, perform various  Bonescript examples.

The access to the Cloud9 IDE

Cloud9 IDE Informations

takes place on port 3000 to the IP address specified above, ie http://192.168.7.2:3000

cloud9 ideIn our examples, we will not change the operating system present on the internal eMMC card but we will download an updated version of Debian for BeagleBone and will install it on a micro sd card.

The system can be closed  using  the Power button on board

power buttonor by connecting via ssh at 192.168.7.2 address with the debian user ,using temppwd as password, and executing the command “sudo poweroff”

sshIn the next article we will proceed to download and install on a micro sd card the last Debian image for BeagleBone

Debian sd card setup for Beaglebone Black

Beaglebone development board

In this article we describe briefly the Beaglebone Black development board. What said is applicable also to its derivatives (Green, Enhanced) for most of the information

Beaglebone Black Board

From the above link  there is a comparison chart between the various models.

The card is the result of an Open Source project with all its elements distributed on site

Beaglebone Black Design Files

Below are the main features of the BeagleBone Black Rev. C (other versions differ with respect to Black).

CPUTexas Instruments Sitara AM3358BZCZ100, 1GHz, 2000 MIPS
Graphics EngineSGX530 3D, 20M Polygons/s
Memory512 MB DDR3L 800Mhz
On Board Flash4Gb, 8bit Embedded MMC
Analog Pins7
Digital Pins65 (3.3V)
PMIC (Power management integrated circuits)TPS65217C PMIC and one additional LDO (Low Dropout Regulator)
Debug20 pin JTAG CT Iopional, Serial Header
PowerMini USB,DC Jack, 5V DC via Expansion Header
Indicators1 Power, 2 Ethernet, 4 Led User controllable
USB client PortAccess to USB0, client mode via mini USB
USB Host PortAccess to USB1, socket type A, 500 mA LS/FS/HS
Serial PortAccess UART0 via Header 6 pin 3.3 V TTL
Ethernet10/100 RJ45
SD/MMC ConnectormicroSD 3.3 V
User InputReset Button, Boot Button, Power Button
Video Output16b HDMI, 1280x1024 (MAX)
AudioVia HDMI, Stereo
Supported Interfaces4x UART, 8x PWM, LCD, GPMC, MMC1, 2x SPI, 2x I2C, A/D Converter, 2xCAN Bus, 4 Timers,2 PRUs
Weight39.68 grams

From the link

Beaglebone Black Wiki

there is a complete description of all the features and sofware compatibility. The System Reference Document, available as a link in the site mentioned above, can be downloaded from the link

System Reference Beablebone Black

The card being Opensource and with many outputs and built-in controls lends itself very well to prototyping of IOT systems, Automation, Home Automation. The hardware functionality expansion can be executed by the usage of expansion cards called Capes

Beaglebone capes

The main linux distribution for the BeagleBone Black card is Debian. On the Debian distribution for BeagleBone it is also available  Cloud9

Cloud 9 Interface

that allows you to interact easily with the hardware on the BeagleBone Black. In subsequent articles we describe the installation, creation of the image and various uses of the card.

Here is the link to the software and hardware features of the card; in particular the page shows the input/outpuy pin of the BeagleBone Black

Beaglebone Black software and hardware

The card can be purchased by following the links listed on the website

Beaglebone Black Purchase

from online retailers or electronics stores.