After loading the firmware into the device esp8266
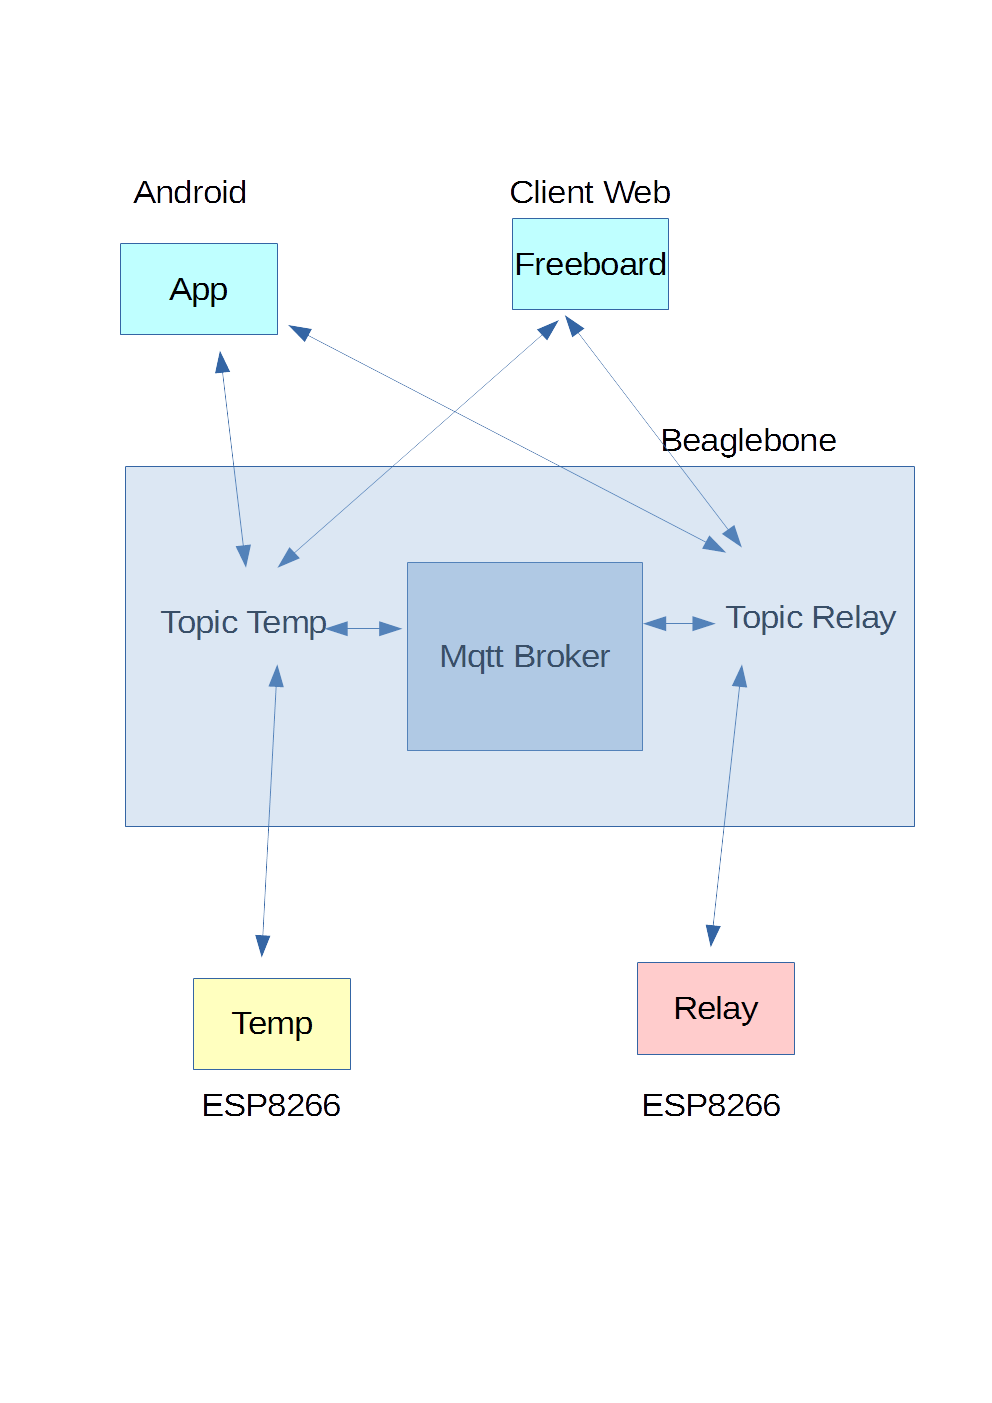
MQTT with BeagleBone and ESP8266-MQTT ESP8266
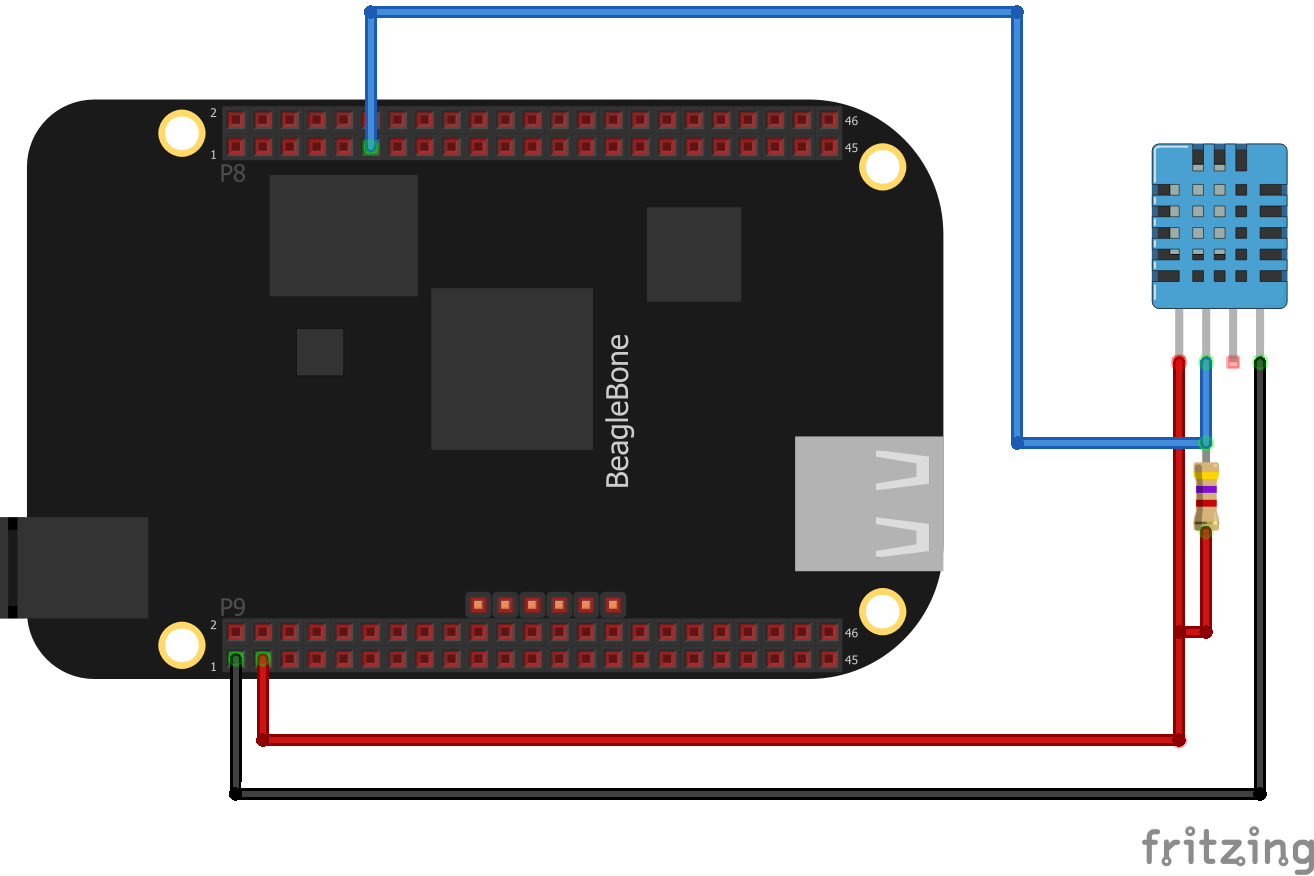
we now connect this module with a DHT11 temperature and humidity sensor. Here is how we connect the sensor to the ESP module
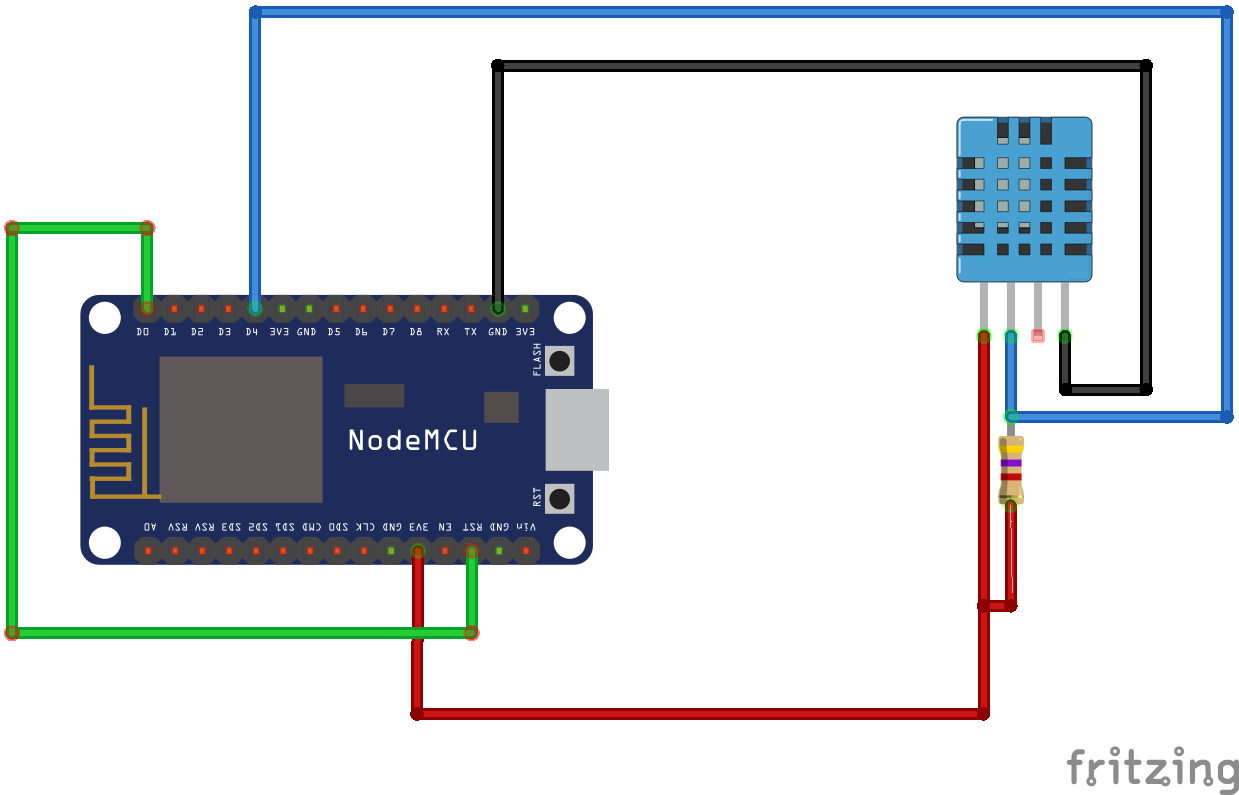
In this example we will consider the option of putting the nodemcu in sleep. To have the node back form the sleep the system has to reboot and it is necessary to connect the PIN D0 (GPIO16) to RST PIN as specified in the nodemcu documentation
Let us take a look at the lua code; It consists of init.lua and tempumid.lua files.
We analyze now the main points of each file
- init.lua
|
1 2 3 4 5 6 7 8 9 10 11 12 13 14 15 16 17 18 19 20 21 22 23 24 25 26 27 28 29 30 31 32 |
-- init.lua SSID="SSDNAME" -- SSID PASSWORD="passwordssid" -- SSID password TIMEOUT=10000 -- timeout to check the network status EXSENSOR1="tempumid.lua" -- module to run MQTTSERVER="mqttbrokeraddress" -- mqtt broker address MQTTPORT="1883" -- mqtt borker port MQTTQOS="0" -- qos used -- Set the netowrk parameters and get ip address wifi.setmode(wifi.STATION) wifi.sta.config(SSID, PASSWORD) wifi.sta.getip() -- Check the network status after the TIMEOUT interval tmr.alarm(0, TIMEOUT,tmr.ALARM_SINGLE, function() status=wifi.sta.status() -- if esp8266 got the ip if (status == wifi.STA_GOTIP ) then dofile(EXSENSOR1) else -- Without ip restart the node print("Error acquiring ip address=",status) node.restart() end end |
In the file we set the the parameters to access the wifi network, the address and port of the MQTT broker and the file to be run on the ESP after wifi connection to the access point is estabilished. If the ESP does’t acquire the netowrk address the system is restarted.
- tempumid.lua
|
1 2 3 4 5 6 7 8 9 10 11 12 13 14 15 16 17 18 19 20 21 22 23 24 25 26 27 28 29 30 31 32 33 34 35 36 37 38 39 40 41 42 43 44 45 46 47 48 49 50 51 52 53 54 55 56 57 58 59 60 61 62 63 64 65 66 67 68 69 70 71 72 73 74 75 76 77 78 79 80 81 82 83 84 85 86 87 88 89 90 91 92 93 94 95 96 97 98 99 100 101 102 103 104 105 106 107 108 109 110 111 112 113 114 115 116 117 118 119 120 121 122 123 124 125 126 127 128 129 130 131 132 133 134 135 136 137 138 139 140 141 142 143 144 145 146 147 |
-- tempumid.lua CNAME="room1" -- Client name AMBIENT="home" -- Ambient name TTOPIC = AMBIENT.."/"..CNAME.."/temperature" -- Temperature topic HTOPIC = AMBIENT.."/"..CNAME.."/humidity" -- Humidity topic STOPIC = AMBIENT.."/"..CNAME.."/status" -- Status topic CTOPIC = AMBIENT.."/"..CNAME.."/command" --Command topic MTOPIC = AMBIENT.."/"..CNAME.."/monitor" --Monitor topic sleep_in_seconds= nil --Sleep in seconds TUPDATE = 15 -- Time interval for update monitor in seconds TUPTEMP = 10 -- Time interval for update temperature and humidity values SPIN = 4 -- Sensor pin TGEN = 5 -- Time interval in seconds usend in various trm -- Define Client Name and connection parameters mqt = mqtt.Client(CNAME, 60, "", "", 1) -- Subscribe to the topics and send status to the status topic mqt:on("connect", function() mqt:subscribe(STOPIC, MQTTQOS) mqt:subscribe(CTOPIC, MQTTQOS) mqt:subscribe(MTOPIC, MQTTQOS) mqt:subscribe(TTOPIC, MQTTQOS) mqt:subscribe(HTOPIC, MQTTQOS) send_status("Sensor ready again") end ) -- Callback when mqtt is offline mqt:on("offline", function() print("mqtt offline"); end) --Callback to manage messages mqt:on("message", function(client, topic, data) manage_message(client, topic, data) end) -- Function to filter the messages function manage_message(client, topic, data) -- If CTOPIC: command topic if topic == CTOPIC then --print("Command") -- If the command is Restart if data == "Restart" then send_status("Restarting") send_mstatus("Restarting") tmr.alarm(2, TGEN*1000, tmr.ALARM_SINGLE, node.restart) --print("restart") -- If the command is null elseif data == nil then -- print("Command not valid") send_status("Command not valid") else -- Check the Sleep command i=string.len(data) dato=string.sub(data,1,5) if dato == "Sleep" then ndato=string.sub(data,6) TSLEEP=tonumber(ndato) if TSLEEP ~= nil then if TSLEEP >= 1 then -- Sets the interval in seconds to sleep sleep_in_seconds=TSLEEP*60 esp_sleep() else -- Send an error in Sleep command send_status("Sleep command error") end else -- Send an error in Sleep command send_status("Sleep command error") end else -- Command not managed send_status("Command not valid") end end end end -- Function to send messages to STOPIC: status topic function send_status(message) mqt:publish(STOPIC, message, MQTTQOS, 0) end -- Fucntion to send messages to MTOPIC: monitor topic function send_mstatus(message) mqt:publish(MTOPIC, message, MQTTQOS, 0) end -- Function to display temp and hum function display_temphum(temp,humi) print("Temperature=%d, Humidity=%d",temp,humi) end -- Function to read and publish temperature and humidity function read_temp_hum(client) status, temp, humi, temp_dec, humi_dec = dht.read(SPIN) if status == dht.OK then mqt:publish(TTOPIC, temp,MQTTQOS, 0) mqt:publish(HTOPIC, humi, MQTTQOS, 0) -- display_temphum(temp,humi) elseif status == dht.ERROR_CHECKSUM then print( "DHT Checksum error." ) elseif status == dht.ERROR_TIMEOUT then print( "DHT timed out." ) end end -- Function that sleeps esp8266 function esp_sleep() send_status("Sensor going to sleep now") send_mstatus("Sensor going to sleep now") -- Delayd sleep to send the message above. tmr.alarm(3, TGEN*1000, tmr.ALARM_SINGLE, function() node.dsleep(sleep_in_seconds*1000000) end) end -- Connection to the mqtt server at the mqttport mqt:connect(MQTTSERVER, MQTTPORT, 0, 1) --Sends periodically the temperature and humidity to the topics tmr.alarm(1, TUPTEMP*1000, tmr.ALARM_AUTO, function() read_temp_hum(mqt) end) -- Sends periodically a message to the monitor topic tmr.alarm(4, TUPDATE*1000, tmr.ALARM_AUTO, function() send_mstatus("Sensor Ready") end) |
The temumid.lua file manages the measurement of temperature and humidity, the subscription on MQTT broker with submission of the data. Global parameters have been set to manage the topic, the waiting time in tmr.alarm. There are in particular the following topics
- /home/room1/temperature: measured temperature topic.
- /home/room1/humidity: measured humidity topic.
- /home/room1/status : Status topic. The status is sent at the start and at request from the command topic /home/room1/command.
- /home/room1/monitor: Status of the esp sent periodically to this topic.
- /home/room1/command: Other clients can send commands to the esp:
- Restart: Restarts the esp.
- Sleep n: Put to sleep for n seconds the esp.
There are various service functions to manage all. The comments in the code describe each feature.
In the next article we will set up the esp with the relay
MQTT with BeagleBone and ESP8266 – MQTT on ESP8266 with Relay