Tag Archives: lua

ESP32 – Nodemcu firmware compiling

After  the compilation of the MicroPython firmware for ESP32

ESP32 – MicroPython compiling for ESP32

this article shows how to generate the Nodemcu firmware for the ESP32 MCU.

The firmware is not yet complete as the one existing for ESP8266.

The instructions can be found on the github at the link

https://github.com/nodemcu/nodemcu-firmware/tree/dev-esp32

The compilation documentation is available at the link

https://nodemcu.readthedocs.io/en/dev-esp32/en/build/

The operating system used is Debian 9 previously encountered for the esptool and Adafruit-ampy utilities

MicroPython – Python on embedded devices

Log on  with the operating system user on Debian 9, sviluppo in our case; under the home folder  create the Esp32 folder and inside this folder the  nodemcu  folder

Clone the repository

To update the cloned repository follow the description on the compilation link, i.e.

Go into  nodemcu-firmware-esp32 folder and run

nodemcu-settingsEnable the bluetooth  in Component config–>Bluetooth
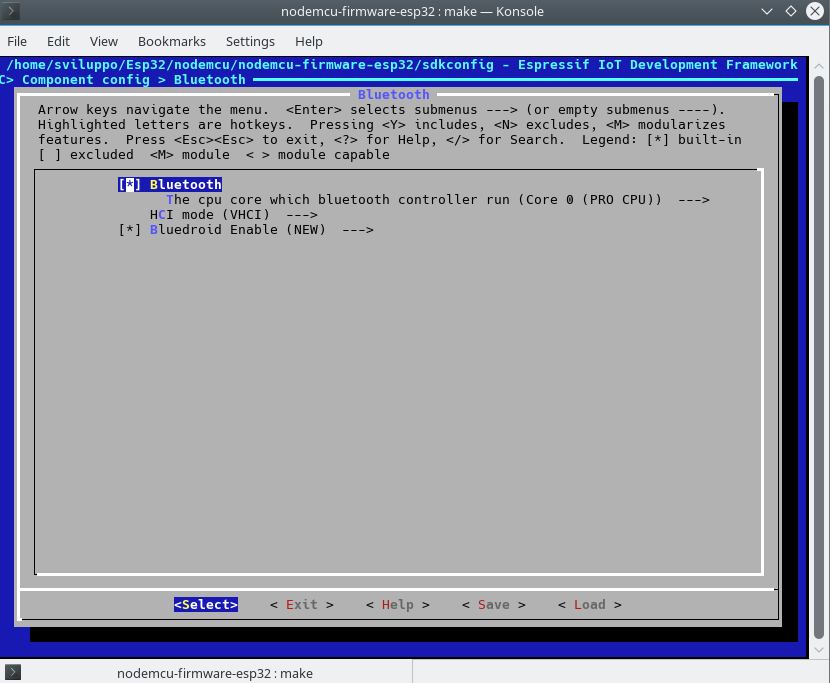
nodemcu-bluetoothEnable various modules in Component config–>Nodemcu modules
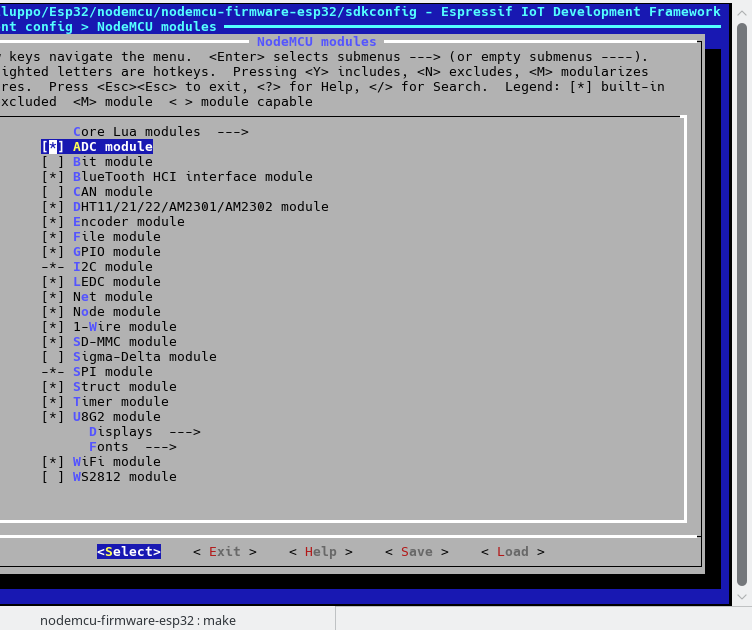
nodemcu-modulesIn the flash settings we set the default values for our ESP32,  Serial flasher config->
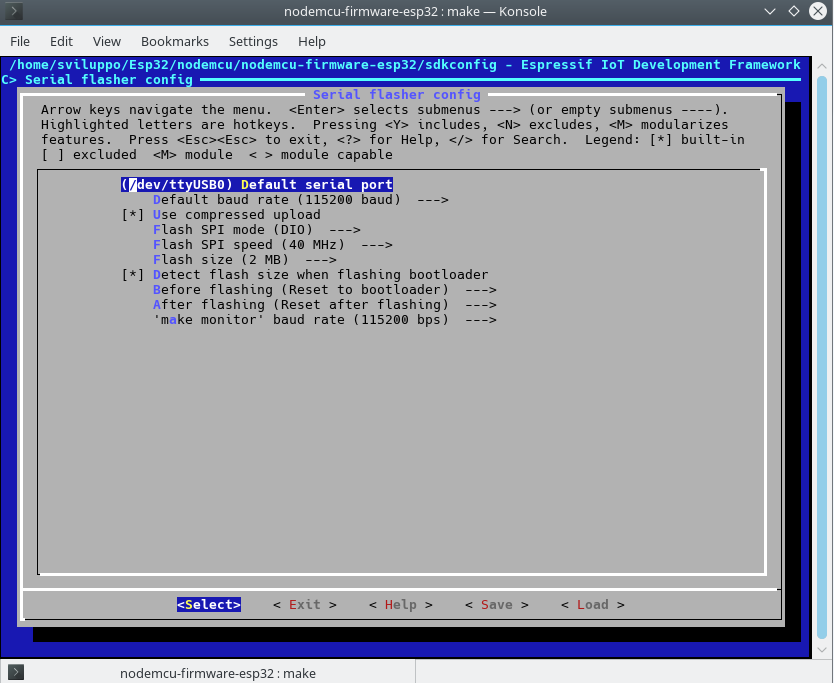
nodemcu-flashSave the configuration and exit. To build the firmware run

At the end of the compilation the command to upload the firmware  is shown; the same operation is executed  by simply running

For informations about the partitions of the various ESP32 versions, refer to the documentation

http://api-guides/partition-tables.html

In the next article we’ll  show how to make an application using the Espressif SDK

ESP32 – IDF Sdk

ESP32 Wifi-Bluetooth Module

In this article we describe briefly the ESP32  chip from Espressif

ESP32

This lower power SOC  contains a 32 bit MCU  with bluetooth and wifi modules. At the Espressif web site we can find the detailed informations about the ESP32

ESP32 Resources

The device datasheet is available in the following pdf document

ESP32 Datasheet

The ESP32 modules are available individually or in a development kits; the last system simplifies its usage as the development kit contains all the hardware to use rapidly the soc device; we are already ready to load the firmware and use the device.

On internet various web sites describe home automation or iot projects using this soc.

A reference site for the ESP32  is

esp32

At above link we can find the various development platforms utilized  for the ESP32. The most relevant  are

  • Arduino Ide

ESP32 Arduino

  • ESP-IDF

ESP32 IDF

  • Micropython

MicroPython

  • PlatformIO

PlatformIO

  • Firmware Lua

LuaNode

Lua-RTOS-ESP32

Nodemcu Development

We can buy the ESP32 modules/dev kits from various internet online websites, for example ebay

ESP32 on ebay

Different ESP32  modules are available from different vendors

Espressif esp-wroom-32

AI-Thinker esp32s

At the link

http://esp32.net/

different hardware configurations available are listed.

As development kits we report

AI-Thinker NodeMCU-32S

DoIT ESP32 Dev Kit

There are development kits based on esp32 that also integrate a LORA wireless  module internally

Lora

We report for example the following

Heltec Wifi LoRa 32

TTGO LoRa32

In the next articles we’ll describe how to build firmwares and use the ESP32 MCU.

MQTT with BeagleBone and ESP8266 – MQTT on ESP8266 with Relay

After the article about the connection with the temperature and humidity sensor

MQTT with BeagleBone and ESP8266 – MQTT on ESP8266 with temperature sensor

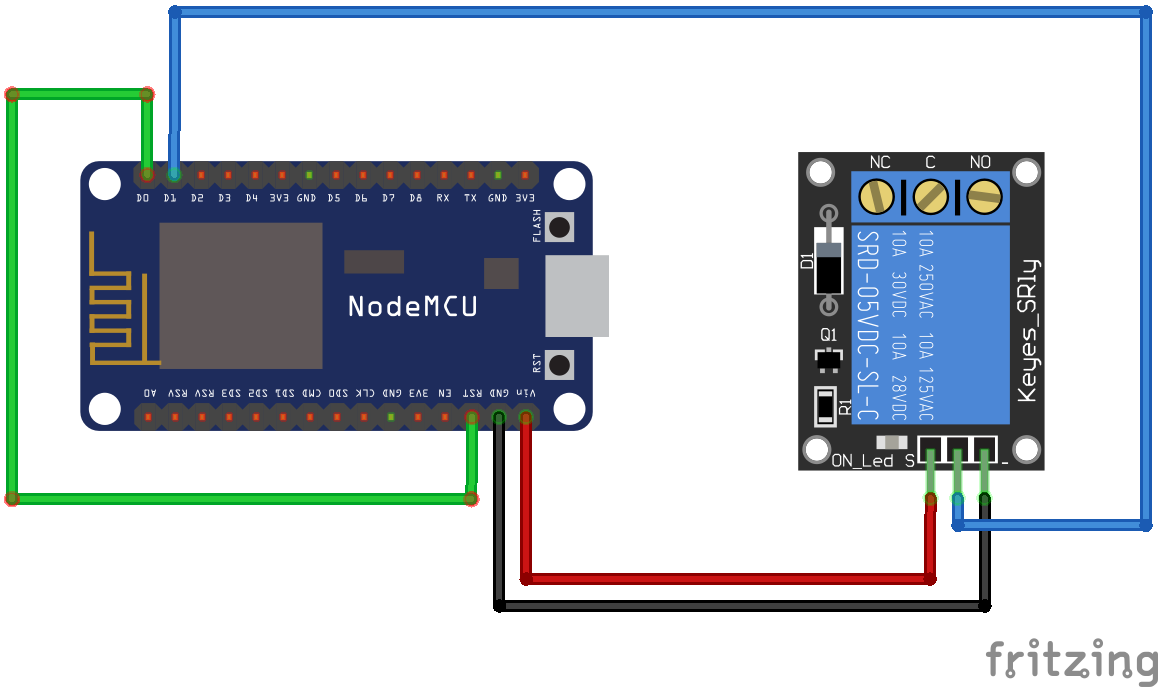
in this article we set the esp8266 to run a relay. Here is how we connect the relay to the ESP module

nodemcu relay

In this example too we will consider the option of putting the nodemcu in sleep. To have the node back form the sleep the system has to reboot and  it is necessary to connect the PIN D0 (GPIO16) to RST PIN as specified in the nodemcu documentation

Nodemcu sleep

Let us take a look at the lua code; It consists of init.lua and relay.lua files.

We analyze now the main points of each file

  • init.lua

In the file we set the the parameters to access the wifi network, the address and port of the MQTT broker  and the file to be run on the ESP after wifi connection to the access point is estabilished. If the ESP doesn’t acquire the network address the system is restarted.

  • relay.lua

The relay.lua file manages the relay, the subscription on MQTT broker with submission of the data. Global parameters have been set to manage the topic, the waiting time in tmr.alarm. There are in particular the following topics

  • /home/relay1/status : Status topic. The status is sent at the start and at  request from the command topic /home/relay1/command.
  • /home/relay1/monitor: Status of the esp sent periodically to this topic.
  • /home/relay1/command: Other clients can send commands to the esp:
    • Restart: Restarts the esp.
    • Sleep n: Put to sleep for n seconds the esp.
    • ON: Turn on the  relay.
    • OFF: Turn off the  relay.
    • Status: Request of tthe relay status (ON or OFF).

There are various service functions to manage all. The comments in the code describe each feature.

In the next article we will set up the webserver on Beaglebone and the websocket configuration for Mosquitto always on the Beaglebone

MQTT with BeagleBone and ESP8266 – WebServer and MQTT WebSocket

MQTT with BeagleBone and ESP8266 – MQTT on ESP8266 with temperature sensor

After loading the firmware into the device esp8266

MQTT with BeagleBone and ESP8266-MQTT ESP8266

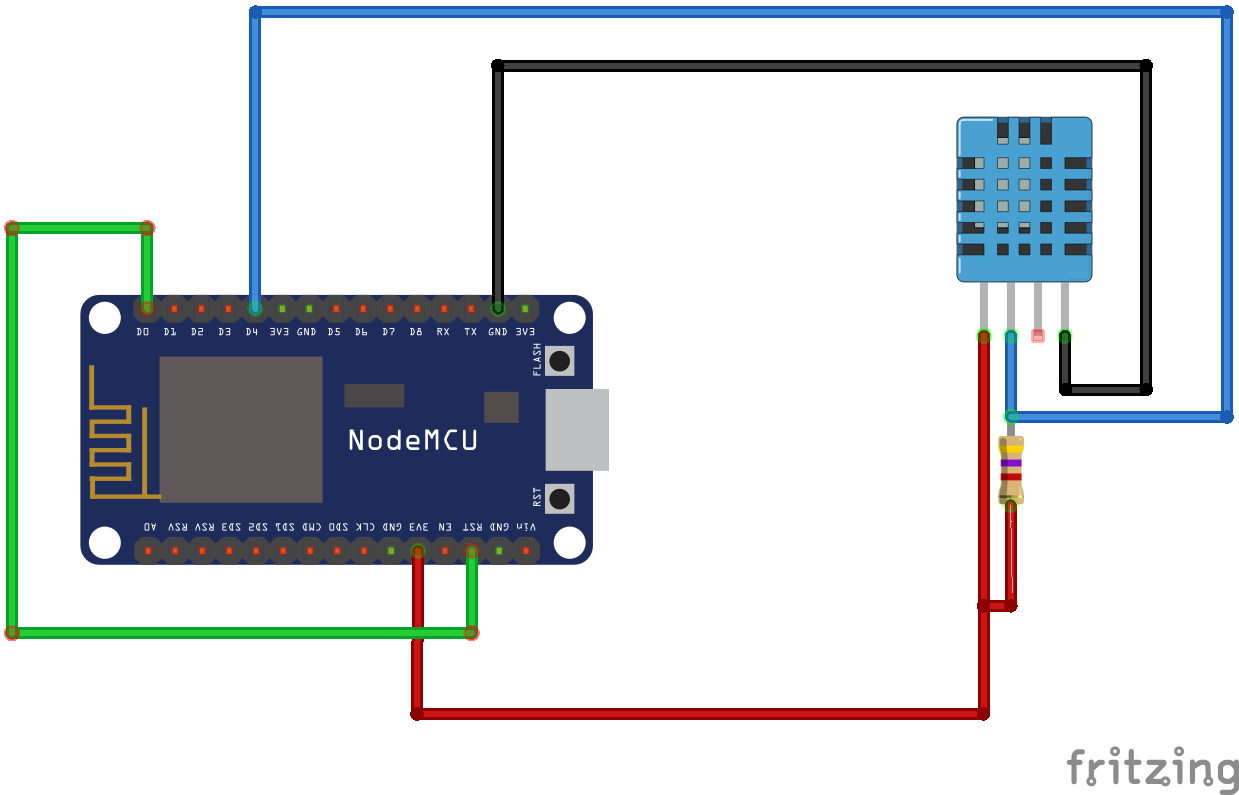
we now connect this module with a DHT11 temperature and humidity sensor. Here is how we connect the sensor to the ESP module

nodemcu dht11

In this example we will consider the option of putting the nodemcu in sleep. To have the node back form the sleep  the system has to reboot and  it is necessary to connect the PIN D0 (GPIO16) to RST PIN as specified in the nodemcu documentation

Nodemcu sleep

Let us take a look at the lua code; It consists of init.lua and tempumid.lua files.

We analyze now the main points of each file

  • init.lua

In the file we set the the parameters to access the wifi network, the address and port of the MQTT broker  and the file to be run on the ESP after wifi connection to the access point is estabilished. If the ESP does’t acquire the netowrk address the system is restarted.

  • tempumid.lua

The temumid.lua file manages the measurement of temperature and humidity, the subscription on MQTT broker with submission of the data. Global parameters have been set to manage the topic, the waiting time in tmr.alarm. There are in particular the following topics

  • /home/room1/temperature: measured temperature topic.
  • /home/room1/humidity: measured humidity topic.
  • /home/room1/status : Status topic. The status is sent at the start and at  request from the command topic /home/room1/command.
  • /home/room1/monitor: Status of the esp sent periodically to this topic.
  • /home/room1/command: Other clients can send commands to the esp:
    • Restart: Restarts the esp.
    • Sleep n: Put to sleep for n seconds the esp.

There are various service functions to manage all. The comments in the code describe each feature.

In the next article we will set up the esp with the relay

MQTT with BeagleBone and ESP8266 – MQTT on ESP8266 with Relay


Nodemcu Enduser_setup module lua sample(part2)

After the firmware build and its upload to the nodemcu dev kit, we connected a switch to pin D5, as shown in the previous article

Nodemcu Enduser_setup module lua sample(part1)

We finally can upload some sample code in which we use the enduser_setup module

Open ESPlorer and load the following sample code

  • webserver.lua

  • riasserawifi.lua

  • init.lua

 It is possible to download the above samples at the following link

 Sample code

Here is the documentation about the enduser_setup module

enduser_setup module documentation

The example consists of three files:

  1. init.lua:  It is executed at the startup of the esp8266.
  2. riazzerawifi.lua: It starts the portal to connect and save the configuration to your Access Point.
  3. webserver.lua:  It starts the webserver sample on the nodemcu.

As you can see from the code in init.lua, when the pin D5 is in the state HIGH, we start the portal using enduser_setup module. In the case in which the pin D5 is in the state LOW the  esp8266 acquires the IP from an Access Point defined previously after which the test webserver starts.

To save the access point confguration to which we want to connect we place the switch in order to have the HIGH input on pin D5 and reboot the card.

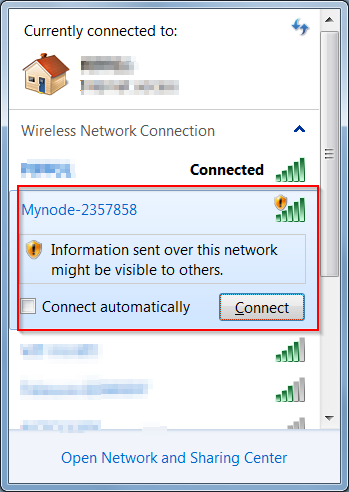
From a PC we can observe the presence of another access point, defined in the file riazzerawifi.lua

composed by Mynode string + ChipID module

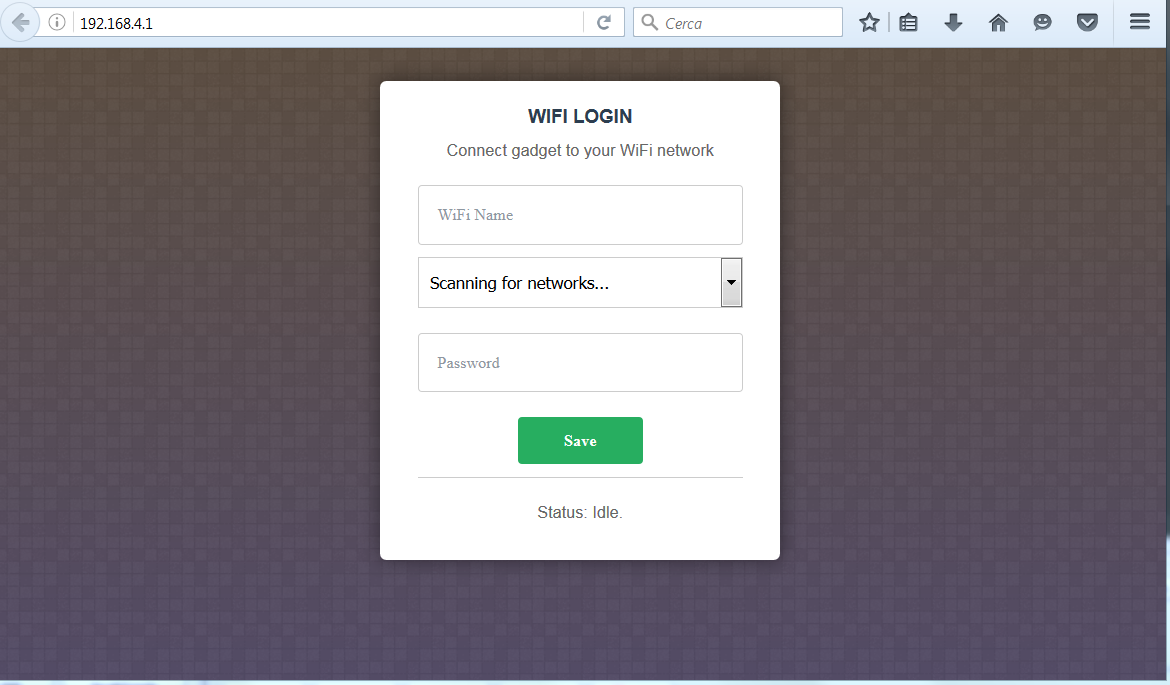
nodemcu portal wifiWe can connect to this access point and  via browser we  access to the portal at the ip address 192.168.4.1

Login portal wifi nodemcuSelect or enter the SSID of an access point providing the correct   password. After the connection reposition the switch to have  the LOW state  for pin D5 and reboot the nodemcu dev kit.

Now the system will automatically connect to the SSID defined previously and starts the example of the web server.

Please refer to the Lua documentation nodemcu for further study and usable modules

LUA Nodemcu Documentation

Nodemcu Enduser_setup module lua sample(part1)

In the previous article we showed a sample LUA code for ESP8266

Lua sample code for esp8266

Let us now see an example in which we’ll use the enduser_setup Lua module.

As a first step we compile the nodemcu firmware by including the enduser_setup module. We have to apply the same steps discussed in the build process article

Nodemcu firmware build

editing the app/include/user_modules.h file and uncommenting the line

After the building and firmware upload to the device, we use a switch connected to nodemcu dev kit as shown in the picture

reset access point nodemcu

The pin D5 can be connected to a low or high input voltage. Based on the input voltage we can change the behavior of the system.

Note: The Pin D5 in this specific example has been used as Input Pin; in the case of use as Output Pin, you must insert a resistor to limit the output current, as specified in the link

GPIO Pin Allocations

In the next article we’lll upload a LUA sample code with enduser_setup module enabled and we’ll utilize it to manage the wifi connections

Nodemcu Enduser_setup module lua sample(part2)

Lua sample code for esp8266

As mentioned in the previous article

how to upload nodemcu firmware with esptool

we are now ready to upload some example code on ESP8266 system.

We follow the LUA Nodemcu documentation

Nodemcu LUA Documentation

and upload a simple http server on the system.

Using ESPlorer  we  upload the following code, a modified version of the code available on the github. Modify the fields “SSID” and “password” with the the values of your Wi-fi Router.

webserver pin

Save the file as ipstatico.lua. With ESPlorer upload the file to nodemcu devkit with “Save to ESP” button .
Create a second file named init.lua

Save this file on the device.

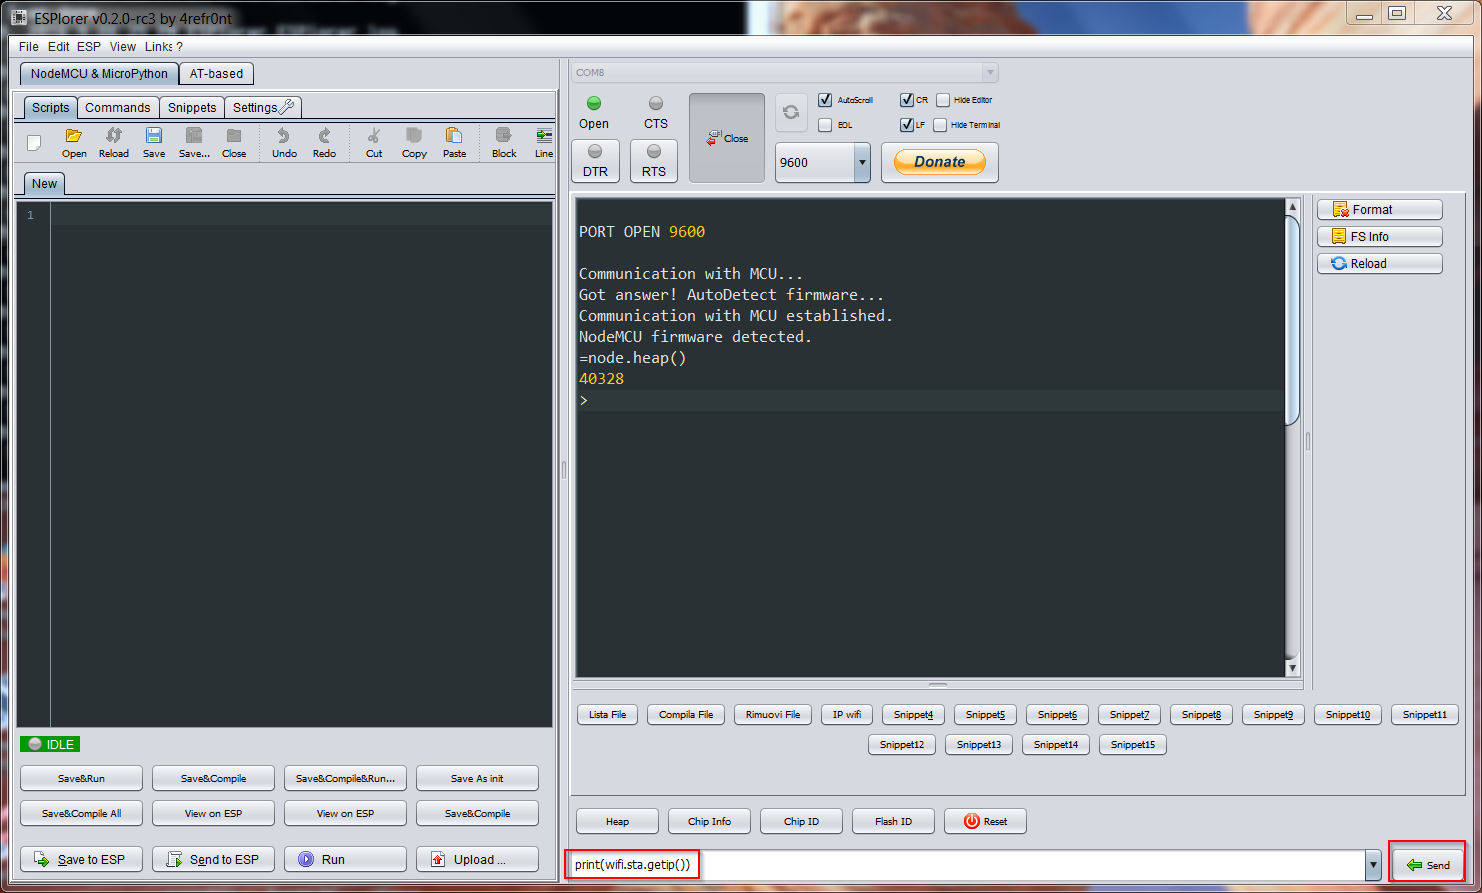
Reboot the device with the reset command on ESPlorer tool and from the ESPlorer  command bar execute

ESPlorerThis command  provides us the ip acquired by the device. We are able now to access with a browser to the assigned ip address, discovered above, and interact with a small interface that allows us to activate or not the PIN1 output

webserverlua

With this method, however, we need to know the Access Point to which you must connect. To overcome this limitation, we can use the enduser_sertup module

Enduser_setup module

With this module we start the ESP8266 device as an access point with a portal on which we can enter the credentials of the access point which we  want to connect.

In the next article we’ll build the nodemcu firmware by adding the  enduser setup module, not available in the standard firmware, and we will do the same example using this  module

Enduser_setup module sample