Tag Archives: media center

Enigma2 set-top-boxes

In this article we describe briefly a hardware category using embedded linux in satellite/terrestrial/cable set-top-boxes with the Enigma2 framework.

Enigma2 system is based on Openembedde/Yocto

Openembedded

Wiki Openembedded

and is developed in python; in tv set-top-boxes is present a linux system with its system drivers. This framework was developed and installed in its hardware by Dream Multimedia TV

Dream Multimedia

Dreambox wiki

Dream Multimedia TV distributed source code allowing the creation of alternative system images by  various development teams.

Counterfeits of Dream Multimedia set-to-boxes appeared in the market, so they restricted the license and source code distribution, trying to prevent their set-top-boxes cloning.

Other set-top-boxes manufactures developed their version of the open source Enigma2 framework; various developed teams gathered in the OE-Alliance group to develop the common parts of the system, as drivers, a common github, etc, letting to each team their custom personalization. Here is a list of OE-Alliace group development teams and other important teams

OE-Alliance Group

This is the common github link

OE-Alliance github

Using Enigma2 framework it is possible to add other functionalities developing addons, strengthening clearly the set-top-box.  HD set-top-boxes use almost exclusively MIPS Broadcom Socs, but with the UHD era manufacturers are beginning to use ARM Broadcom Socs.

Here are some set-top-boxes manufactures that use Enigma2 in their products

Gigablue

Xtrend

Vuplus

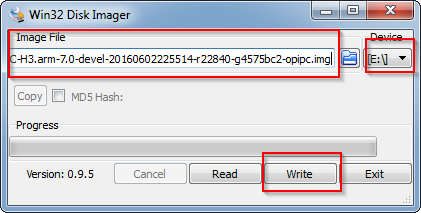
In other blogs we’ll decrive how to setup the envinroment and generate an Enigma2 image from source code based on OE-Alliance github or other important team.

Remote control configuration for Openelec in Orange PI PC

In this page we describe how to setup a remote control to control Kodi on our Openelec distribution on Orange PI PC board. We connect an USB keyboard,  an ethernet cable  and an HDMI cable to the Orange PI PC to manage the system, connect to the network and connect to the TV respectively.

First we have to check the IP Address assigned to Openelec by the network router; we access in System->System Info

screenshot009

In Summary  we can read the Ip address (eg:192.168.1.125)

screenshot010

Now we are able to logon in ssh in Openelec. In Windows systems we have to download and execute putty, available at the following address

Putty

In  Linux ed Osx systems we use a shell command and execute (where IP_OPENELEC is eg.:192.168.1.125)

The logon password is:openelec

In windows we configure Putty using the Orange Pi PC IP address obtained above, check SSH; after saving with a name to this connection we connect with the Open button

PuTTY Configuration

To connect into the Openelec system we have to use the following values:

Login as: root

password:openelec

Now we are able to setup our remote control

shell

Execute the following commands

Follow the instrucions on the screen. In particular push all the buttons; in the second part of the configuration we have to map the remote controlo buttons with the operating system codes (eg: KEY_OK, KEY_PLAY, KEY_RED, etc). We have the main codes in the file

In the remote.xml file

we have the mapping among Kodi actions and the operating system events .

The command

shows all the events available in our system.

At the end of the procedure we reboot the system with the command

Now we can control Openelec with our remote control.

Here is the lircd.conf generated by the procedure described above

 lircd.conf

If you need to relaunch the procedure, remove the lircd.conf file and execute again the above commands.

You are able to access the configuration directory using also the windows samba protocol

Configfiles

First start of Openelec on Orange PI PC

After the micro sd setup, we insert it into the Orange PI PC slot; we connect the board to the TV using an HDMI cable,  then we connect to the board an USB keyboard, an USB mouse, an ethernet cable linked to a router and turn on the device.

At the startup Openelec extends the micro sd available space and at the next start  we have

PrimoAvvioOE1

Choose Next to proceed to the next screen in which eventually modify the hostname

PrimoAvvioOE2

With Next we are able now to view the IP address assigned to the board

PrimoAvvioOE3

At the next screen the system presents the available network services

PrimoAvvioOE4

Enable the SSH service

PrimoAvvioOE5

At the next step we have the final screen

PrimoAvvioOE6

And finally we access the Openelec interface

PrimoAvvioOE7

SD card setup for Orange PI PC Openelec in OSX

First operation to do in order to use Openelec on Orange PI PC is the micro sd preparation.

It is advisable to use a micro SD class 10 to gain better performances.

As first step  we proceed to the Openelec image download from the link specified in Orange PI PC forum

Openelec Images

paying attention to choose the opipc version.

We choose the latest image in .gz format. After the file download  in a directory, we open a shell command window in this directory and  unzip the content

Then we plug the micro sd card and find this device

In our case we have the following output

We proceed to the device unmout; in our case the command is

WARNING: Be sure that the device is the micro sd card and not the internal disk. The next operation imply the complete rewriting of the device with the loss of all data on it.

We can now write the image into the micro sd card, using the correct device, that in our case is /dev/disk2

WARNING: This operation wipes all data on the micro sd card.

After a while we have the micro sd card ready to be used in the Orange PI PC board.

SD card setup for Orange PI PC Openelec in Linux

First operation to do in order to use Openelec on Orange PI PC is the micro sd preparation.

It is advisable to use a micro SD class 10 to gain better performances.

As first step  we proceed to the Openelec image download from the link specified in Orange PI PC forum

Openelec Images

paying attention to choose the opipc version.

We choose the latest image in .gz format. After the file download  in a directory, we open a shell command window in this directory and  unzip the content

Then we plug the micro sd card and check this device

In our case we have the following output

We check if this device is umounted

In the case we have the device in the output response, as in our case

we proceed to the unmount

WARNING: Be sure that the device is the micro sd card and not the internal disk. The next operation imply the complete rewriting of the device with the loss of all data on it.

We can now write the image into the micro sd card, using the correct device, that in our case is /dev/sdb

WARNING: This operation wipes all data on the micro sd card.

After a while we have the micro sd card ready to be used in the Orange PI PC board.

SD card setup for Orange PI PC Openelec in Windows

First operation to do in order to use Openelec on Orange PI PC is the micro sd preparation.

It is advisable to use a micro SD class 10 to gain better performances.

As first step  we proceed to the Openelec image download from the link specified in Orange PI PC forum

Openelec Images

paying attention to choose the opipc version.

We choose the latest image in .gz format. We expand the content using a compression software, as 7-zip, obtainig one file having .img extension.

ImmagineOPIPC

In windows operating system we can trasfer this image to the micro sd card by using a specific sotware. We used Win32 Disk Imager, available from the following link

Win32 Disk Imager

After the Win32 Disk Imager installazion we are able to write the micro sd card, i.e E disk in our case. We choose as input the image expanded in the step above

ScritturaSchedaSDEN

Press Write to transfer the image on the sd card.

WARNING: This operation wipes all data on the micro sd card.

After a while we have the micro sd card ready to be used in the Orange PI PC board.