Tag Archives: orange pi

Resolution change of the video output in Openelec on Orange PI PC (Part1)

In the Orange PI Openelec image the default video output resolution is 1080p60. If our tv works with a different resolution we’ll have no image on the television.

To overcome this problem it is possible to change the resolution and fps  for the video output.

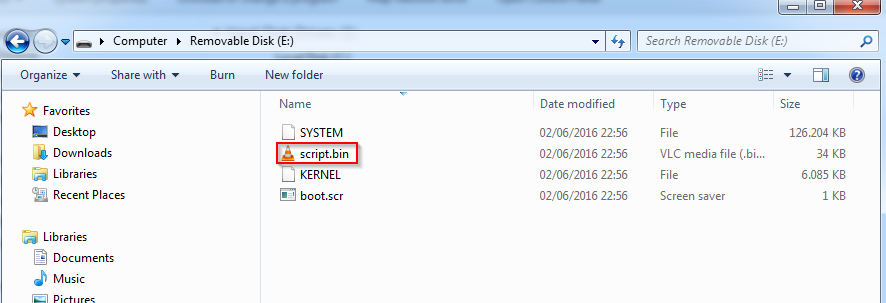
The micro sd has two partitions. We have to work in the vfat partition

schedasd

We have to modify the script.bin file.

contenutoschedasd

In the home partition of the debian user (sviluppo in our case) create a folder orangepi; inside this folder create another folder called  sunxi. Go into sunxi folder

Follow the instructions available from linux-sunxi site in order to modify the script.bin file. As first step install the required tools

Sunxi Tools

We have to install the libusb package, as described below

Install git and pkg-config

Now using git download the tool sources

Go into sunxi.tools folder

Execute the tools compilation

We are now able to modify the Orange PI PC parameters available in the script.bin file.

Create a folder under sunxi, for example scriptfile

Add to th ePATH variable the sunxi tools folders executables

Now in next article we can modify the parameters of video output in the script.bin file

http://www.microdev.it/wp/en/2016/07/29/resolution-change-of-the-video-output-in-openelec-on-orange-pi-pc-part2/

SD card setup for Orange PI PC Armbian in Linux

As already described in the previous article

Openelec SD card setup

also for the Armbian distribution we have to prepare an sd micro card.It is advisable to use a micro SD class 10 to gain better performances. As first step  we proceed to the Armbian  image download from Armbian web site

Download Armbian Orange PI PC

We choose for example the Debian Jessie Desktop Image.

We install 7zip package. In Debian we can use the following command

After the file  download  wint 7z extension in a directory, we open a shell command window in this directory and  unzip the content

We have among other files the one with .raw extension. Then we plug the micro sd card and check this device

In our case we have the following output

We check if this device is umounted

In the case we have the device in the output response, as in our case

we proceed to the unmount

WARNING: Be sure that the device is the micro sd card and not the internal disk. The next operation imply the complete rewriting of the device with the loss of all data on it.

We can now write the image into the micro sd card, using the correct device, that in our case is /dev/sdb

WARNING: This operation wipes all data on the micro sd card.

After a while we have the micro sd card ready to be used in the Orange PI PC board.

SD card setup for Orange PI PC Armbian in OSX

As already described in the previous article

Openelec SD card setup

also for the Armbian distribution we have to prepare an sd micro card. It is advisable to use a micro SD class 10 to gain better performances. As first step  we proceed to the Armbian  image download from Armbian web site

Download Armbian Orange PI PC

We choose for example the Debian Jessie Desktop Image. We expand the content using a compression software, as Keka

Keka

obtaining one file having .raw extension

armbianOSX

Then we plug the micro sd card and find this device

In our case we have the following output

We proceed to the device unmout; in our case the command is

WARNING: Be sure that the device is the micro sd card and not the internal disk. The next operation imply the complete rewriting of the device with the loss of all data on it.

We can now write the image into the micro sd card, using the correct device, that in our case is /dev/disk2

WARNING: This operation wipes all data on the micro sd card.

After a while we have the micro sd card ready to be used in the Orange PI PC board.

SD card setup for Orange PI PC Armbian in Windows

As already described in the previous article

Orange PI PC Openelec SD card setup

for the Armbian distribution we have to prepare an sd micro card.It is advisable to use a micro SD class 10 to gain better performances. As first step  we proceed to the Armbian  image download from Armbian web site

Download Armbian Orange PI PC

We choose for example the Debian Jessie Desktop Image

armbianWe expand the content using a compression software, as 7-zip, obtaining one file having .raw extension.

armbian_estensione

In windows operating system we can trasfer this image to the micro sd card by using a specific sotware. We used Win32 Disk Imager, available from the following link

Win32 Disk Imager

After the Win32 Disk Imager installazion we are able to write the micro sd card, i.e E disk in our case. We choose as input the image expanded in the step above

Win32 Disk ImagerEng

Press Write to transfer the image on the sd card.

WARNING: This operation wipes all data on the micro sd card.

After a while we have the micro sd card ready to be used in the Orange PI PC board.

Remote control configuration for Openelec in Orange PI PC

In this page we describe how to setup a remote control to control Kodi on our Openelec distribution on Orange PI PC board. We connect an USB keyboard,  an ethernet cable  and an HDMI cable to the Orange PI PC to manage the system, connect to the network and connect to the TV respectively.

First we have to check the IP Address assigned to Openelec by the network router; we access in System->System Info

screenshot009

In Summary  we can read the Ip address (eg:192.168.1.125)

screenshot010

Now we are able to logon in ssh in Openelec. In Windows systems we have to download and execute putty, available at the following address

Putty

In  Linux ed Osx systems we use a shell command and execute (where IP_OPENELEC is eg.:192.168.1.125)

The logon password is:openelec

In windows we configure Putty using the Orange Pi PC IP address obtained above, check SSH; after saving with a name to this connection we connect with the Open button

PuTTY Configuration

To connect into the Openelec system we have to use the following values:

Login as: root

password:openelec

Now we are able to setup our remote control

shell

Execute the following commands

Follow the instrucions on the screen. In particular push all the buttons; in the second part of the configuration we have to map the remote controlo buttons with the operating system codes (eg: KEY_OK, KEY_PLAY, KEY_RED, etc). We have the main codes in the file

In the remote.xml file

we have the mapping among Kodi actions and the operating system events .

The command

shows all the events available in our system.

At the end of the procedure we reboot the system with the command

Now we can control Openelec with our remote control.

Here is the lircd.conf generated by the procedure described above

 lircd.conf

If you need to relaunch the procedure, remove the lircd.conf file and execute again the above commands.

You are able to access the configuration directory using also the windows samba protocol

Configfiles

First start of Openelec on Orange PI PC

After the micro sd setup, we insert it into the Orange PI PC slot; we connect the board to the TV using an HDMI cable,  then we connect to the board an USB keyboard, an USB mouse, an ethernet cable linked to a router and turn on the device.

At the startup Openelec extends the micro sd available space and at the next start  we have

PrimoAvvioOE1

Choose Next to proceed to the next screen in which eventually modify the hostname

PrimoAvvioOE2

With Next we are able now to view the IP address assigned to the board

PrimoAvvioOE3

At the next screen the system presents the available network services

PrimoAvvioOE4

Enable the SSH service

PrimoAvvioOE5

At the next step we have the final screen

PrimoAvvioOE6

And finally we access the Openelec interface

PrimoAvvioOE7

SD card setup for Orange PI PC Openelec in OSX

First operation to do in order to use Openelec on Orange PI PC is the micro sd preparation.

It is advisable to use a micro SD class 10 to gain better performances.

As first step  we proceed to the Openelec image download from the link specified in Orange PI PC forum

Openelec Images

paying attention to choose the opipc version.

We choose the latest image in .gz format. After the file download  in a directory, we open a shell command window in this directory and  unzip the content

Then we plug the micro sd card and find this device

In our case we have the following output

We proceed to the device unmout; in our case the command is

WARNING: Be sure that the device is the micro sd card and not the internal disk. The next operation imply the complete rewriting of the device with the loss of all data on it.

We can now write the image into the micro sd card, using the correct device, that in our case is /dev/disk2

WARNING: This operation wipes all data on the micro sd card.

After a while we have the micro sd card ready to be used in the Orange PI PC board.

SD card setup for Orange PI PC Openelec in Linux

First operation to do in order to use Openelec on Orange PI PC is the micro sd preparation.

It is advisable to use a micro SD class 10 to gain better performances.

As first step  we proceed to the Openelec image download from the link specified in Orange PI PC forum

Openelec Images

paying attention to choose the opipc version.

We choose the latest image in .gz format. After the file download  in a directory, we open a shell command window in this directory and  unzip the content

Then we plug the micro sd card and check this device

In our case we have the following output

We check if this device is umounted

In the case we have the device in the output response, as in our case

we proceed to the unmount

WARNING: Be sure that the device is the micro sd card and not the internal disk. The next operation imply the complete rewriting of the device with the loss of all data on it.

We can now write the image into the micro sd card, using the correct device, that in our case is /dev/sdb

WARNING: This operation wipes all data on the micro sd card.

After a while we have the micro sd card ready to be used in the Orange PI PC board.

SD card setup for Orange PI PC Openelec in Windows

First operation to do in order to use Openelec on Orange PI PC is the micro sd preparation.

It is advisable to use a micro SD class 10 to gain better performances.

As first step  we proceed to the Openelec image download from the link specified in Orange PI PC forum

Openelec Images

paying attention to choose the opipc version.

We choose the latest image in .gz format. We expand the content using a compression software, as 7-zip, obtainig one file having .img extension.

ImmagineOPIPC

In windows operating system we can trasfer this image to the micro sd card by using a specific sotware. We used Win32 Disk Imager, available from the following link

Win32 Disk Imager

After the Win32 Disk Imager installazion we are able to write the micro sd card, i.e E disk in our case. We choose as input the image expanded in the step above

ScritturaSchedaSDEN

Press Write to transfer the image on the sd card.

WARNING: This operation wipes all data on the micro sd card.

After a while we have the micro sd card ready to be used in the Orange PI PC board.

Orange PI PC board

In this article we describe an ARM mini pc, similar to Rasperry PI, but cheaper.

Looking at the manufacturer website

http://www.orangepi.org/

we put in evidence the main features of the board:

CPUH3 Quad-core Cortex-A7 H.265/HEVC 4K
GPUMali400MP2 GPU @600MHz·Supports OpenGL ES 2.0
RAM1GB DDR3 (shared with GPU)
StorageTF card (Max. 64GB)
Network10/100M Ethernet RJ45
Audio InputMicrophone
Audio OutputJack 3.5 mm and HDMI
USB portsThree USB 2.0 HOST, one USB 2.0 OTG
Low level Periphericals40 Pins Header,compatibile with layout Raspberry Pi B+
GPIO(1x3) pinUART, ground
LEDPower Led and Status Led
KeyIR input, POWER

This board belongs to a products family using the same soc, but with different accessories (mmc, ram, network, etc). This model is available for the purchase also from the manufacturer site.

For this device we have various Linux distribution, available from the manufacturer site, but we focus on the following flavours:

  1. Openelec : Media center usage linux distribution.
  2. Armbian: Server/desktop Linux image.

About point  1 informations are available at the following web site:

http://www.orangepi.org/orangepibbsen/forum.php

while from Armbian site we can dowload the Armbian Orange PI image:

http://www.armbian.com/orange-pi-pc/

In next blogs we’ll treat the installation, compilation of these Linux images on Orange PI PC board.