In a series of articles seen previously on Mqtt, Beaglebone and ESP8266
Mqtt with Beaglebone and ESP8266 – Articles List
we have created the infrastructure for managing the ESP8266 nodes .
In this article we program the two ESP8266 nodes using MicroPython instead of Nodemcu and Lua.
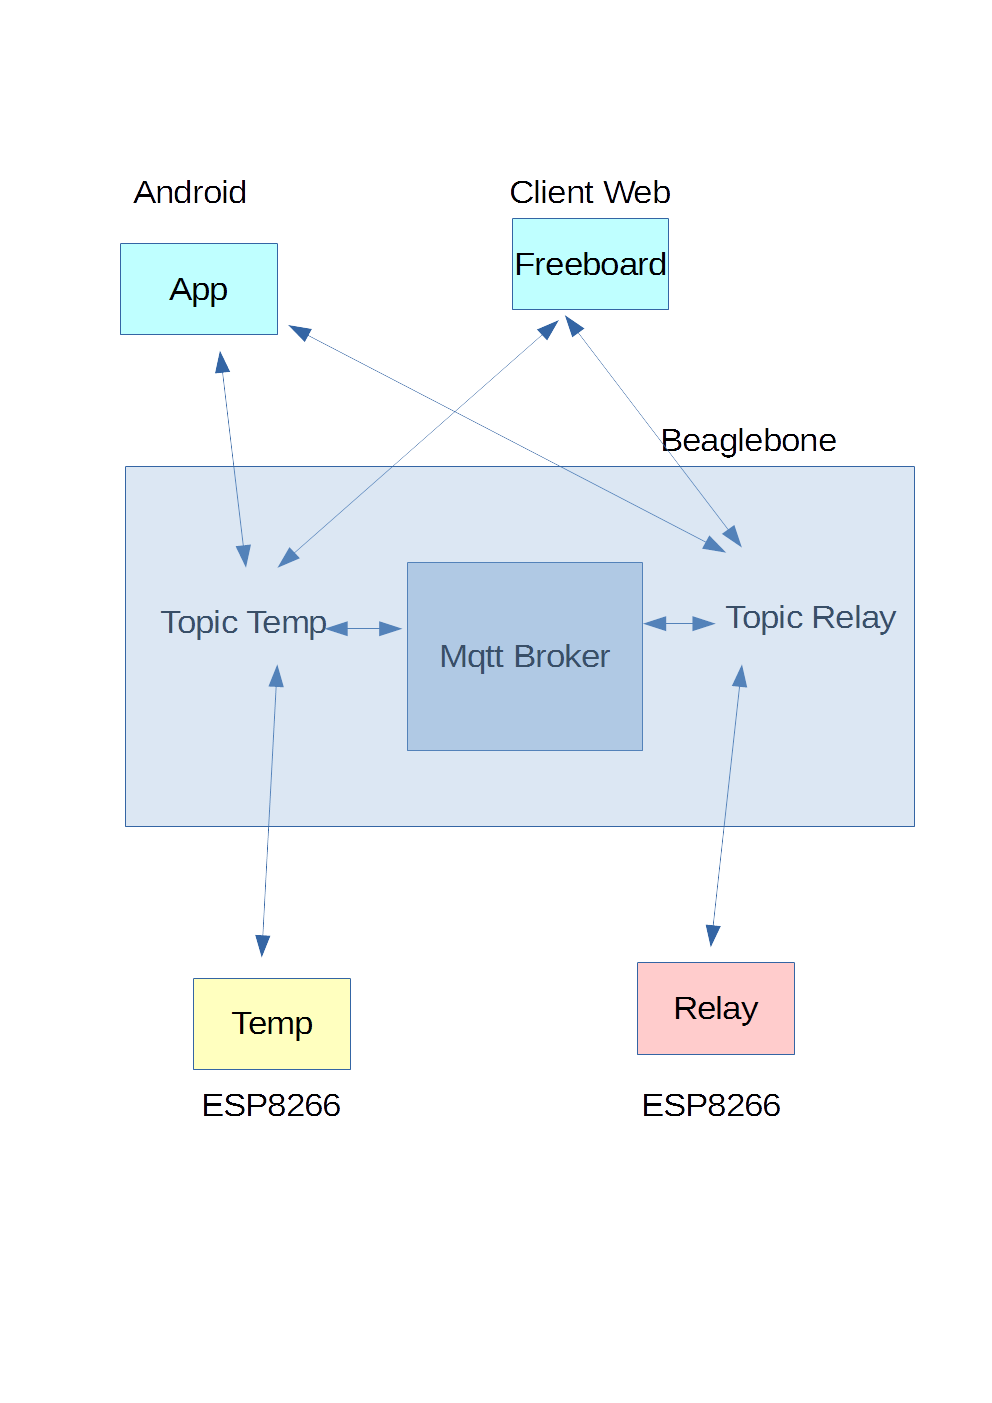
The infrastructure remains identical; on the Beaglebone there is Mqtt Mosquitto Server and Freeboard for the management of the mqtt topics, visualization and interaction.
The ESP8266 node examples with relay and DHT11 sensor use the umqtt MicroPython libraries, available on the site
In the following examples, only the umqtt simple is used; in the code several delays have been inserted to allow the board to manage the messages and not run into errors; in the case the Mqtt server is not available the code restarts the board.
Below the code used for these examples.
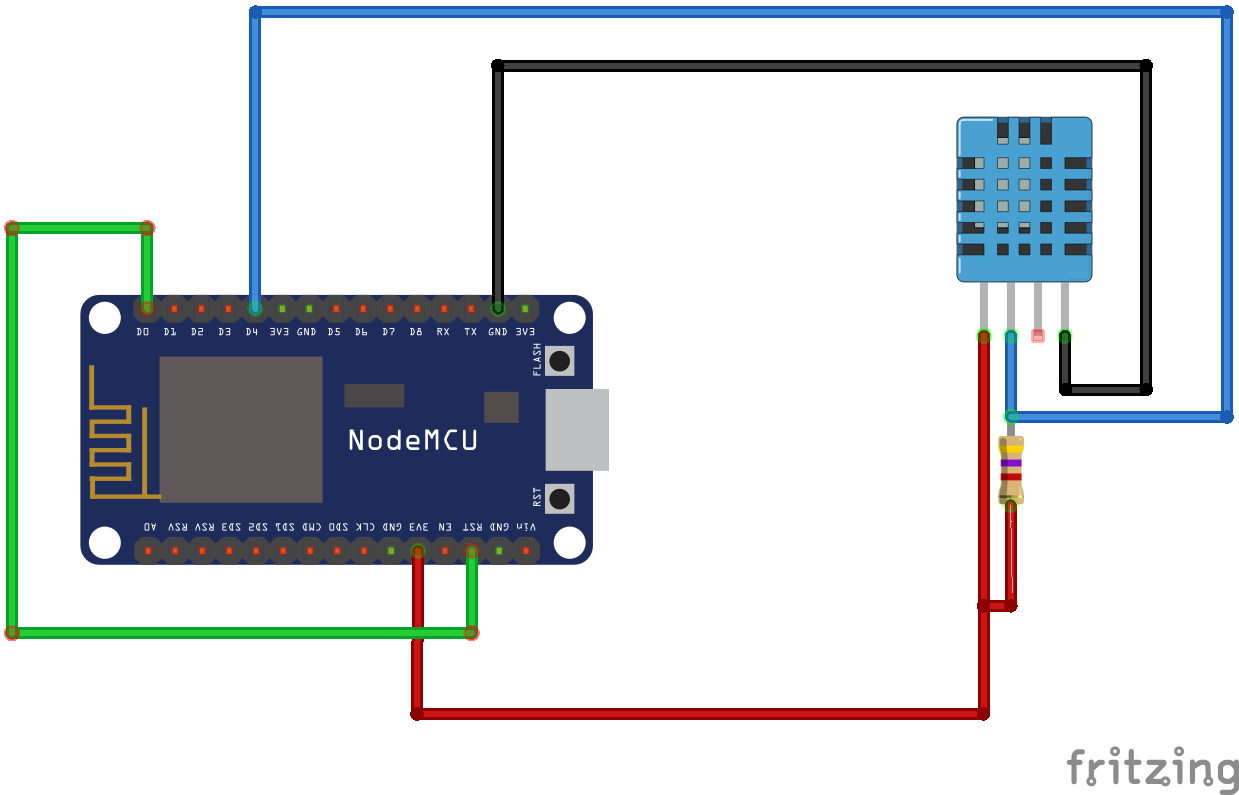
Node with DHT11 sensor
- boot.py: code executed at startup
|
1 2 3 4 5 6 7 8 9 10 11 12 13 14 15 16 17 18 19 20 21 22 23 24 25 26 27 28 29 |
#This file is executed on every boot (including wake-boot from deepsleep) import esp #esp.osdebug(None) #Connects to the wifi AP providing a hostname, AP Name and passord def do_connect(): import network sta_if = network.WLAN(network.STA_IF) if not sta_if.isconnected(): print('connecting to network...') sta_if.active(True) #Sets the device hostname sta_if.config(dhcp_hostname='ESP_ROOM1') print(sta_if.config('dhcp_hostname')) #CHANGE THE VALUES TO YOUR ACCESSPOINT NAME AND PASSWORD sta_if.connect('ACCESSPOINT', 'PASSWORDACCESSPOINT') while not sta_if.isconnected(): pass print('network config:', sta_if.ifconfig()) #Imports various modules for network, webrepl and garbage collector import gc import webrepl import network do_connect() webrepl.start() gc.collect() |
- umqtt/simple.py: mqtt library
|
1 2 3 4 5 6 7 8 9 10 11 12 13 14 15 16 17 18 19 20 21 22 23 24 25 26 27 28 29 30 31 32 33 34 35 36 37 38 39 40 41 42 43 44 45 46 47 48 49 50 51 52 53 54 55 56 57 58 59 60 61 62 63 64 65 66 67 68 69 70 71 72 73 74 75 76 77 78 79 80 81 82 83 84 85 86 87 88 89 90 91 92 93 94 95 96 97 98 99 100 101 102 103 104 105 106 107 108 109 110 111 112 113 114 115 116 117 118 119 120 121 122 123 124 125 126 127 128 129 130 131 132 133 134 135 136 137 138 139 140 141 142 143 144 145 146 147 148 149 150 151 152 153 154 155 156 157 158 159 160 161 162 163 164 165 166 167 168 169 170 171 172 173 174 175 176 177 178 179 180 181 182 183 184 185 186 187 188 189 190 191 192 193 194 195 196 197 198 199 200 201 202 203 204 |
import usocket as socket import ustruct as struct from ubinascii import hexlify class MQTTException(Exception): pass class MQTTClient: def __init__(self, client_id, server, port=0, user=None, password=None, keepalive=0, ssl=False, ssl_params={}): if port == 0: port = 8883 if ssl else 1883 self.client_id = client_id self.sock = None self.server = server self.port = port self.ssl = ssl self.ssl_params = ssl_params self.pid = 0 self.cb = None self.user = user self.pswd = password self.keepalive = keepalive self.lw_topic = None self.lw_msg = None self.lw_qos = 0 self.lw_retain = False def _send_str(self, s): self.sock.write(struct.pack("!H", len(s))) self.sock.write(s) def _recv_len(self): n = 0 sh = 0 while 1: b = self.sock.read(1)[0] n |= (b & 0x7f) << sh if not b & 0x80: return n sh += 7 def set_callback(self, f): self.cb = f def set_last_will(self, topic, msg, retain=False, qos=0): assert 0 <= qos <= 2 assert topic self.lw_topic = topic self.lw_msg = msg self.lw_qos = qos self.lw_retain = retain def connect(self, clean_session=True): self.sock = socket.socket() addr = socket.getaddrinfo(self.server, self.port)[0][-1] self.sock.connect(addr) if self.ssl: import ussl self.sock = ussl.wrap_socket(self.sock, **self.ssl_params) premsg = bytearray(b"\x10\0\0\0\0\0") msg = bytearray(b"\x04MQTT\x04\x02\0\0") sz = 10 + 2 + len(self.client_id) msg[6] = clean_session << 1 if self.user is not None: sz += 2 + len(self.user) + 2 + len(self.pswd) msg[6] |= 0xC0 if self.keepalive: assert self.keepalive < 65536 msg[7] |= self.keepalive >> 8 msg[8] |= self.keepalive & 0x00FF if self.lw_topic: sz += 2 + len(self.lw_topic) + 2 + len(self.lw_msg) msg[6] |= 0x4 | (self.lw_qos & 0x1) << 3 | (self.lw_qos & 0x2) << 3 msg[6] |= self.lw_retain << 5 i = 1 while sz > 0x7f: premsg[i] = (sz & 0x7f) | 0x80 sz >>= 7 i += 1 premsg[i] = sz self.sock.write(premsg, i + 2) self.sock.write(msg) #print(hex(len(msg)), hexlify(msg, ":")) self._send_str(self.client_id) if self.lw_topic: self._send_str(self.lw_topic) self._send_str(self.lw_msg) if self.user is not None: self._send_str(self.user) self._send_str(self.pswd) resp = self.sock.read(4) assert resp[0] == 0x20 and resp[1] == 0x02 if resp[3] != 0: raise MQTTException(resp[3]) return resp[2] & 1 def disconnect(self): self.sock.write(b"\xe0\0") self.sock.close() def ping(self): self.sock.write(b"\xc0\0") def publish(self, topic, msg, retain=False, qos=0): pkt = bytearray(b"\x30\0\0\0") pkt[0] |= qos << 1 | retain sz = 2 + len(topic) + len(msg) if qos > 0: sz += 2 assert sz < 2097152 i = 1 while sz > 0x7f: pkt[i] = (sz & 0x7f) | 0x80 sz >>= 7 i += 1 pkt[i] = sz #print(hex(len(pkt)), hexlify(pkt, ":")) self.sock.write(pkt, i + 1) self._send_str(topic) if qos > 0: self.pid += 1 pid = self.pid struct.pack_into("!H", pkt, 0, pid) self.sock.write(pkt, 2) self.sock.write(msg) if qos == 1: while 1: op = self.wait_msg() if op == 0x40: sz = self.sock.read(1) assert sz == b"\x02" rcv_pid = self.sock.read(2) rcv_pid = rcv_pid[0] << 8 | rcv_pid[1] if pid == rcv_pid: return elif qos == 2: assert 0 def subscribe(self, topic, qos=0): assert self.cb is not None, "Subscribe callback is not set" pkt = bytearray(b"\x82\0\0\0") self.pid += 1 struct.pack_into("!BH", pkt, 1, 2 + 2 + len(topic) + 1, self.pid) #print(hex(len(pkt)), hexlify(pkt, ":")) self.sock.write(pkt) self._send_str(topic) self.sock.write(qos.to_bytes(1, "little")) while 1: op = self.wait_msg() if op == 0x90: resp = self.sock.read(4) #print(resp) assert resp[1] == pkt[2] and resp[2] == pkt[3] if resp[3] == 0x80: raise MQTTException(resp[3]) return # Wait for a single incoming MQTT message and process it. # Subscribed messages are delivered to a callback previously # set by .set_callback() method. Other (internal) MQTT # messages processed internally. def wait_msg(self): res = self.sock.read(1) self.sock.setblocking(True) if res is None: return None if res == b"": raise OSError(-1) if res == b"\xd0": # PINGRESP sz = self.sock.read(1)[0] assert sz == 0 return None op = res[0] if op & 0xf0 != 0x30: return op sz = self._recv_len() topic_len = self.sock.read(2) topic_len = (topic_len[0] << 8) | topic_len[1] topic = self.sock.read(topic_len) sz -= topic_len + 2 if op & 6: pid = self.sock.read(2) pid = pid[0] << 8 | pid[1] sz -= 2 msg = self.sock.read(sz) self.cb(topic, msg) if op & 6 == 2: pkt = bytearray(b"\x40\x02\0\0") struct.pack_into("!H", pkt, 2, pid) self.sock.write(pkt) elif op & 6 == 4: assert 0 # Checks whether a pending message from server is available. # If not, returns immediately with None. Otherwise, does # the same processing as wait_msg. def check_msg(self): self.sock.setblocking(False) return self.wait_msg() |
- dht11.py: module for reading the temperature and humidity on the GPIO2
|
1 2 3 4 5 6 7 8 9 10 11 12 13 14 15 16 |
#Module to read temperature and humidity with dht11 sensor import dht import machine TPin=2 #GPIO Pin def temperatura(): d=dht.DHT11(machine.Pin(TPin)) d.measure() temperatura=d.temperature() umidita=d.humidity() print(d.temperature()) print(d.humidity()) return temperatura,umidita |
- main.py: code executed after boot
|
1 |
exec(open('./client_mqtt.py').read(),globals()) |
- client_mqtt.py: Main module for node management
|
1 2 3 4 5 6 7 8 9 10 11 12 13 14 15 16 17 18 19 20 21 22 23 24 25 26 27 28 29 30 31 32 33 34 35 36 37 38 39 40 41 42 43 44 45 46 47 48 49 50 51 52 53 54 55 56 57 58 59 60 61 62 63 64 65 66 67 68 69 70 71 72 73 74 75 76 77 78 79 80 81 82 83 84 85 86 87 88 89 90 91 92 93 94 95 96 97 98 99 100 101 102 103 104 105 106 107 108 109 110 111 112 113 114 115 116 117 118 119 120 121 122 123 124 125 126 127 128 129 130 131 132 133 134 135 136 137 138 139 140 141 142 143 144 145 146 147 148 149 150 151 152 153 154 155 156 157 158 159 160 161 162 163 164 165 166 167 168 169 170 171 172 173 174 175 176 177 178 179 180 181 182 183 184 |
#Import module from library umqtt.simple from umqtt.simple import MQTTClient #Import Pin definition for esp8266 from machine import Pin #Import time and machine libraries import time import machine #Import dht11 module import dht11 #Mosquitto server #INSERT YOUR MQTT SERVER IP server="MQTT SERVER IP" #Define di timeouts timeouts=2 #Define the topics ttopic=b"home/room1/temperature" #Temperature Topic htopic=b"home/room1/humidity" #Humidity Topic stopic=b"home/room1/status" #Status Topic ctopic=b"home/room1/command" #Command Topic mtopic=b"home/room1/monitor"#Monitor Topic #Send status to status topic def send_status(message): c.publish(stopic, message) #Sets the sleep mode def esp_sleep(secondi): rtc=machine.RTC() rtc.irq(trigger=rtc.ALARM0, wake=machine.DEEPSLEEP) send_status("Sensor going to sleep now") time.sleep(timeouts) send_mstatus("Sensor going to sleep now") rtc.alarm(rtc.ALARM0,secondi*1000) machine.deepsleep() #Send status to status monitor topic def send_mstatus(message): c.publish(mtopic, message) # Received messages from subscriptions will be delivered to this callback def sub_cb(topic, msg): if topic == b"home/room1/command": if msg == b"Restart": send_status("Restarting") time.sleep(timeouts) machine.reset() elif msg == b"": send_status("Command not valid") else: i=len(msg) dato=msg[:5] if dato== b"Sleep": tsleep=int(msg[6:i]) if tsleep is not None: if tsleep >= 1: esp_sleep(tsleep) else: send_status("Sleep command error") else: send_status("Command not valid") else: send_status("Command not valid") else: print("Other command") #Connects to the various topics def connetti(): while True: try: c.connect() c.subscribe(ttopic) c.subscribe(htopic) c.subscribe(ctopic) c.subscribe(stopic) c.subscribe(mtopic) send_status("Sensor Ready Again") time.sleep(3*timeouts) break except: #If it is not able to connect to mosquitto restart the device time.sleep(5*timeouts) machine.reset() finally: time.sleep(5) #Publish to different topics (temp and hum) def pubblica(topic,message): c.publish(topic, message) #Define the mqtt client. callback method and connects to mqtt c = MQTTClient("room1", server) c.set_callback(sub_cb) connetti() #Variables to manage the monitor and when send the temperature monitor=False inviatemp=True #Main iteration while True: try: if monitor == True: #Send status to monitor topic send_mstatus("Sensor Ready") #Sleep the esp8266 otherwise we get errors as it is not able to process quickly the requests time.sleep(5*timeouts) monitor=False elif monitor==False: monitor=True #check the messages from topics # Non-blocking wait for message try: c.check_msg() except: time.sleep(5*timeouts) machine.reset() temp,hum=dht11.temperatura() #Turns temp into a string temperatura=str(temp) #Sleep the esp8266 otherwise we get errors as it is not able to process quickly the requests time.sleep(5*timeouts) #Turns hum into a string umidita=str(hum) #Check if to send temperature or humidity values to the topics if inviatemp == True: pubblica(ttopic,temperatura) inviatemp=False else: pubblica(htopic,umidita) inviatemp=True time.sleep(10*timeouts) #Finally clause at the end of the try to catch other incoming messages from topics finally: time.sleep(5*timeouts) try: c.check_msg() except: time.sleep(10*timeouts) machine.reset() c.disconnect() |
- riavvia.py: service code to restart the module from uPyCraft
|
1 2 3 |
#Module to reboot the device running it import machine machine.reset() |
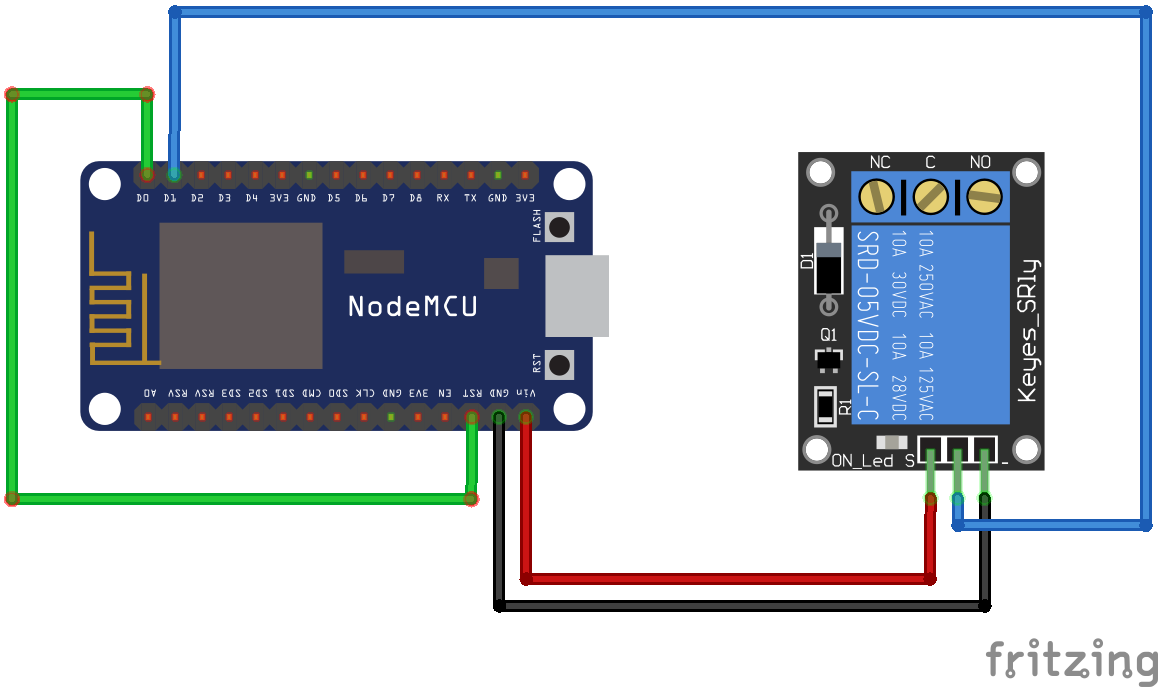
Node with relay
- boot.py: code executed at startup
|
1 2 3 4 5 6 7 8 9 10 11 12 13 14 15 16 17 18 19 20 21 22 23 24 25 26 27 28 29 |
#This file is executed on every boot (including wake-boot from deepsleep) import esp #esp.osdebug(None) #Connects to the wifi AP providing a hostname, AP Name and passord def do_connect(): import network sta_if = network.WLAN(network.STA_IF) if not sta_if.isconnected(): print('connecting to network...') sta_if.active(True) #Sets the device hostname sta_if.config(dhcp_hostname='ESP_RELAY1') print(sta_if.config('dhcp_hostname')) #CHANGE THE VALUES TO YOUR ACCESSPOINT NAME AND PASSWORD sta_if.connect('ACCESSPOINT', 'PASSWORDACCESSPOINT') while not sta_if.isconnected(): pass print('network config:', sta_if.ifconfig()) #Imports various modules for network, webrepl and garbage collector import gc import webrepl import network do_connect() webrepl.start() gc.collect() |
- umqtt/simple.py: mqtt library
|
1 2 3 4 5 6 7 8 9 10 11 12 13 14 15 16 17 18 19 20 21 22 23 24 25 26 27 28 29 30 31 32 33 34 35 36 37 38 39 40 41 42 43 44 45 46 47 48 49 50 51 52 53 54 55 56 57 58 59 60 61 62 63 64 65 66 67 68 69 70 71 72 73 74 75 76 77 78 79 80 81 82 83 84 85 86 87 88 89 90 91 92 93 94 95 96 97 98 99 100 101 102 103 104 105 106 107 108 109 110 111 112 113 114 115 116 117 118 119 120 121 122 123 124 125 126 127 128 129 130 131 132 133 134 135 136 137 138 139 140 141 142 143 144 145 146 147 148 149 150 151 152 153 154 155 156 157 158 159 160 161 162 163 164 165 166 167 168 169 170 171 172 173 174 175 176 177 178 179 180 181 182 183 184 185 186 187 188 189 190 191 192 193 194 195 196 197 198 199 200 201 202 203 204 |
import usocket as socket import ustruct as struct from ubinascii import hexlify class MQTTException(Exception): pass class MQTTClient: def __init__(self, client_id, server, port=0, user=None, password=None, keepalive=0, ssl=False, ssl_params={}): if port == 0: port = 8883 if ssl else 1883 self.client_id = client_id self.sock = None self.server = server self.port = port self.ssl = ssl self.ssl_params = ssl_params self.pid = 0 self.cb = None self.user = user self.pswd = password self.keepalive = keepalive self.lw_topic = None self.lw_msg = None self.lw_qos = 0 self.lw_retain = False def _send_str(self, s): self.sock.write(struct.pack("!H", len(s))) self.sock.write(s) def _recv_len(self): n = 0 sh = 0 while 1: b = self.sock.read(1)[0] n |= (b & 0x7f) << sh if not b & 0x80: return n sh += 7 def set_callback(self, f): self.cb = f def set_last_will(self, topic, msg, retain=False, qos=0): assert 0 <= qos <= 2 assert topic self.lw_topic = topic self.lw_msg = msg self.lw_qos = qos self.lw_retain = retain def connect(self, clean_session=True): self.sock = socket.socket() addr = socket.getaddrinfo(self.server, self.port)[0][-1] self.sock.connect(addr) if self.ssl: import ussl self.sock = ussl.wrap_socket(self.sock, **self.ssl_params) premsg = bytearray(b"\x10\0\0\0\0\0") msg = bytearray(b"\x04MQTT\x04\x02\0\0") sz = 10 + 2 + len(self.client_id) msg[6] = clean_session << 1 if self.user is not None: sz += 2 + len(self.user) + 2 + len(self.pswd) msg[6] |= 0xC0 if self.keepalive: assert self.keepalive < 65536 msg[7] |= self.keepalive >> 8 msg[8] |= self.keepalive & 0x00FF if self.lw_topic: sz += 2 + len(self.lw_topic) + 2 + len(self.lw_msg) msg[6] |= 0x4 | (self.lw_qos & 0x1) << 3 | (self.lw_qos & 0x2) << 3 msg[6] |= self.lw_retain << 5 i = 1 while sz > 0x7f: premsg[i] = (sz & 0x7f) | 0x80 sz >>= 7 i += 1 premsg[i] = sz self.sock.write(premsg, i + 2) self.sock.write(msg) #print(hex(len(msg)), hexlify(msg, ":")) self._send_str(self.client_id) if self.lw_topic: self._send_str(self.lw_topic) self._send_str(self.lw_msg) if self.user is not None: self._send_str(self.user) self._send_str(self.pswd) resp = self.sock.read(4) assert resp[0] == 0x20 and resp[1] == 0x02 if resp[3] != 0: raise MQTTException(resp[3]) return resp[2] & 1 def disconnect(self): self.sock.write(b"\xe0\0") self.sock.close() def ping(self): self.sock.write(b"\xc0\0") def publish(self, topic, msg, retain=False, qos=0): pkt = bytearray(b"\x30\0\0\0") pkt[0] |= qos << 1 | retain sz = 2 + len(topic) + len(msg) if qos > 0: sz += 2 assert sz < 2097152 i = 1 while sz > 0x7f: pkt[i] = (sz & 0x7f) | 0x80 sz >>= 7 i += 1 pkt[i] = sz #print(hex(len(pkt)), hexlify(pkt, ":")) self.sock.write(pkt, i + 1) self._send_str(topic) if qos > 0: self.pid += 1 pid = self.pid struct.pack_into("!H", pkt, 0, pid) self.sock.write(pkt, 2) self.sock.write(msg) if qos == 1: while 1: op = self.wait_msg() if op == 0x40: sz = self.sock.read(1) assert sz == b"\x02" rcv_pid = self.sock.read(2) rcv_pid = rcv_pid[0] << 8 | rcv_pid[1] if pid == rcv_pid: return elif qos == 2: assert 0 def subscribe(self, topic, qos=0): assert self.cb is not None, "Subscribe callback is not set" pkt = bytearray(b"\x82\0\0\0") self.pid += 1 struct.pack_into("!BH", pkt, 1, 2 + 2 + len(topic) + 1, self.pid) #print(hex(len(pkt)), hexlify(pkt, ":")) self.sock.write(pkt) self._send_str(topic) self.sock.write(qos.to_bytes(1, "little")) while 1: op = self.wait_msg() if op == 0x90: resp = self.sock.read(4) #print(resp) assert resp[1] == pkt[2] and resp[2] == pkt[3] if resp[3] == 0x80: raise MQTTException(resp[3]) return # Wait for a single incoming MQTT message and process it. # Subscribed messages are delivered to a callback previously # set by .set_callback() method. Other (internal) MQTT # messages processed internally. def wait_msg(self): res = self.sock.read(1) self.sock.setblocking(True) if res is None: return None if res == b"": raise OSError(-1) if res == b"\xd0": # PINGRESP sz = self.sock.read(1)[0] assert sz == 0 return None op = res[0] if op & 0xf0 != 0x30: return op sz = self._recv_len() topic_len = self.sock.read(2) topic_len = (topic_len[0] << 8) | topic_len[1] topic = self.sock.read(topic_len) sz -= topic_len + 2 if op & 6: pid = self.sock.read(2) pid = pid[0] << 8 | pid[1] sz -= 2 msg = self.sock.read(sz) self.cb(topic, msg) if op & 6 == 2: pkt = bytearray(b"\x40\x02\0\0") struct.pack_into("!H", pkt, 2, pid) self.sock.write(pkt) elif op & 6 == 4: assert 0 # Checks whether a pending message from server is available. # If not, returns immediately with None. Otherwise, does # the same processing as wait_msg. def check_msg(self): self.sock.setblocking(False) return self.wait_msg() |
-
- main.py: code executed after boot
1exec(open('./client_mqtt.py').read(),globals())- client_mqtt.py: Main module for node management
|
1 2 3 4 5 6 7 8 9 10 11 12 13 14 15 16 17 18 19 20 21 22 23 24 25 26 27 28 29 30 31 32 33 34 35 36 37 38 39 40 41 42 43 44 45 46 47 48 49 50 51 52 53 54 55 56 57 58 59 60 61 62 63 64 65 66 67 68 69 70 71 72 73 74 75 76 77 78 79 80 81 82 83 84 85 86 87 88 89 90 91 92 93 94 95 96 97 98 99 100 101 102 103 104 105 106 107 108 109 110 111 112 113 114 115 116 117 118 119 120 121 122 123 124 125 126 127 128 129 130 131 132 133 134 135 136 137 138 139 140 141 142 143 144 145 146 147 148 149 150 151 152 153 154 155 156 157 158 159 160 161 162 163 164 165 166 167 168 169 170 171 172 173 174 175 |
#Import module from library umqtt.simple from umqtt.simple import MQTTClient #Import Pin definition for esp8266 from machine import Pin #Import time and machine libraries import time import machine #Mosquitto server #INSERT YOUR MQTT SERVER IP server="MQTT SERVER IP" #ESP Pin for the relay Rpin = Pin(5, Pin.OUT, value=0) #Relay Pin #Define di timeouts timeouts=2 #Define the topics stopic=b"home/relay1/status" #Status Topic ctopic=b"home/relay1/command" #Command Topic mtopic=b"home/relay1/monitor"#Monitor Topic #Send status to status topic def send_status(message): c.publish(stopic, message) #Send status to status monitor topic def send_mstatus(message): c.publish(mtopic, message) #Sets the sleep mode def esp_sleep(secondi): rtc=machine.RTC() rtc.irq(trigger=rtc.ALARM0, wake=machine.DEEPSLEEP) send_status("Relay going to sleep now") time.sleep(timeouts) send_mstatus("Relay going to sleep now") time.sleep(timeouts) rtc.alarm(rtc.ALARM0,secondi*1000) machine.deepsleep() #Send relay status and turn it ON def relay_on(): send_status("Relay ON") Rpin.on() #Send relay status and turn it OFF def relay_off(): send_status("Relay OFF") Rpin.off() #Check the relay status and send it to the status topic def relay_status(): if Rpin.value() == 0: send_status("Relay OFF") else: send_status("Relay ON") # Received messages from subscriptions will be delivered to this callback def sub_cb(topic, msg): if topic == b"home/relay1/command": if msg == b"Restart": send_status("Restarting") time.sleep(timeouts) machine.reset() elif msg == b"": send_status("Command not valid") elif msg == b"ON": relay_on() elif msg == b"OFF": relay_off() elif msg == b"Status": relay_status() else: i=len(msg) dato=msg[:5] if dato== b"Sleep": tsleep=int(msg[6:i]) if tsleep is not None: if tsleep >= 1: esp_sleep(tsleep) else: send_status("Sleep command error") else: send_status("Command not valid") else: send_status("Command not valid") else: print("Other command") #Connects to the various topics def connetti(): try: c.connect() c.subscribe(ctopic) time.sleep(3*timeouts) c.subscribe(stopic) time.sleep(3*timeouts) c.subscribe(mtopic) time.sleep(3*timeouts) send_status("Relay Ready Again") time.sleep(3*timeouts) except: #If it is not able to connect to mosquitto restart the device time.sleep(5*timeouts) machine.reset() #Define the mqtt client. callback method and connects to mqtt c = MQTTClient("relay1", server) c.set_callback(sub_cb) connetti() #Variables to manage the monito monitor=False #Main iteration while True: try: if monitor == True: #Send status to monitor topic send_mstatus("Relay Ready") time.sleep(timeouts) monitor=False elif monitor==False: monitor=True #check the messages from topics # Non-blocking wait for message try: c.check_msg() except: time.sleep(5*timeouts) machine.reset() time.sleep(5*timeouts) #Finally clause at the end of the try to catch other incoming messages from topics finally: time.sleep(timeouts) try: c.check_msg() except: time.sleep(5*timeouts) machine.reset() c.disconnect() |
- riavvia.py: service code to restart the module from uPyCraft
|
1 2 3 |
#Module to reboot the device running it import machine machine.reset() |
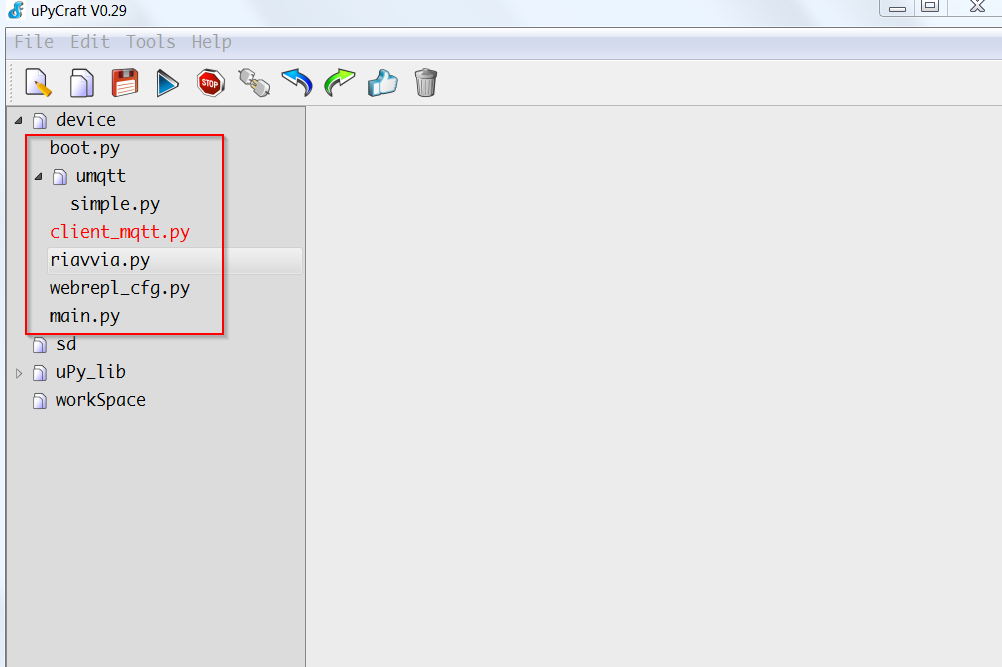
Below is the filesystem on ESP8266 for the relays sample
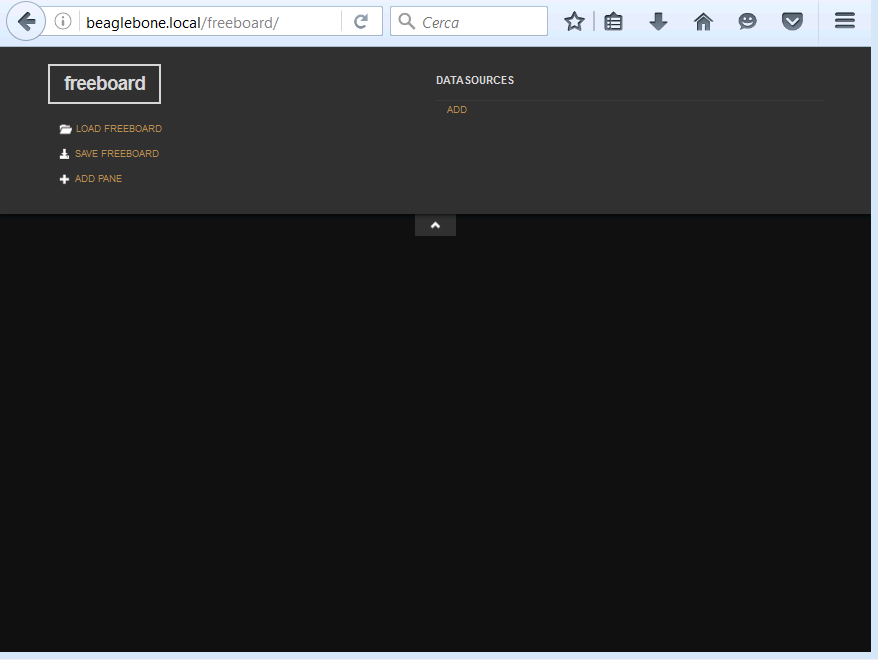
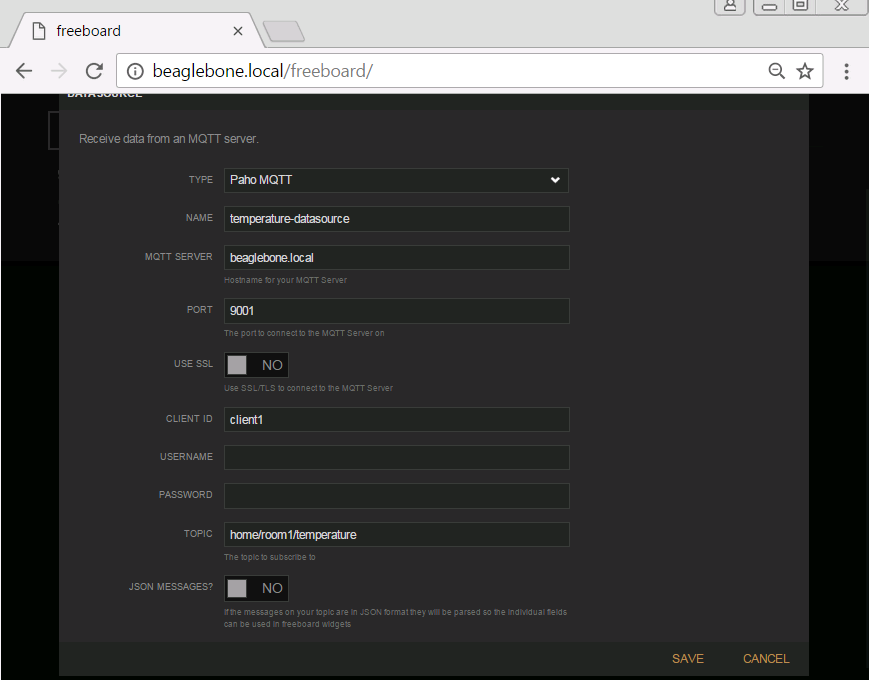
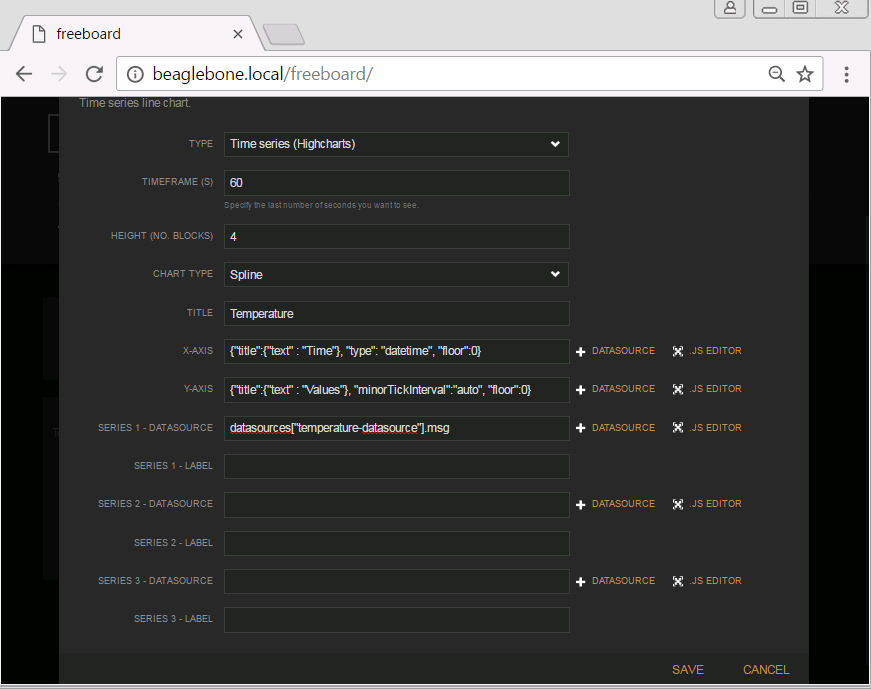
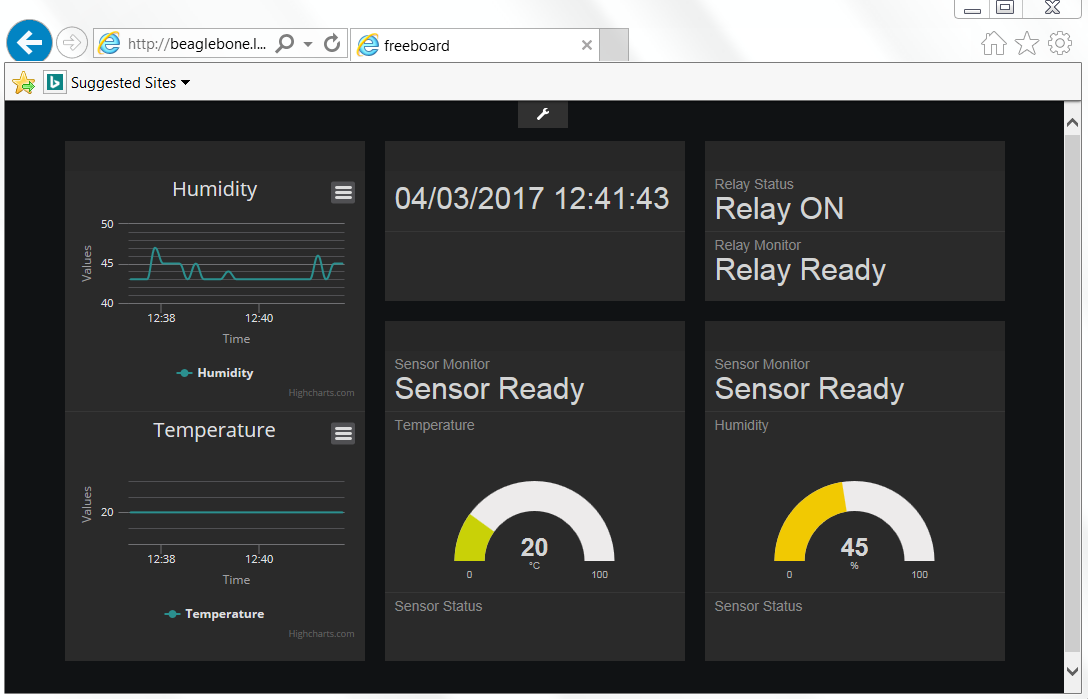
 By accessing Freeboard we have the same informations obtained with Nodemcu and LUA on ESP8266 nodes
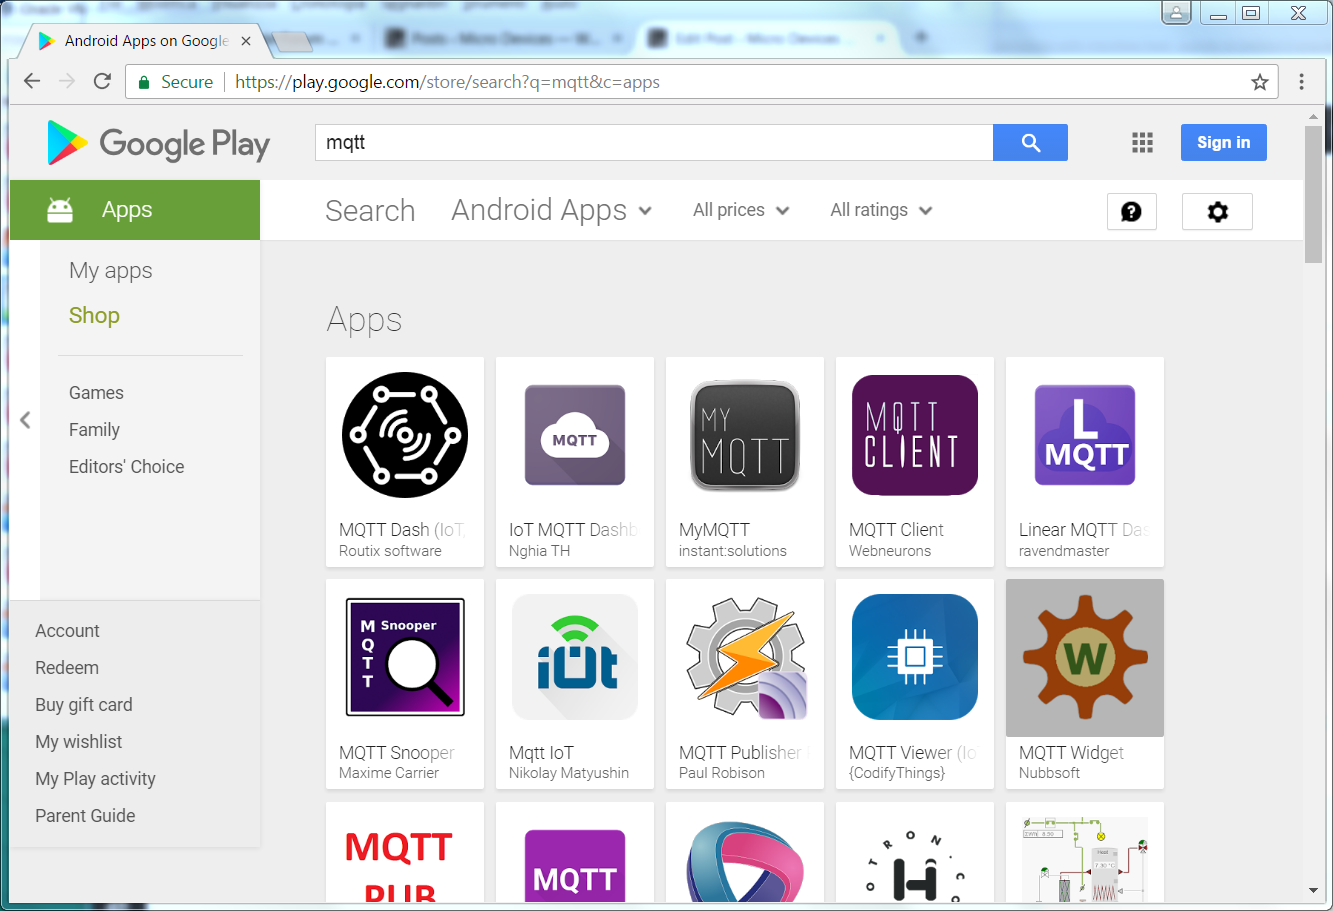
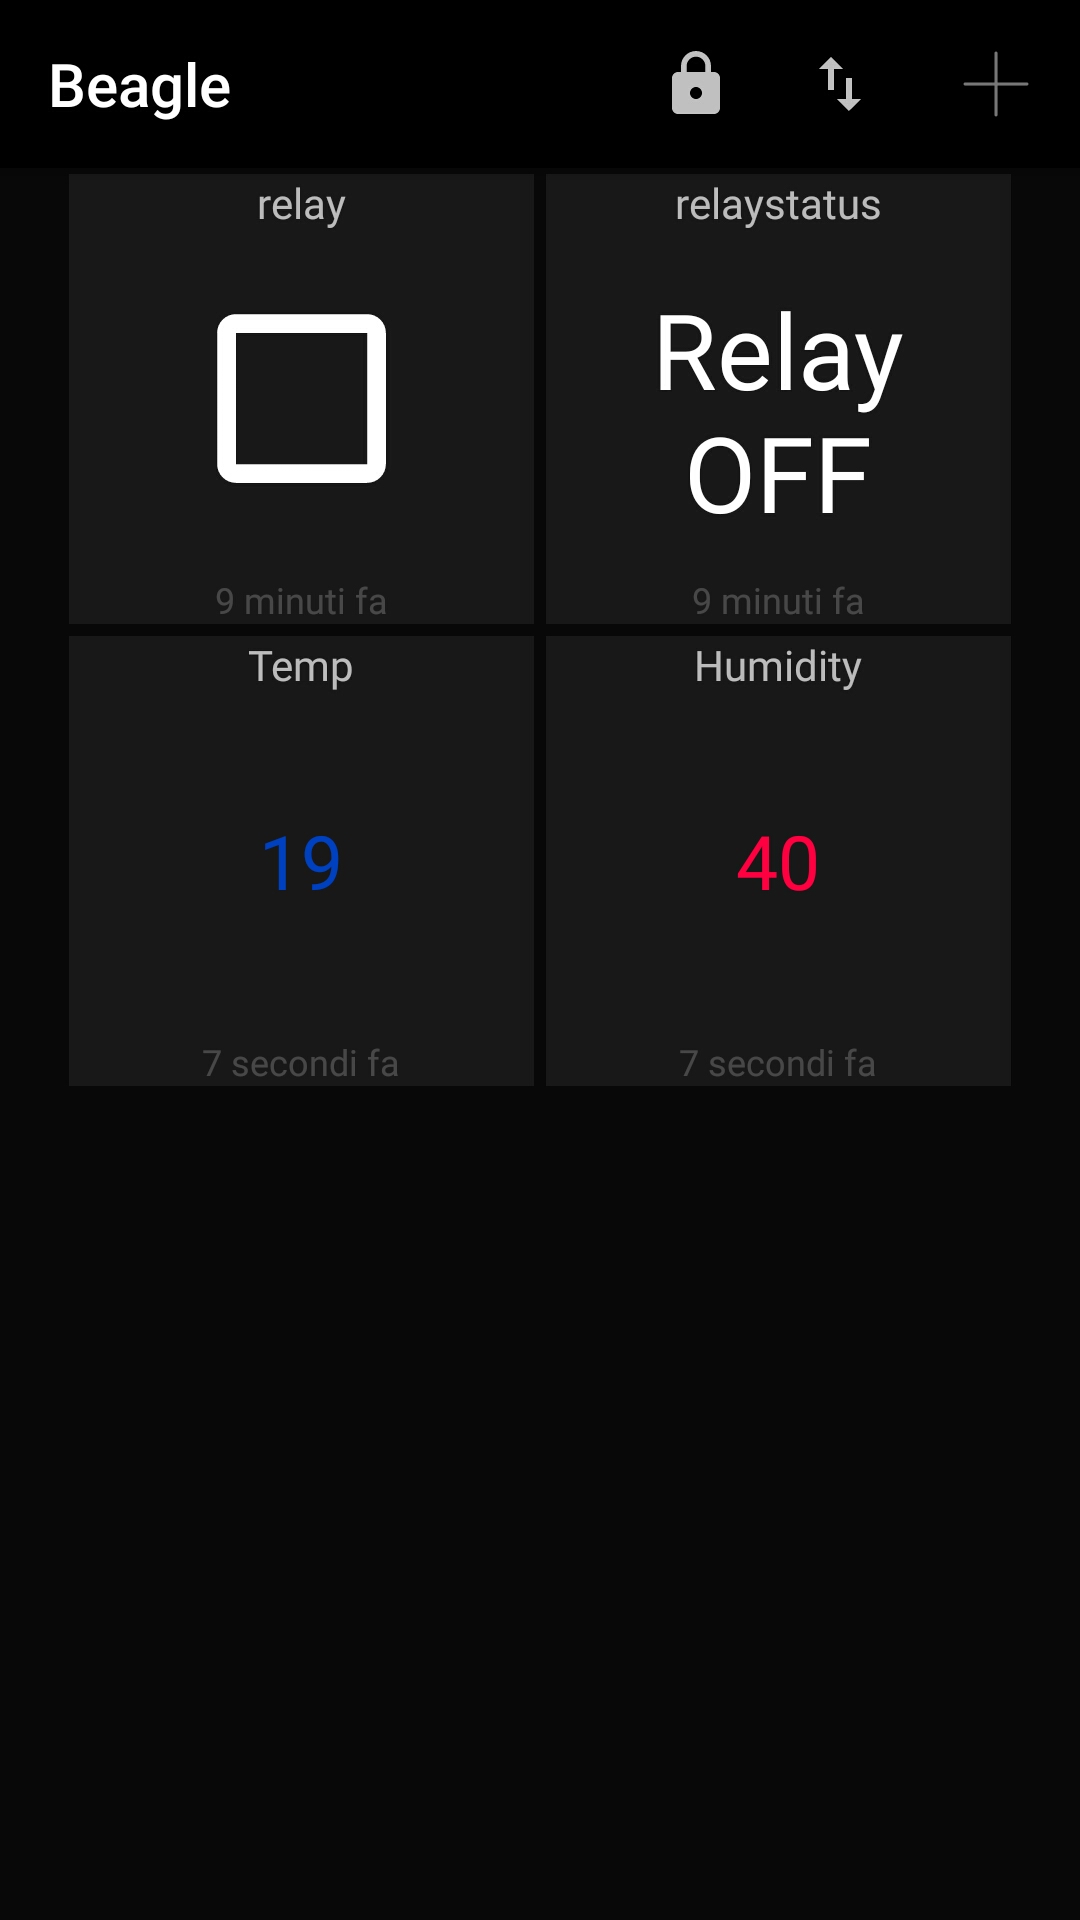
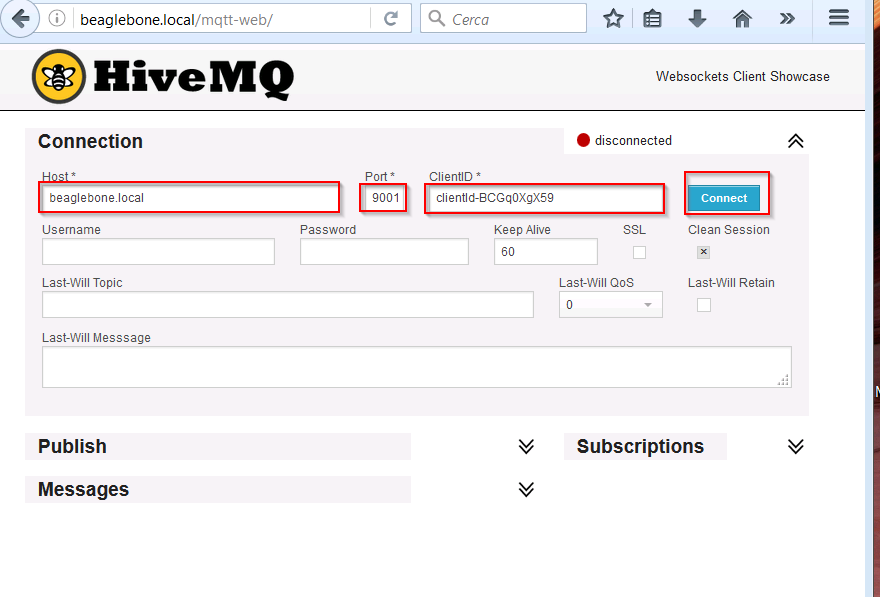
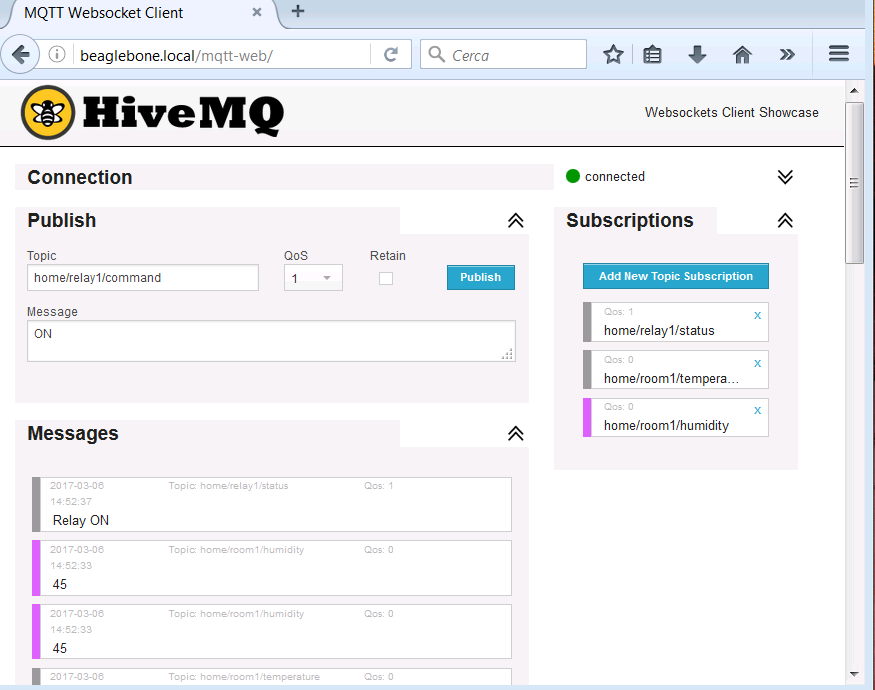
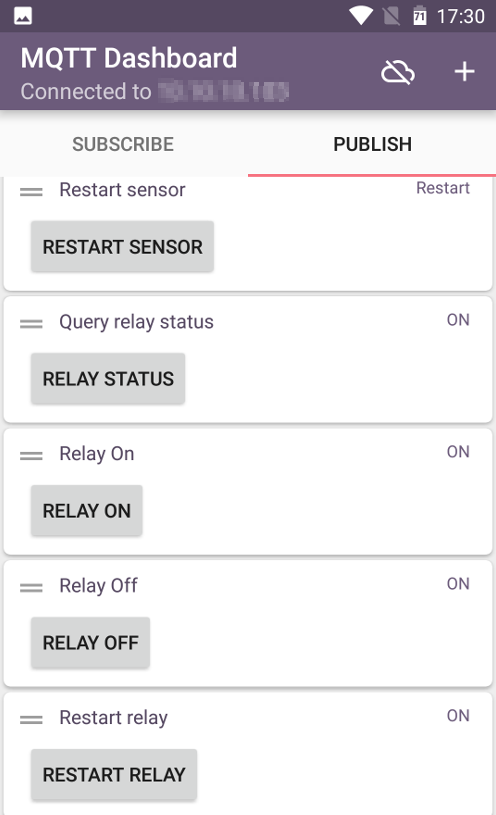
 Below are the screens with MQTT Dashboard installed on an Android smartphone, with the possibility to check the status of the relay, read the sensor parameters, restart and sleep the two nodes

Here are the links to download the two examples
In the next article we will compile the MicroPython firmware for ESP8266
MicroPython – MicroPython compiling for ESP8266