
Dopo aver installato un client mqtt web
Mqtt con Beaglebone ed ESP8266-Web server e Mqtt websocket
passiamo ad installare la dashboard freeboard
Posizionamoci in /var/www/html sul Beaglebone come root e cloniamo il repository github di freeboard; cambiare il proprietario della cartella freeboard in www-data:www-data
|
1 2 3 |
#cd /var/www/html #git clone https://github.com/Freeboard/freeboard.git freeboard #chown www-data:www-data -R freeboard |
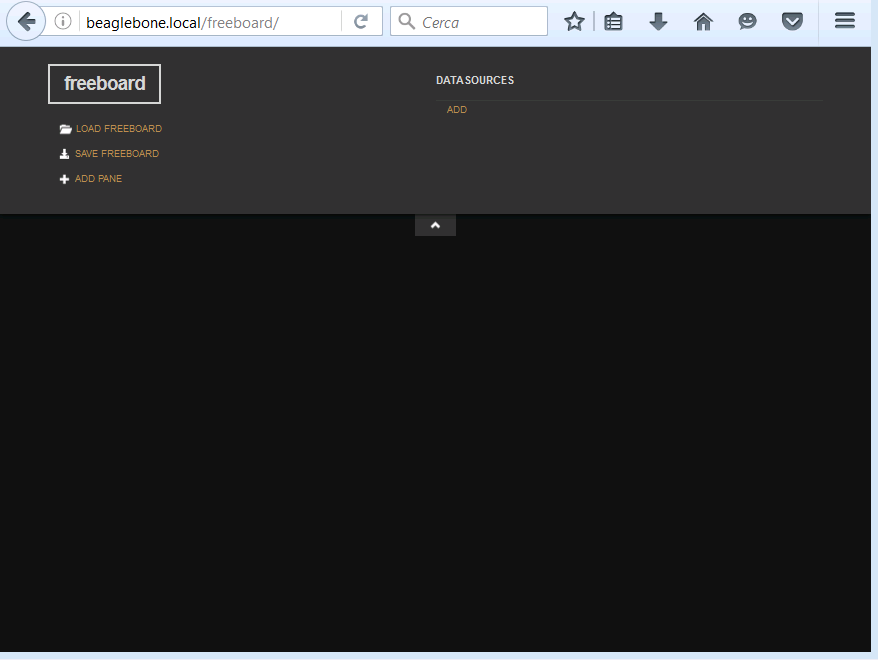
Accedendo con brower sul Beaglebone nella cartella freeboard si accede alla dashboard
 Occorre a questo punto inserire dei plugin aggiuntivi a freeboard. Si aggiungono i seguenti plugin
- freeboard-mqtt
Clonare il github https://github.com/alsm/freeboard-mqtt
|
1 2 |
#cd #git clone https://github.com/alsm/freeboard-mqtt |
Scaricare la libreria javascript mqtt paho
|
1 2 |
#cd #git clone https://github.com/eclipse/paho.mqtt.javascript.git |
Il link alla libreria è il seguente
Creare una cartella mqtt sotto la cartella plugins di freeboard e copiare i file mqttws31.js e paho.mqtt.plugin.js
|
1 2 3 |
#cd /var/www/html/freeboard/plugins/mqtt # ls mqttws31.js paho.mqtt.plugin.js |
Editare il file paho.mqtt.plugin.js ed inserire il riferimento della libreria mqttws31.js nella sezione external_scripts; anche in questo caso cambiare il proprietario per la nuova cartella mqtt ed i suoi contenuti
|
1 2 3 4 5 6 7 8 9 10 11 12 13 14 15 |
// # A Freeboard Plugin that uses the Eclipse Paho javascript client to read MQTT messages (function() { // ### Datasource Definition // // ------------------- freeboard.loadDatasourcePlugin({ "type_name" : "paho_mqtt", "display_name": "Paho MQTT", "description" : "Receive data from an MQTT server.", "external_scripts" : [ "plugins/mqtt/mqttws31.js" ], "settings" : [ |
Cambiare il proprietario
|
1 2 |
#cd /var/www/html/freeboard/plugins #chown www-data:www-data -R mqtt |
Editare il file /var/www/html/freeboard/index.html ed inserire il riferimento al nuovo plugin paho.mqtt.plugin.js nella sezione head.js
|
1 2 3 4 5 6 7 8 9 10 11 12 13 14 15 16 |
<!DOCTYPE html> <html> <head> <meta charset="UTF-8"> <title>freeboard</title> <meta name="mobile-web-app-capable" content="yes"> <meta name="apple-mobile-web-app-capable" content="yes" /> <meta name="apple-mobile-web-app-status-bar-style" content="black" /> <meta name="viewport" content = "width = device-width, initial-scale = 1, user-scalable = no" /> <link href="css/freeboard.min.css" rel="stylesheet" /> <script src="js/freeboard.thirdparty.min.js"></script> <script type="text/javascript"> head.js("js/freeboard_plugins.min.js", "plugins/mqtt/paho.mqtt.plugin.js", // *** Load more plugins here *** function(){ |
- Aggiungere il plugin dynamic-highcharts
Clonare in una cartella il github
|
1 |
git clone https://github.com/onlinux/freeboard-dynamic-highcharts-plugin |
Copiare il file plugin_highcharts.js nella cartella /var/www/html/plugins/thirdparty e cambiare il proprietario
|
1 2 |
#cd /var/www/html/freeboard/plugins/thirdparty #chown www-data:www-data plugin_highcharts.js |
Editare anche in questo caso il file /var/www/html/freeboard/index.html ed aggiungere il plugin come fatto al punto precedente
|
1 2 3 4 5 6 7 8 9 10 11 12 13 14 15 16 17 |
<!DOCTYPE html> <html> <head> <meta charset="UTF-8"> <title>freeboard</title> <meta name="mobile-web-app-capable" content="yes"> <meta name="apple-mobile-web-app-capable" content="yes" /> <meta name="apple-mobile-web-app-status-bar-style" content="black" /> <meta name="viewport" content = "width = device-width, initial-scale = 1, user-scalable = no" /> <link href="css/freeboard.min.css" rel="stylesheet" /> <script src="js/freeboard.thirdparty.min.js"></script> <script type="text/javascript"> head.js("js/freeboard_plugins.min.js", "plugins/thirdparty/plugin_highcharts.js", "plugins/mqtt/paho.mqtt.plugin.js", // *** Load more plugins here *** function(){ |
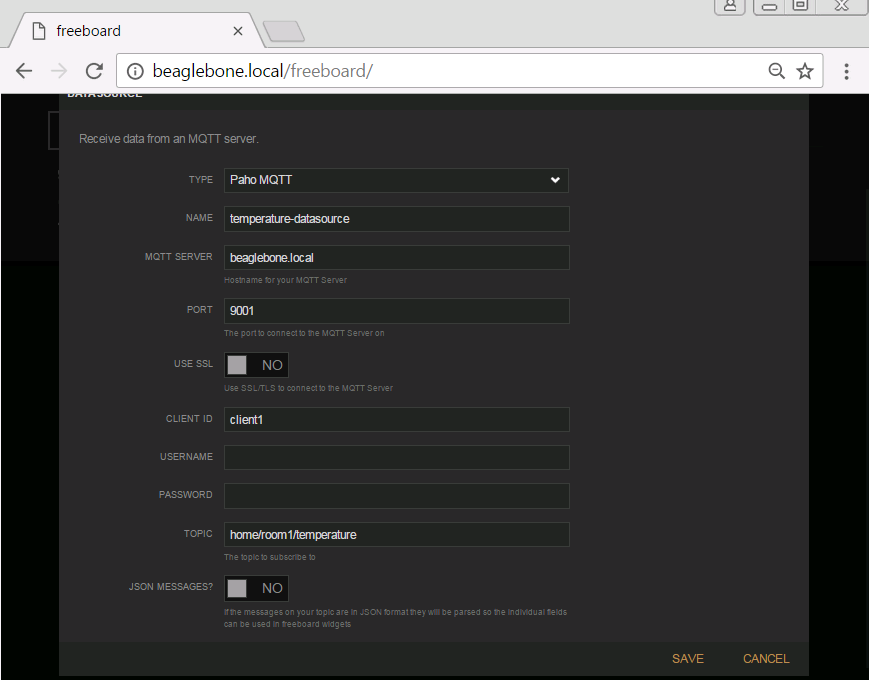
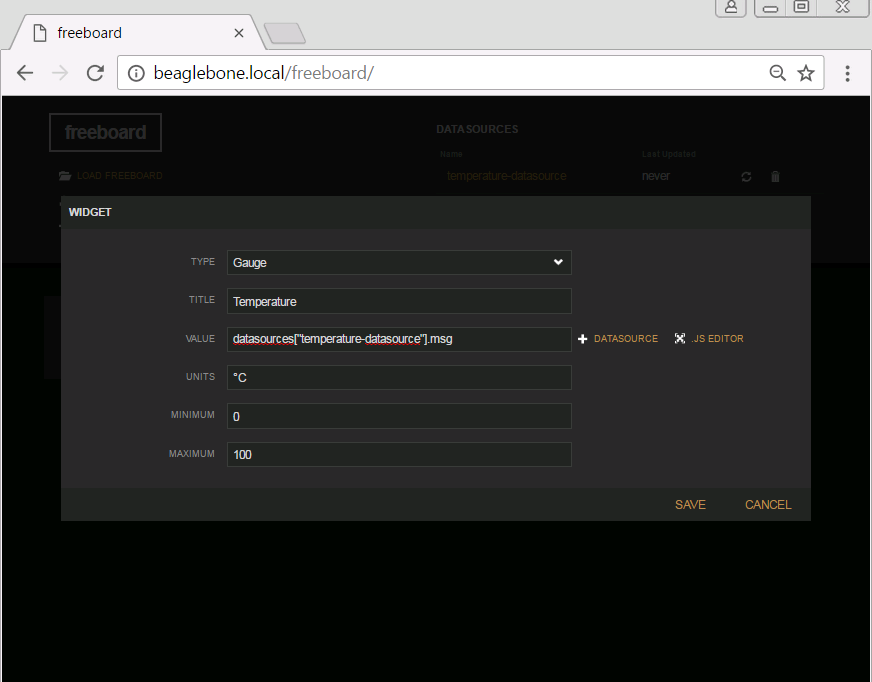
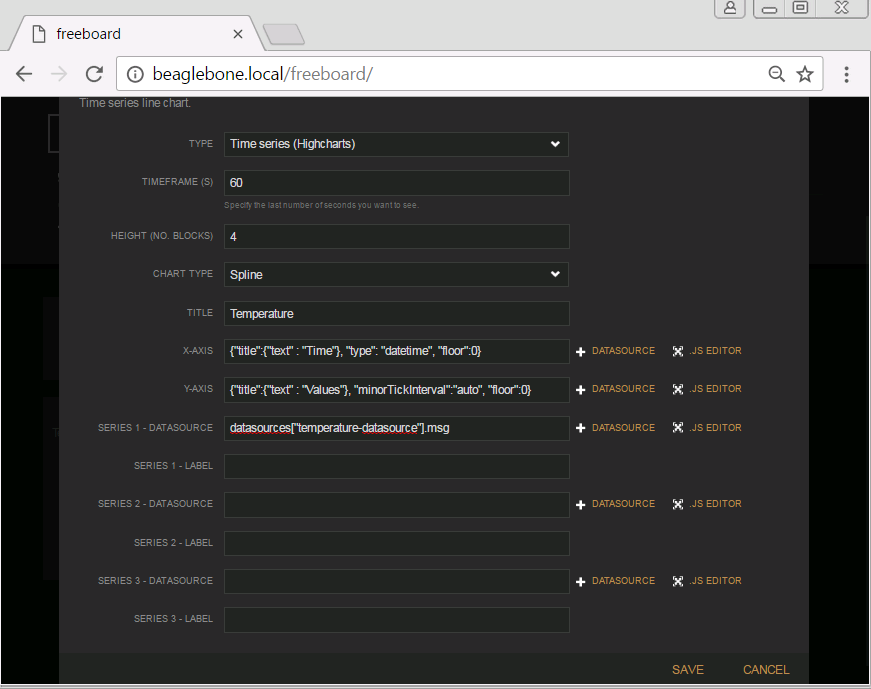
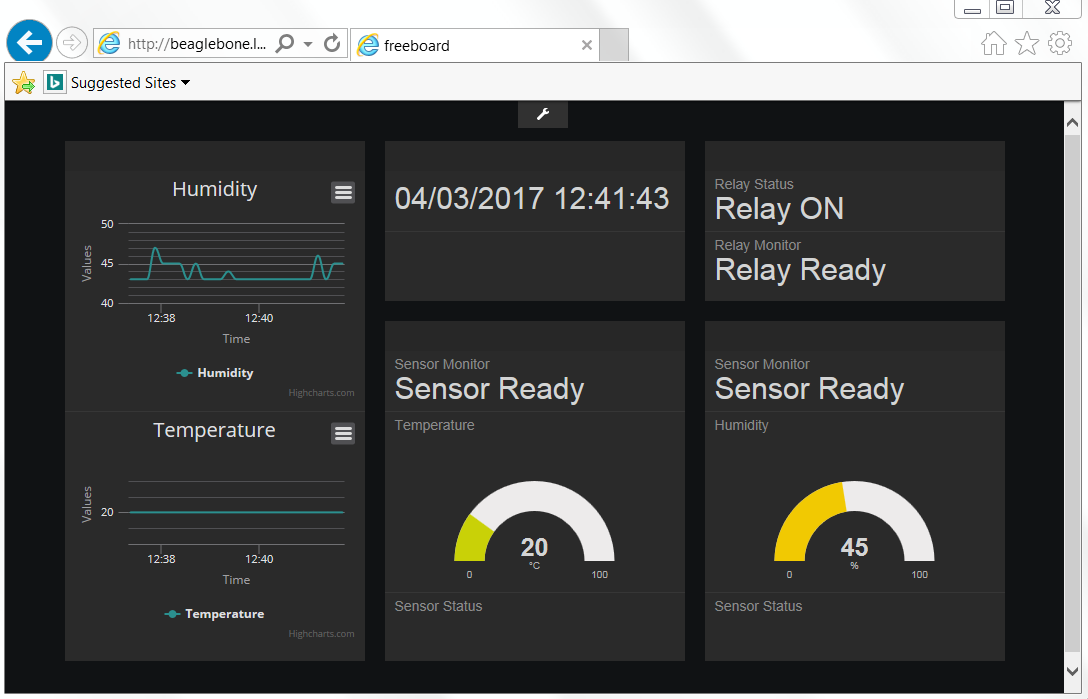
Accedere sulla dashboard freeboard ed aggiungere i collegamenti ai topic di temperatura ed umidità come datasource, i gauge per la misura instananea dei valori e la rappresentazione dei valori nel corso del tempo. Di seguito esempi di impostazioni :
- Datasource
- Gauge
- Timeseries
 Utilizzando Chrome/Chromium come brower è possibile salvare le impostazioni in un file json. La configurazione può essere caricata localmente dal brower o può essere caricata dal browser dal webserver, salvando ad esempio il file dashboard.json in /var/www/html/freeboard; inserendo l’url
|
1 |
http://beaglebone.local/freeboard/index.html?load=dashboard.json |
si accede alla Dashboard.
Di seguito la interfaccia Freeboard con varie widgets che mostrano lo stato e l’andamento dei sensori e relay ESP8266
 In questa serie di articolo il Beaglebone è stato configurato in modo da porte accedere utlizzando l’alias beaglebone.local/beaglebone
Preparazione sd card Debian per Beaglebone Black
ma si può usare comunque l’IP del Beaglebone per accedere ai servizi forniti dalla scheda.
Nel prossimo articolo si tratta la configurazione di client Mqtt Android
Mqtt con Beaglebone ed ESP8266 – Client Android