Tag Archives: orange pi

OctoPrint installation on Orange PI PC – Autostart

After the installation of OctoPrint and CuraEngine in the previous article

OctoPrint Package Installation

we treat now the configuration of the 3d print server.

As first operation, we set up the automatic startup of OctoPrint.

Run the following commands

Edit the /etc/ defaults/octoprint file changing the pointing to the executable to start OctoPrint using vi

or nano

and edit the file from

to

taking into account also the different user being used.

Add the script to startup automatically OctoPrint

Start OctoPrint  with the command

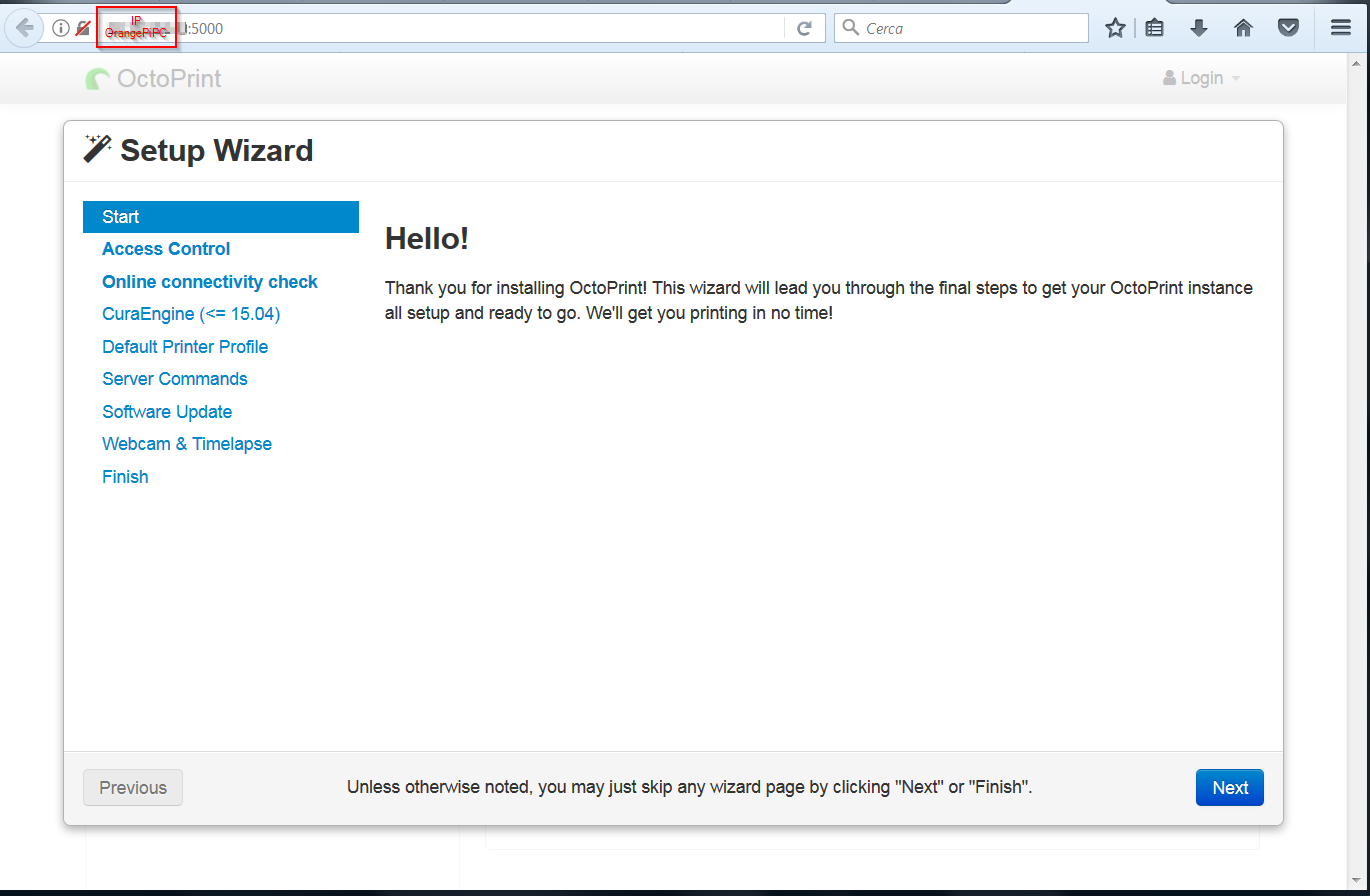
Check that OctoPrint is active on port 5000 of the Orange PI PC by accessing the address

Rebooting the Orange PI PC, the OctoPrint server now starts automatically.

In the next article, Linux will be configured to connect to OctoPrint on the Http standard port, i.e. on  port 80

HAProxy Installation

OctoPrint installation on Orange PI PC – Python package installation

This article describes how to enable the Orange PI PC board to work as 3d printers network server.

A  software that provides this functionality is OctoPrint

OctoPrint

From the OctoPrint site we can download an image for Raspberry PI with the system already ready; in the case of the Orange PI PC we have  to install and configure OctoPrint on a Linux image.

You can also use a Linux image available for Orange PI PC and run the steps related to OctoPrint package installation, but you have to check the prerequisites for Octoprint python package installation.

We instead built for this article an image using the Armban scripts.

As a first step, prepare the micro sd card with an Armbian image. In the specific case, we’ll use a Debian Jessie image created using the Armbian script, as indicated on the link

Armbian building

and described also in a previous article

Building Armbian image for Orange PI PC

We followed these steps to build the Armbian image on Ubuntu Xenial 16.04; from  a Linux command shell

In the building options choose

armbianopipcfosWe selected the default kernel configuration

armbianopipckernelChoose an Orange PI PC board

armbianopipcboardWe used the mainline kernel

armbianopipcmlkerneland Debian Jessie as distribution

armbianopipcjessieWe built an image with desktop envinronment

armbianopipcjessiedeAfter this option, the script proceeds to the compilation. The generated image is Armbian_5.34_Orangepipc_Debian_jessie_next_4.13.12_desktop.img. This image can be downloaded from the link

Armbian image for Orange Pi PC

Start Armbian and create the user for the Jessie image; in this case we choose octoprint/password as user.

If necessary, reconfigure the keyboard with the command

and proceed to upgrade the system

If the system needs to be configured via a wireless connection, the connection must be active at startup. For this purpose in our case we used the Wicd daemon

Wicd Debian

Remove the network-manager package

This command uninstalls network-manager and network-manager-gnome.

Check that the wireless interface is not present in

/etc/network/interfaces

Proceed to Wicd installation

Check that the octoprint user is present in the netdev group

In our case it is already present, giving as a result

netdev-group

If not present, add it with the command

Start  wicd

Logon to the armbian graphic desktop and start the wireless configuration with the command

wicd-client

Configure and save the network connection from the graphical interface.

If you want the remote desktop follow the steps listed in the article

Remote desktop setup for Armbian on Orange PI PC

We can now install Octoprint. Follow the steps available at the link

OctoPrint installation on Linux

Install the prerequisites

Create under /opt the octoprint folder and assign the ownership  to octoprint

In a Linux shell command go to /opt/octoprint  folder and download the software

Run

Create the  .octoprint folder

Add  octoprint to the following groups  to manage the 3d printer using the USB port

Check  the correct installation by running the command

The OctoPrint server can be reached on port 5000 at the IP address of Orange PI PC

http://ipaddress:5000

octoprinttest

Install the Cura Engine at this point; place yourself in the octoprint user’s home and download the source package

Unpack the package

Go into  the unpacked folder

Run  the compilation with the command

The compiled software is located under the build folder

curaengineCreate the /opt /octoprint/cura folder and copy the CuraEngine file to this folder

The executable is now in the /opt/octoprint/cura folder and will be used later by OctoPrint.

In the next article we’ll treat how to configure OctoPrint’s automatic startup

OctoPrint Autostart

Libreelec8 addon building for Orange PI PC

In the article about the Libreelec8 build for Orange PI PC

Libreelec8 in OrangePI PC

we created the environment and compiled the Libreelec8 image for our development board. We integrate what it has been said in the previous article showing how to build  the Libreelec 8 addons for our Orange PI PC board.

Now we proceed to build some addons. The packages that you can build are available in the kodi-binary-addons folder as shown below

libreelec8 addonsand in the packages/addons folder

addons packages

We build the  pvr.iptvsimple addon running the following command from the /home/sviluppo/orangepi/libreelec/libreelec-8.0 folder

addon command

We build the proftpd addon, among those avaliable in the packages/addons  folder

The compiled addons are available in the following folder

addons

Here are the links to download some compiled addons

PVR addons

Service Addons

Libreelec8 in OrangePI PC

This article describes the steps that I ran to prepare a first version of Libreelec 8 in Orange PI PC cards and other H3 socs.

Starting from the Debian development envinronment, with its installed packages, already used for the compilation of OpenELEC 7

 Openelec compilation for Orange PI PC

we proceed to build an Libreelec 8 image.

We started as basis from the work done for Openelec 7 and Libreelec 7 available on the two github repositories

H3 Openelec 7 Github

H3 Libreelec 7 Github

Log in a unix command shell as user sviluppo; create a folder, libreelec , under orangepi folder and move into it

Clone the Libreelec8 github

The patches have been created for a specific version of the commit, so we align our github clone to that version

Download from the following link the patches, the H3 project and other stuff

H3 Libreelec 8

Unzip this file in /home/sviluppo/orangepi/libreelec

Run the following steps

1)Copy  to /home/sviluppo/orangepi/libreelec/libreelec-8.0/projects the folder

H3

2) Copy to /home/sviluppo/orangepi/libreelec/libreelec-8.0/packages/multimedia  the folders

cedarx
libmpeg2

3) Copy to /home/sviluppo/orangepi/libreelec/libreelec-8.0/packages/tools the folder

sunxi-tools

4) Copy to /home/sviluppo/orangepi/libreelec/libreelec-8.0/packages/sysutils  the folder

  sunxi-sys-utils

5) Copy to /home/sviluppo/orangepi/libreelec/libreelec-8.0/packages/graphics  the folder

sunxi-mali

6) Copy to /home/sviluppo/orangepi/libreelec/libreelec-8.0/packages/linux-drivers  the folder

mt7601u

7)  The following patches are available in /home/sviluppo/orangepi/libreelec/H3LE8/patches folder

linux.patch

image.patch

mkimage.patch

kodi.patch

libcec.patch

u-boot.patch

u-boot-release.patch

u-boot-update.patch

Patch the code from the /home/sviluppo/orangepi/libreelec folder running the following commands

Proceed to the image build for Orange PI PC from the folder /home/sviluppo/orangepi/libreelec/libreelec-8.0  running

At the end of the compilation in the /home/sviluppo/orangepi/libreelec/libreelec-8.0/target folder we find the files to install or update Libreelec 8

 At the link

Openelec 7 H3 FAQ

we find the boards we can build changing the SYSTEM parameter in the building command

SYSTEM=opi2
SYSTEM=opione
SYSTEM=opipc
SYSTEM=opiplus
SYSTEM=opilite
SYSTEM=opipcplus
SYSTEM=opiplus2e
SYSTEM=bpim2p
SYSTEM=bx2

This image is a first attempt to build Libreelec 8 for  H3  socs. The image was installed on Orange PI PC and the system worked well, but still bugs and malfunctions may occur.

Here is the built Libreelec 8 image for Orange PI PC

Orange PI PC Libreelec 8 Image

We tested this image on an Orange PI PC board.

Here are other images we did’t test on the devices

Orange Pi2 Libreelec 8 Image

Orange Pi Lite Libreelec 8 Image

Orange Pi One Libreelec 8 Image

Orange Pi PC Plus Libreelec 8 Image

Orange Pi Plus Libreelec 8 Image

Orange Pi Plus 2e Libreelec 8 Image

WARNING: The image installation on the device is at your own risk. We accept no responsibility if the installation leads to  malfunction or block of the device.

The following article shows how to build the addons

Libreelec 8 addon building for Orange PI PC

Openelec addon building for Orange PI PC

In the article about the OpenELEC build for Orange PI PC

Openelec building for Orange PI PC

we created the environment and compiled the OpenELEC image for our development board. We integrate what it has been said in the previous article showing how to build  the Openelec addons for our Orange PI PC board.

As stated in the linked article we have to open a shell command window in the  OPENELEC-OPIPC folder

Using the  graphical interface in Debian we can verify the availabilty of the official addons structure. To add the unofficial ones we have to run from the  OpenELEC-OPIPC folder

Now we proceed to build an official addon and an unofficial one. The packages that you can build ara available in the official folder as shown below

official Addonsand in the unofficial folder

unofficial Addons

We build the  official pvr.iptvsimple addon with the command

For the unofficial we build the p7zip module

The compiled addons are availablein the following folder

addons

In the case of errors in the compliation check the logs and proceed consequently. For example in the case of trasmission the system was not able to download the source package using the link in the package.mk file

To overcome this unexpected error we added another link to the package, i.e.  we  changed the package.mk file from

to

In this way, the transmission addon has been compiled correctly, always with the command

Building Armbian image for Orange PI PC

We treat now the bulding of the image Armbian for Orange PI PC. From the developer’s github

Armbian Github

we find the steps to do the task.

From the Armbian site

Building Armbian

the supported building envinronment is Ubuntu. In our test we use Ubuntu 16.04.1 LTS x86-64

Ubuntu

and our Debian 8.5 envinroment used for the other tasks described on this site. With Ubuntu the compile.sh script installs all the required packages to build the image.  On the Armbian web site we can find also various compilation options..

Using Debian 8.5 as host, we have to exectute some prerequisites tasks described below. In the case of issues execute the building on Ubuntu..

First we install the cross compilation envinronment in Debian

https://wiki.debian.org/CrossToolchains

We have to create the file  crosstools.list in /etc/apt/sources.list.d

Edit this file and add the line

Save the file and add the repository key using curl. We install the curl package

and add the key

Now we are ready to install the packages and architecture as listed below

At this point the procedure is the same on Ubuntu or Debian. We create a folder called armbian under orangepi folder in the home folder of the linux system; in our case the user is sviluppo

We clone the repository with the following command in a shell command window in the armbian folder

To build the image execute

When requested enter the root password and for our image select the options described below.

  • Full OS image

fullosimage

  • Orangepipc board

orangepipc

  • default kernel

defaultkernel

  • Debian stable image

debianstable

  • Image with desktop envinronment

debiande

We find the image under the folder output/images ready to be transferred on a micro sd card as described in previous article

immagine

Remote desktop setup for Armbian on Orange PI PC

To enable the remote desktop for Armbian on Orange PI PC execute the logon to the system, for example using an ssh client

loginDelete, if installed, the packages

Install the following packages

Now we are able to login on Armbian using the remote desktop. Start the remote desktop client entering the Orange PI PC IP address

Remote Desktop ConnectionExecute the login with the user created at the first boot of Armbian, for example user1

Remote Desktop_LoginWe now have the access to the XFCE desktop remotely

Remote_Desktop

Armbian Boot on Orange PI PC

After the creation of the micro sd card with the Armbian image for Orange PI PC

Armbian image on micro sd

we can boot the Orange PI PC with the card inserted in the card slot. At the boot the first operation is the partition increase on the card, then the system requires the root password change from the default, 1234, to a new password. The next operation is the creation of a normal Debian user, for example user1; we provide the main required informations like username, password and letting the default  for the other fields. After these steps the system opens the XFCE graphical interface with the default resolution. To change the resolution execute the following command

It shows a list with all the available options; to enable a 1080p60 resolution execute

 To change the locales configuration execute the following command choosing the language to use

while to modify the keyboard layout use the following command

Openelec compilation for Orange PI PC

In this article we describe how to proceed to compile the Openelec image for the Orange PI PC card.

From the Orange PI PC forum, in the Openelec section the developers describe the steps to compile the image

Openelec Orange PI PC FAQ

In previous blogs we described how to install debian and how to modify the script.bin file to adapt the hdmi output to our television

Debian installation

Output resolution change

The compilation takes a long time; it is advisable to use multicore processors to speed up the compilation process.

Create a folder, openelec, under orangepi folder and move into it

Install the following packages

With git download the github sources in the local  OPENELEC-OPIPC folder

After the above operation access to OPENELEC-OPIPC folder

Execute the following command

The process check prerequisities and installs additional packages

Insert the root password when required; after the prerequisites installation the compilation begins.

At the end of the compilation in the target folder we find the files to install or update Openelec

  1. The file having the .img.gz extension is to upack and tranfer to a micro sd card as described in previous posts.target
  2. The file with .tar extension is to be copied in the update folder on the Openelec system; this file updates the system when rebooting the Orange PI PC cardupdate

Resolution change of the video output in Openelec on Orange PI PC (Part2)

After the installation and compilation of the sunxi tools we are able to manage the script.bin file

http://www.microdev.it/wp/en/2016/07/29/resolution-change-of-the-video-output-in-openelec-on-orange-pi-pc-part1/

Copy into scriptfile folder our script.bin file.

From th sunxi link it is possible to view the guide about the parameters of the fex file

Fex Guide

Using the tool, compiled in part1 article, let’s convert the file from binary into a text one, executing the following command

Now we can work on the script.fex file. Edit it with a text tool software, for example pluma in Debian

script.fex

In this file we have to find the parameters to modify the video output; here are the parameters to modify

In our test file we found the following settings

According to the fex guide, for the HDMI output (screen_output_type=3) and a setting of 720p60 we have to change the 10 value into 5 in the screen0_output_mode parameter

WARNING: This file contains all the main parameters for the correct operation of the card. Don’t  change anything if you are not sure  waht the change of parameters entails.

After the parameters change convert the text file into a binary format with the following command, generating a .bin file

Move this file into the micro sd card; rename the original script.bin file into script.bin.back and move the  script720p60.bin into script.bin.

In the  Fex Guide we find all the parameters settings according to the various output resolutions.

Inserting the sd card into the Orange PI PC we can test the new output resolution connecting the hdmi to our television and powering on the card.