Category Archives: Installation

Flashing the firmware using Nodemcu Flasher

In the previous article we examined the different ways to flash the firmware

Flashing Nodemcu firmware

Now we describe how to proceed in Windows.

Looking at the Nodemcu firmware github

Nodemcu github

we find the followng application for Windows

 Nodemcu flasher

 We download the version compatible with our Windows operating system (32 or 64 bit)

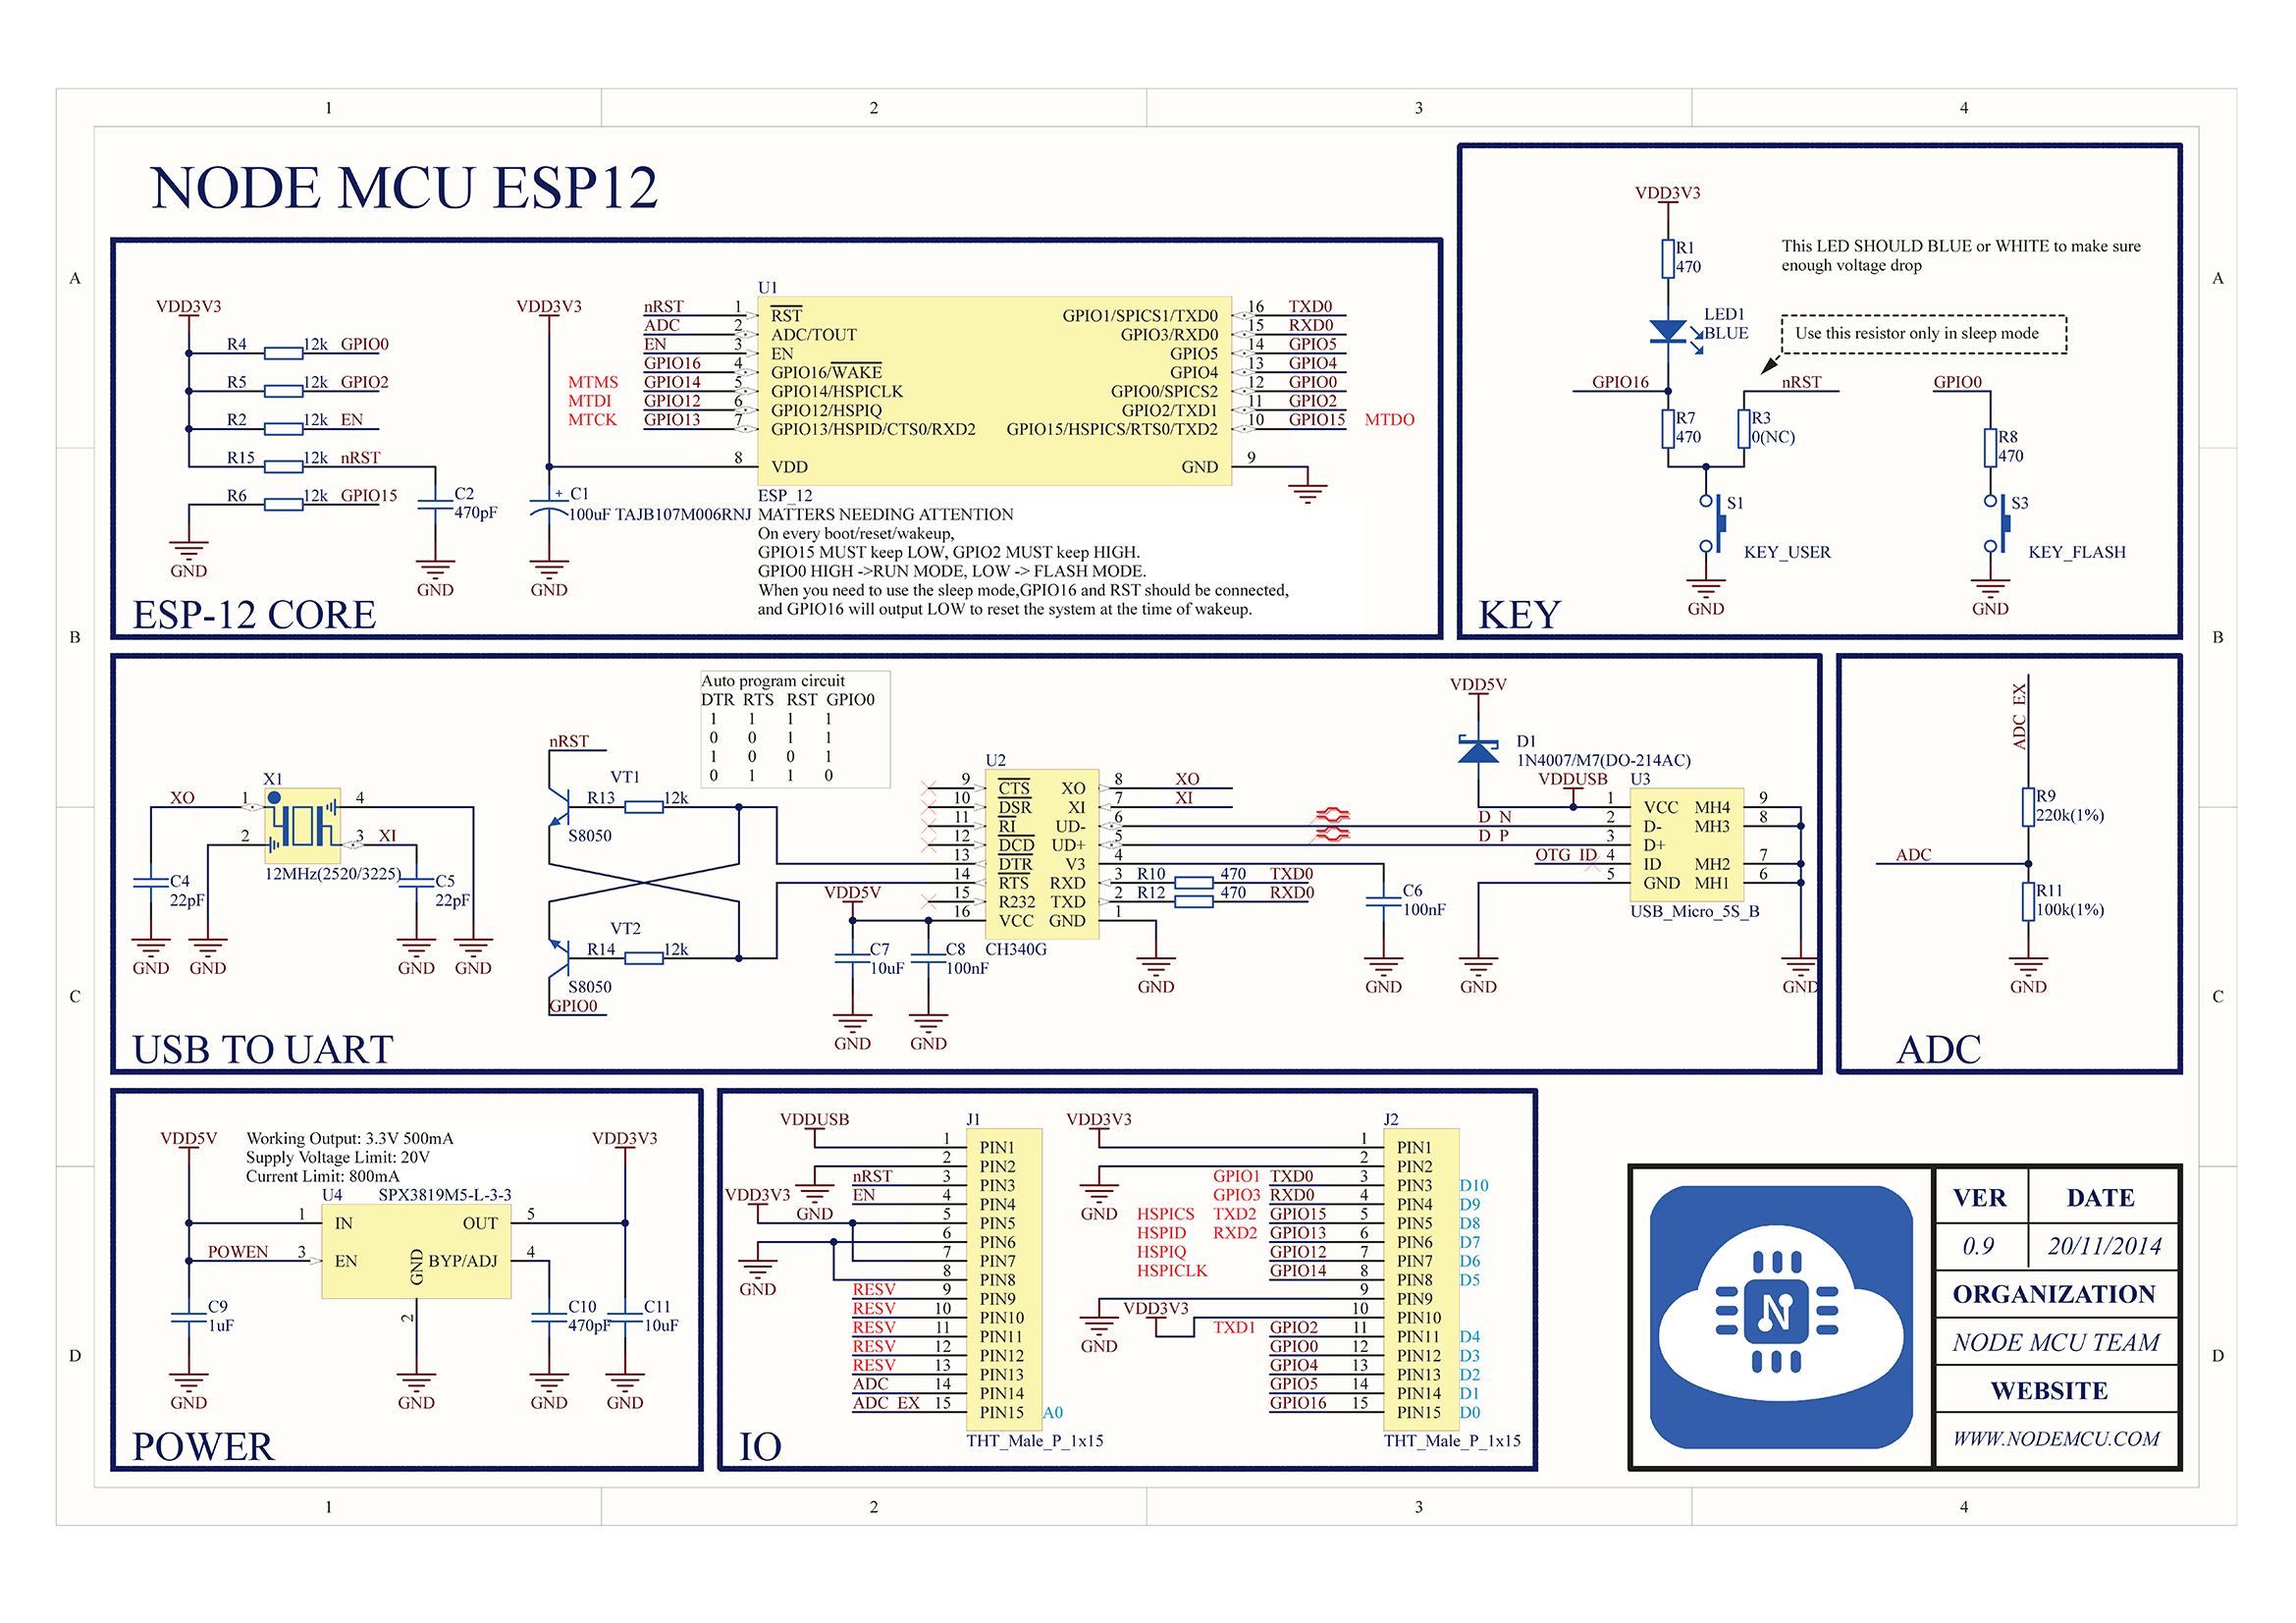
First operation is to install the USB-Serial chip drivers of our Nodemcu Devkit, as specified in previous article. We have a devkit Nodemcu ver. 0.9, so we have to install the CH340G drivers

CH340G Drivers

After the drivers installation we can download the Nodemcu flasher in a folder and plug the  USB-Micro Usb cable between the pc and the devkit. Our COM port should be visible in the Windows device manager in the COM  devices list

PortaCom

In our case it is available on the COM port 5.

The steps to follow are the following:

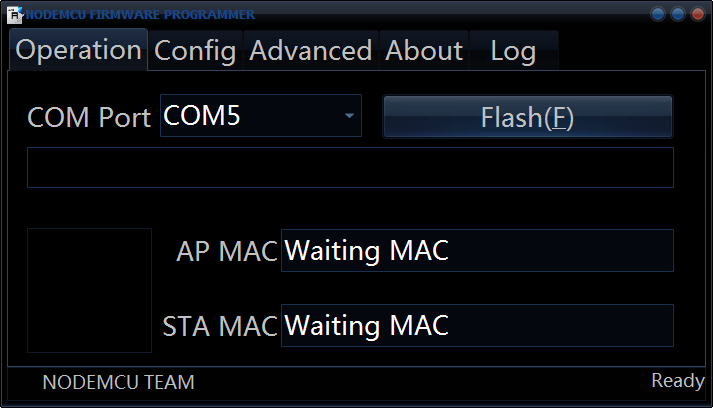
  • Run Nodemcu Flasher and choose the COM5 port.

NodemcuProg

  • In Config select  INTERNAL://NODEMCU  with address 0x00000.

NodemcuProgConfig

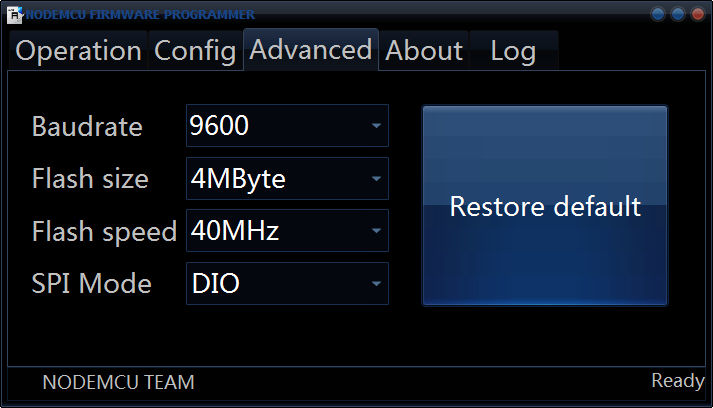
  •  In Advanced we have the following parameters
    • Baudate: 9600 as specified in our devkit.
    • Flash size: 4MByte. Flash size of our devkit.
    • Flash Speed: 40MHz. The default speed.
    • SPI Mode: DIO is the default for 4Mb flash size.

NodemcuProgAdvanced

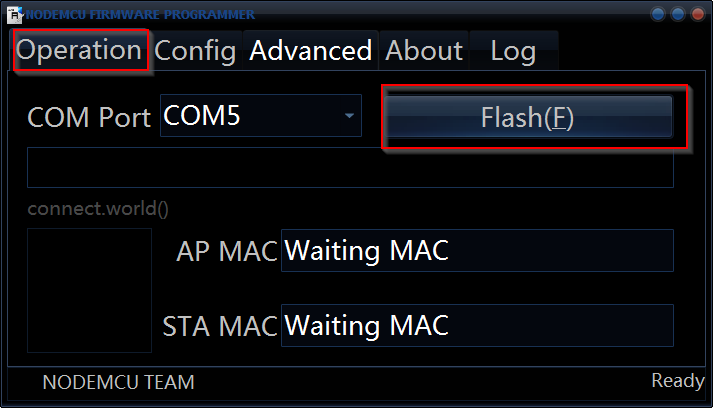
  • Proceed with the flash of the firmware pressing the FLASH button

NodemcuProgFlash

  • The application shows a progress bar of the operation

NodemcuProgProgress

At the end you can close the window and make sure everything is working properly using a LUA script uploader program, which we’ll see in the next article

Uploading LUA code


How to flash the Nodemcu firmware

In previous article we described the ESP8266 wifi module integrate into the Nodemcu development kit

ESP8266 WiFi Module

Here we look at how to load the firmware on the device.

First step is to assess the nodemcu development kit model we are working with. In our case we’ll perform the various operations with a development board Nodemcu V0.9. The USB-Serial chipset in this case is the CH340G

The drivers for this chipset can be downloaded directly from github of nodemcu

USB-Serial Drivers

To load the firmware, you can use the methods described in the Nodemcu site

Flashing Firmware

Basically there are two main methods:

  • Flash through the Windows Nodemcu Flasher tool

Nodemcu Flasher

  • Flash via a utility in Python to use in Linux, OSX or Windows

esptool

The Nodemcu flasher tool allows you to load a default firmware on the card  intuitively and quickly.

As can be seen from the above documentation of the  devkit you do not need to take any action on the pin GPI0 ESP to put the devive in flash mode; the flash operation and execution start automatically.

In the next article we’ll flash the firmware using the Nodemcu Flasher tool

Flashing the firmware with Nodemcu Flasher

Nodemcu Firmware

As discussed in previous article

ESP8266 WiFi Module

we’ll work on the ESP8266 SOC using the Nodemcu firmware

Firmware Nodemcu

Nodemcu is, to date at rev.  1.5.4.1, based on LUA 5.1.4. It is based upon Expressif SDK NONOS

Expressif SDK NONOS

It uses the spiffs filesystem

spiffs filesystem

We can get the firmware, as specified at the link

Nodemcu building

with different methods

  • Using a cloud service, specifying the additional modules if required

Nodemcu Custom Build

  • Using a Docker system

Docker Nodemcu Build

  •  Using cross compilation under a Linux system

We’ll descrive how to install the cross compilation envinronment under our Debian machine described in previous post.

The easiest way to get a default firmware is to use the Nodemcu Flasher tool.

In the next article we’ll treat how to load the firmware using various tools, among which the Nodemcu Flasher tool

How to flash the Nodemcu firmware

Debian envinronment for embedded systems development

In this article we describe Debian 8.5 installation we’ll use to compile Openelec for Orange Pi PC, Enigma2 images and other operations for embedded devices.

Download  AMD64  Debian 8.5 iso

Debian X86_64

Proceed with the operating system installation on your system. It is recommended  to use a virtual machine like VirtualBox. Use at least  4 GB of ram and 50 GB of hard disk.

VirtualBox

Using VirtualBox it is possible the virtual disk creation with dynamic space allocation. After the operating system installation log on into the system with the user created during the installation; we used the “sviluppo” user id. It is possible to log on to the linux system using the graphical interface or through ssh to the IP address of the Debian system.

Add to sudo group the user created in the Debian installation; open a shell command window and execute

In our case we have the following output

sviluppo user doesn’t belong to sudo group. Execute the command

Enter the root password when required and execute

In our example

Reboot the system

At the reboot log on into Debian and proceed to add the packages repositories, if not already present.  Go to the /etc/apt folder

Backup the original file

Edit the file using for example the vi editor

It is possible to comment out the lines positioning at the beginning of the line, press i to go in editing mode and add the # character. Pressing the ESC key we go into reading mode and it is possible to move in the file using the  arrow keys. In case of errors in editing mode it is possible to avoid the last change using the key ESC+u.

Comment out the  lines

Add the following lines

To add the lines press o keys to go into writing mode with an empty new line; with copy and paste we can add all the lines or proceed manually for each of them.

To save the file and quit press ESC+:wq.

It is possible to use one of the text editors available in Desktop Envinroment on which we logged into to edit and save the file.  For example to use pluma editor open a shell command windows and execute

From pluma open the file /etc/apt/sources.list, make the changes described above and save the file.

Update the repository lists  and the packages

Install the development packages

Install an ftp server to use for files transfer

After the installation open the file  /etc/vsftpd.conf and uncomment the following parameter

Open the file with vi or pluma as superuser

With vi editor search the string with the command

Delete the # character positioning the cursor on it and pressing the x key.

Save and quit with ESC+:wq.

Restart the ftp server using the command

We have now the envinronment to compile, modify, develop  our embedded systems.

SD card setup for Orange PI PC Armbian in Linux

As already described in the previous article

Openelec SD card setup

also for the Armbian distribution we have to prepare an sd micro card.It is advisable to use a micro SD class 10 to gain better performances. As first step  we proceed to the Armbian  image download from Armbian web site

Download Armbian Orange PI PC

We choose for example the Debian Jessie Desktop Image.

We install 7zip package. In Debian we can use the following command

After the file  download  wint 7z extension in a directory, we open a shell command window in this directory and  unzip the content

We have among other files the one with .raw extension. Then we plug the micro sd card and check this device

In our case we have the following output

We check if this device is umounted

In the case we have the device in the output response, as in our case

we proceed to the unmount

WARNING: Be sure that the device is the micro sd card and not the internal disk. The next operation imply the complete rewriting of the device with the loss of all data on it.

We can now write the image into the micro sd card, using the correct device, that in our case is /dev/sdb

WARNING: This operation wipes all data on the micro sd card.

After a while we have the micro sd card ready to be used in the Orange PI PC board.

SD card setup for Orange PI PC Armbian in OSX

As already described in the previous article

Openelec SD card setup

also for the Armbian distribution we have to prepare an sd micro card. It is advisable to use a micro SD class 10 to gain better performances. As first step  we proceed to the Armbian  image download from Armbian web site

Download Armbian Orange PI PC

We choose for example the Debian Jessie Desktop Image. We expand the content using a compression software, as Keka

Keka

obtaining one file having .raw extension

armbianOSX

Then we plug the micro sd card and find this device

In our case we have the following output

We proceed to the device unmout; in our case the command is

WARNING: Be sure that the device is the micro sd card and not the internal disk. The next operation imply the complete rewriting of the device with the loss of all data on it.

We can now write the image into the micro sd card, using the correct device, that in our case is /dev/disk2

WARNING: This operation wipes all data on the micro sd card.

After a while we have the micro sd card ready to be used in the Orange PI PC board.

SD card setup for Orange PI PC Armbian in Windows

As already described in the previous article

Orange PI PC Openelec SD card setup

for the Armbian distribution we have to prepare an sd micro card.It is advisable to use a micro SD class 10 to gain better performances. As first step  we proceed to the Armbian  image download from Armbian web site

Download Armbian Orange PI PC

We choose for example the Debian Jessie Desktop Image

armbianWe expand the content using a compression software, as 7-zip, obtaining one file having .raw extension.

armbian_estensione

In windows operating system we can trasfer this image to the micro sd card by using a specific sotware. We used Win32 Disk Imager, available from the following link

Win32 Disk Imager

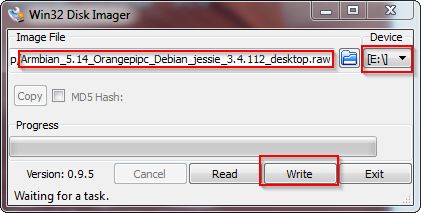
After the Win32 Disk Imager installazion we are able to write the micro sd card, i.e E disk in our case. We choose as input the image expanded in the step above

Win32 Disk ImagerEng

Press Write to transfer the image on the sd card.

WARNING: This operation wipes all data on the micro sd card.

After a while we have the micro sd card ready to be used in the Orange PI PC board.

SD card setup for Orange PI PC Openelec in OSX

First operation to do in order to use Openelec on Orange PI PC is the micro sd preparation.

It is advisable to use a micro SD class 10 to gain better performances.

As first step  we proceed to the Openelec image download from the link specified in Orange PI PC forum

Openelec Images

paying attention to choose the opipc version.

We choose the latest image in .gz format. After the file download  in a directory, we open a shell command window in this directory and  unzip the content

Then we plug the micro sd card and find this device

In our case we have the following output

We proceed to the device unmout; in our case the command is

WARNING: Be sure that the device is the micro sd card and not the internal disk. The next operation imply the complete rewriting of the device with the loss of all data on it.

We can now write the image into the micro sd card, using the correct device, that in our case is /dev/disk2

WARNING: This operation wipes all data on the micro sd card.

After a while we have the micro sd card ready to be used in the Orange PI PC board.

SD card setup for Orange PI PC Openelec in Linux

First operation to do in order to use Openelec on Orange PI PC is the micro sd preparation.

It is advisable to use a micro SD class 10 to gain better performances.

As first step  we proceed to the Openelec image download from the link specified in Orange PI PC forum

Openelec Images

paying attention to choose the opipc version.

We choose the latest image in .gz format. After the file download  in a directory, we open a shell command window in this directory and  unzip the content

Then we plug the micro sd card and check this device

In our case we have the following output

We check if this device is umounted

In the case we have the device in the output response, as in our case

we proceed to the unmount

WARNING: Be sure that the device is the micro sd card and not the internal disk. The next operation imply the complete rewriting of the device with the loss of all data on it.

We can now write the image into the micro sd card, using the correct device, that in our case is /dev/sdb

WARNING: This operation wipes all data on the micro sd card.

After a while we have the micro sd card ready to be used in the Orange PI PC board.

SD card setup for Orange PI PC Openelec in Windows

First operation to do in order to use Openelec on Orange PI PC is the micro sd preparation.

It is advisable to use a micro SD class 10 to gain better performances.

As first step  we proceed to the Openelec image download from the link specified in Orange PI PC forum

Openelec Images

paying attention to choose the opipc version.

We choose the latest image in .gz format. We expand the content using a compression software, as 7-zip, obtainig one file having .img extension.

ImmagineOPIPC

In windows operating system we can trasfer this image to the micro sd card by using a specific sotware. We used Win32 Disk Imager, available from the following link

Win32 Disk Imager

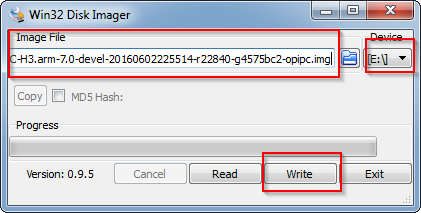
After the Win32 Disk Imager installazion we are able to write the micro sd card, i.e E disk in our case. We choose as input the image expanded in the step above

ScritturaSchedaSDEN

Press Write to transfer the image on the sd card.

WARNING: This operation wipes all data on the micro sd card.

After a while we have the micro sd card ready to be used in the Orange PI PC board.