Tag Archives: debian

Cross building for Beaglebone

In the article on the Debian environment we prepared the linux machine for the development of embedded systems

Debian development envinronment

In the article on building an image for the Orange PI PC we installed the cross build tools for armhf environment

Building Armbian for Orange PI PC

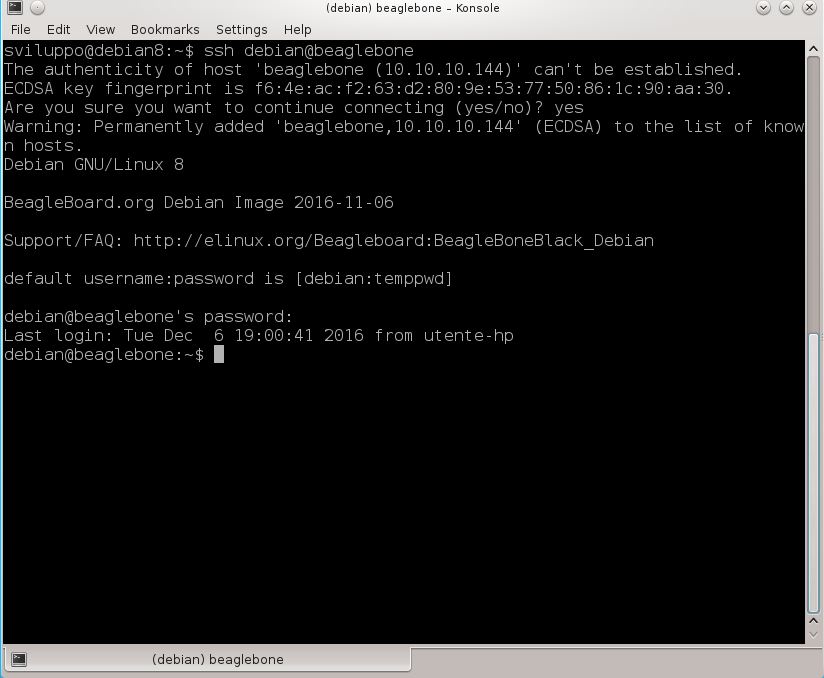
Starting from the clean image of the Debian envinronment we list the steps required to install the cross compiling environment. We log on Debian Desktop as sviluppo/ password.

As a preliminary step we install  the cross toolchains in Debian

https://wiki.debian.org/CrossToolchains

Create the file crosstools.list in the /etc/apt/sources.list.d folder

and add the line

Save the file and add the key of  the repository embedian.org

Install the following packages and add the armhf architecture

We install at this point the Eclipse IDE for Cpp downloading the IDE for Linux 64bit

Eclipse IDE

Unzip the eclipse package under / home /sviluppo.

Install the jre java

Add the line at the end of the file

Run the following commands

Run Eclipse from the eclipse folder to start the IDE

eclipseAs a first example we create a simple program in C for BeagleBone.

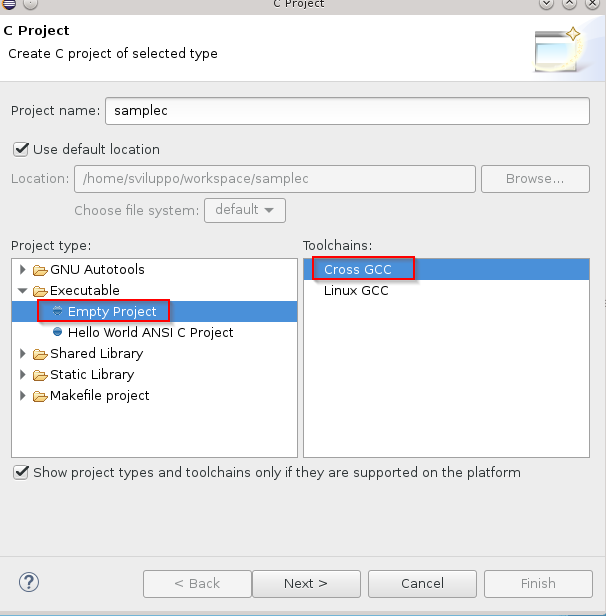
Create a new project in C, by inserting the following data

new projectSelect both configurations

project configurationEnter the cross compiler prefix and path

crosscompiler prefixPress Finish.
Add to the project a source file in C

C source file
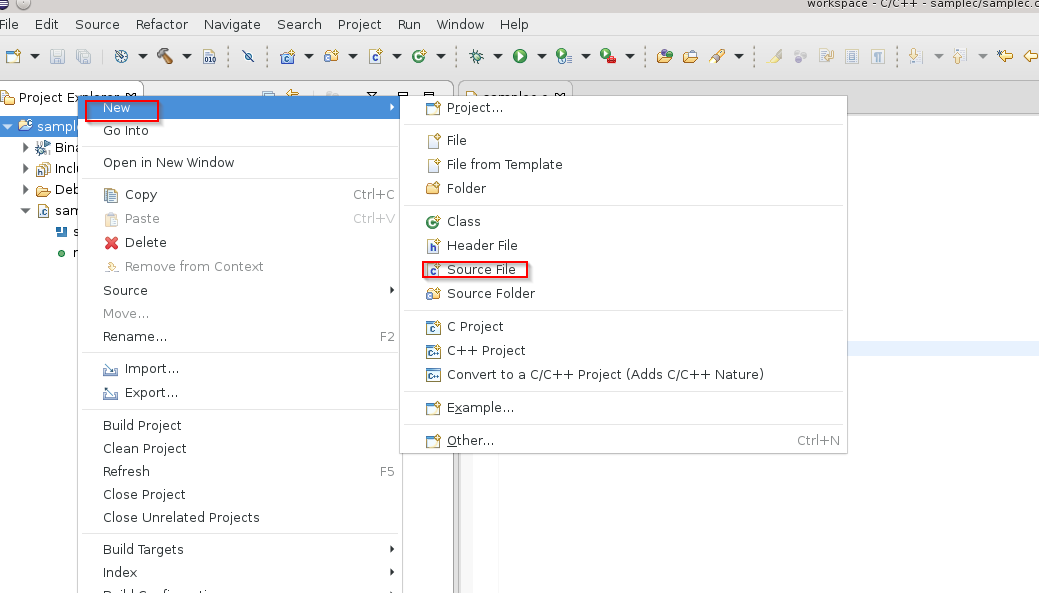
Insert the following simple code

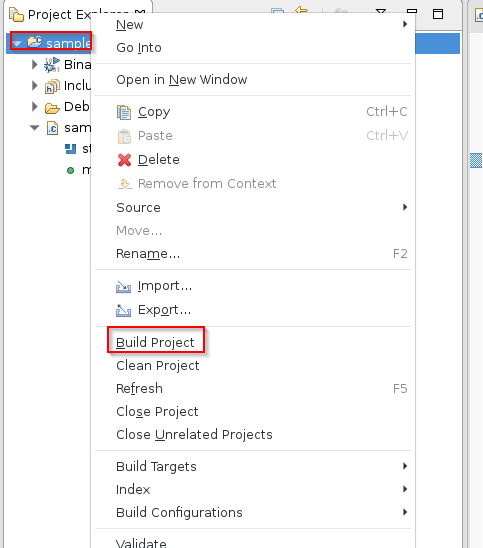
Proceed with the build by selecting the project with the right mouse button and choosing Build Project

project build Transfer the generated files on BeagleBone. You can use scp or ftp.

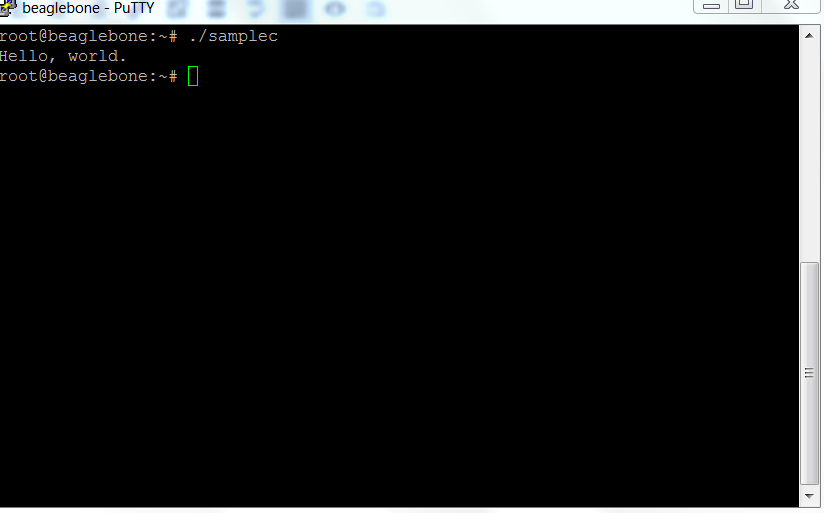
Give execution permissions to the file and run it

The result is of course the text inserted in the code

sample run

Development tools on Beaglebone

In the previous article we have installed and updated to the latest Debian image our BeagleBone

Debian sd card setup for Beaglebone Black

We also enabled the network services to access the board using the hostname.

After these changes we can access the Beaglebone using the following address in the the browser

http: //beaglebone.local

The web interface presents several examples of code executed with bonescript, javascript library based on node.js framework

Node.js

You can perform these simple examples to begin to interact with the board. There are also links to the development tools such as Cloud9, Nodered and informations about these development tools

toolsClicking on Cloud9 we access at the section dedicated to this tool. It is shown how to create a simple example and to run at boot the code placing it into the autorun folder in the IDE interface. From this section we can access to the Cloud9 ide available on port 3000 of the Beaglebone site

Cloud9

For more information about the tool, refer to the site

Cloud9

Accessing to the Nodered section we find  the link  to the web page about the basic informations about Nodered

Getting stared with Nodered

and the link to the Nodered ide, running at 1880 port of the web server running on BeagleBone

Beaglebone Nodered

Nodered beaglebone

In the web page about the first steps for Nodered there are examples with which to start using the tool. From the web site https://nodered.org we can have more informations about the tool.

In addition to tools in javascript on BeagleBone there are C/C++ compilers, Python interpreter and the possibility  to add additional development tools.

From the home page of the our BeagleBone board web interface, http: //beaglebone.local, we find the informations about all available headers and functions. The following image shows the  expansion headers

cape headers

In next articles we will show some code examples with the development board.

Debian sd card setup for Beaglebone Black

In the previous article we started up the development board Beaglebone Black / Green.

Startup of the Beaglebone

Let’s look  how to install an updated image of Debian for BeagleBone. As a first step we have to access the site which contains the Beaglebone  images

Beaglebone images

We download, having a BeagleBone Black Rev. C, bone-debian-8.6-lxqt-4gb-armhf-2016-11-06-4gb.img.xz. Unpack the 7zip image and load into a micro sd card with Win32DiskImager, as done for the Orange PI PC

SD card setup for Orange PI PC

If we wanted to load that image on the internal flash, we must edit the /boot/uEnv.txt files on a Linux system and uncomment the line

In that case, when we start the board the system will rewrite the operating system present on the internal flash with the version loaded on the micro sd card. We do not follow this road in order to do all the tests on the sd card leaving the internal partition unmodified. So let’s connect our Beaglebone to a network router. We insert the micro sd card and startup the development board. In some boards we need to press of the USER / BOOT button

 beaglebone black

because the operating system boots from micro sd card; with our board it is not necessary to perform this operation. We have to log on Beagleone now; the avahi-daemon service is already active on the Beaglebone and Linux systems resolve the address by hostname; Windows, instead, needs tha samba service activated to solve the Beaglebone hostname; installing samba we obtain the hostname recognition with the protocol netbios from Windows. If you are using a Windows machine to work with the Beagelbone you must first check the ip assigned by the network router to the  BeagleBone. From a Linux system, for example, connect to the Beaglebone using ssh as debian / temppwd and the beaglebone hostname

ssh BeagleboneIn Windows we need to install the samba service first to have the same functionality. Proceed at this point with the updating and samba installation

After the updates and samba services activation, we are ready to show examples with our BeagleBone and we are able to connect to it using the beaglebone and beaglebone.local hostnames. In the next article we will see tools already available on the board and how to add more features.

We can install the ftp service too, as we could use it in next articles

 To deactivate and activate it use the following commands

Startup of the Beaglebone development board

In a previous article we have given a brief description of Beaglebone Black board and its variants.

 Beaglebone development board

The BeagleBone in this review comes with 4GB of space on board, and with the operating system already installed.

We can access the BeagleBone, in our case the Black, without using the Ethernet network, but connecting it to a PC through the mini service USB connection as specified on the BeagleBone site

Getting started with Beaglebone

After connecting the BeagleBone Black to the PC via the USB cable we find  another removable  device to the existing disks

Beaglebone removable diskRunning start.htm we start an interface similar to the one available on  the  getting-started web site

getting startedWe proceed to the installation of network-over-USB drivers for the  operating system, Windows 64-bit in our case

driver network over usbProceed to download the file and run it, providing the permissions required by Windows

beaglebone driver installerAt the end the window with the performed operations is shown

beaglebone driver installer summaryUsing Firefox or Chrome we access to the following address http://192.168.7.2; we access in this way to the web server, running on Beaglebone board, through network over  USB

beaglebone web siteThe page shows how to update the system, login to the IDECloud9, perform various  Bonescript examples.

The access to the Cloud9 IDE

Cloud9 IDE Informations

takes place on port 3000 to the IP address specified above, ie http://192.168.7.2:3000

cloud9 ideIn our examples, we will not change the operating system present on the internal eMMC card but we will download an updated version of Debian for BeagleBone and will install it on a micro sd card.

The system can be closed  using  the Power button on board

power buttonor by connecting via ssh at 192.168.7.2 address with the debian user ,using temppwd as password, and executing the command “sudo poweroff”

sshIn the next article we will proceed to download and install on a micro sd card the last Debian image for BeagleBone

Debian sd card setup for Beaglebone Black

Remote desktop setup for Armbian on Orange PI PC

To enable the remote desktop for Armbian on Orange PI PC execute the logon to the system, for example using an ssh client

loginDelete, if installed, the packages

Install the following packages

Now we are able to login on Armbian using the remote desktop. Start the remote desktop client entering the Orange PI PC IP address

Remote Desktop ConnectionExecute the login with the user created at the first boot of Armbian, for example user1

Remote Desktop_LoginWe now have the access to the XFCE desktop remotely

Remote_Desktop

Armbian Boot on Orange PI PC

After the creation of the micro sd card with the Armbian image for Orange PI PC

Armbian image on micro sd

we can boot the Orange PI PC with the card inserted in the card slot. At the boot the first operation is the partition increase on the card, then the system requires the root password change from the default, 1234, to a new password. The next operation is the creation of a normal Debian user, for example user1; we provide the main required informations like username, password and letting the default  for the other fields. After these steps the system opens the XFCE graphical interface with the default resolution. To change the resolution execute the following command

It shows a list with all the available options; to enable a 1080p60 resolution execute

 To change the locales configuration execute the following command choosing the language to use

while to modify the keyboard layout use the following command

Debian envinronment for embedded systems development

In this article we describe Debian 8.5 installation we’ll use to compile Openelec for Orange Pi PC, Enigma2 images and other operations for embedded devices.

Download  AMD64  Debian 8.5 iso

Debian X86_64

Proceed with the operating system installation on your system. It is recommended  to use a virtual machine like VirtualBox. Use at least  4 GB of ram and 50 GB of hard disk.

VirtualBox

Using VirtualBox it is possible the virtual disk creation with dynamic space allocation. After the operating system installation log on into the system with the user created during the installation; we used the “sviluppo” user id. It is possible to log on to the linux system using the graphical interface or through ssh to the IP address of the Debian system.

Add to sudo group the user created in the Debian installation; open a shell command window and execute

In our case we have the following output

sviluppo user doesn’t belong to sudo group. Execute the command

Enter the root password when required and execute

In our example

Reboot the system

At the reboot log on into Debian and proceed to add the packages repositories, if not already present.  Go to the /etc/apt folder

Backup the original file

Edit the file using for example the vi editor

It is possible to comment out the lines positioning at the beginning of the line, press i to go in editing mode and add the # character. Pressing the ESC key we go into reading mode and it is possible to move in the file using the  arrow keys. In case of errors in editing mode it is possible to avoid the last change using the key ESC+u.

Comment out the  lines

Add the following lines

To add the lines press o keys to go into writing mode with an empty new line; with copy and paste we can add all the lines or proceed manually for each of them.

To save the file and quit press ESC+:wq.

It is possible to use one of the text editors available in Desktop Envinroment on which we logged into to edit and save the file.  For example to use pluma editor open a shell command windows and execute

From pluma open the file /etc/apt/sources.list, make the changes described above and save the file.

Update the repository lists  and the packages

Install the development packages

Install an ftp server to use for files transfer

After the installation open the file  /etc/vsftpd.conf and uncomment the following parameter

Open the file with vi or pluma as superuser

With vi editor search the string with the command

Delete the # character positioning the cursor on it and pressing the x key.

Save and quit with ESC+:wq.

Restart the ftp server using the command

We have now the envinronment to compile, modify, develop  our embedded systems.

SD card setup for Orange PI PC Armbian in Linux

As already described in the previous article

Openelec SD card setup

also for the Armbian distribution we have to prepare an sd micro card.It is advisable to use a micro SD class 10 to gain better performances. As first step  we proceed to the Armbian  image download from Armbian web site

Download Armbian Orange PI PC

We choose for example the Debian Jessie Desktop Image.

We install 7zip package. In Debian we can use the following command

After the file  download  wint 7z extension in a directory, we open a shell command window in this directory and  unzip the content

We have among other files the one with .raw extension. Then we plug the micro sd card and check this device

In our case we have the following output

We check if this device is umounted

In the case we have the device in the output response, as in our case

we proceed to the unmount

WARNING: Be sure that the device is the micro sd card and not the internal disk. The next operation imply the complete rewriting of the device with the loss of all data on it.

We can now write the image into the micro sd card, using the correct device, that in our case is /dev/sdb

WARNING: This operation wipes all data on the micro sd card.

After a while we have the micro sd card ready to be used in the Orange PI PC board.

SD card setup for Orange PI PC Armbian in OSX

As already described in the previous article

Openelec SD card setup

also for the Armbian distribution we have to prepare an sd micro card. It is advisable to use a micro SD class 10 to gain better performances. As first step  we proceed to the Armbian  image download from Armbian web site

Download Armbian Orange PI PC

We choose for example the Debian Jessie Desktop Image. We expand the content using a compression software, as Keka

Keka

obtaining one file having .raw extension

armbianOSX

Then we plug the micro sd card and find this device

In our case we have the following output

We proceed to the device unmout; in our case the command is

WARNING: Be sure that the device is the micro sd card and not the internal disk. The next operation imply the complete rewriting of the device with the loss of all data on it.

We can now write the image into the micro sd card, using the correct device, that in our case is /dev/disk2

WARNING: This operation wipes all data on the micro sd card.

After a while we have the micro sd card ready to be used in the Orange PI PC board.

SD card setup for Orange PI PC Armbian in Windows

As already described in the previous article

Orange PI PC Openelec SD card setup

for the Armbian distribution we have to prepare an sd micro card.It is advisable to use a micro SD class 10 to gain better performances. As first step  we proceed to the Armbian  image download from Armbian web site

Download Armbian Orange PI PC

We choose for example the Debian Jessie Desktop Image

armbianWe expand the content using a compression software, as 7-zip, obtaining one file having .raw extension.

armbian_estensione

In windows operating system we can trasfer this image to the micro sd card by using a specific sotware. We used Win32 Disk Imager, available from the following link

Win32 Disk Imager

After the Win32 Disk Imager installazion we are able to write the micro sd card, i.e E disk in our case. We choose as input the image expanded in the step above

Win32 Disk ImagerEng

Press Write to transfer the image on the sd card.

WARNING: This operation wipes all data on the micro sd card.

After a while we have the micro sd card ready to be used in the Orange PI PC board.