After describing the general specifications of the two boards in the previous article
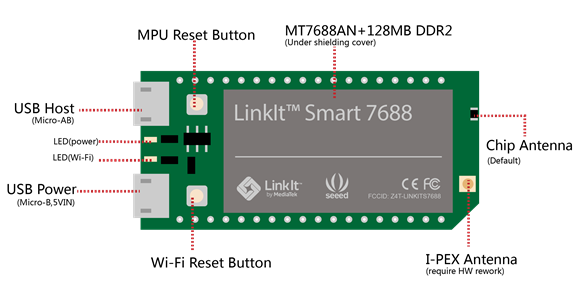
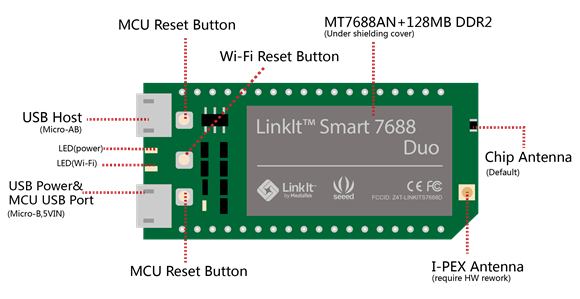
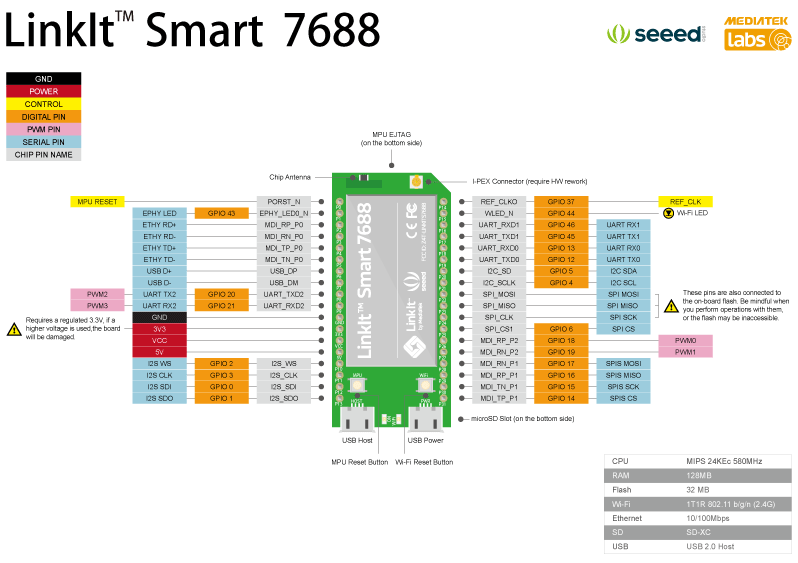
Linkit 7688 and 7688 Duo Development Boards
now we build the OpenWrt image from the sources. The following link describes the steps
Building the firmware from the source code
First we have to create the folder Linkit under /home/sviluppo in a shell command window in our Debian image, already used to build OpenWrt in another article
|
1 2 3 |
cd mkdir Linkit cd Linkit |
Install the prerequisites
|
1 2 3 4 5 6 7 8 9 10 |
sudo apt-get install git-core sudo apt-get install build-essential sudo apt-get install libssl-dev sudo apt-get install libncurses5-dev sudo apt-get install unzip sudo apt-get install gawk sudo apt-get install subversion sudo apt-get install mercurial sudo apt-get install libxml-parser-perl sudo apt-get install g++ |
Clone the OpenWrt repository
|
1 |
git clone git://git.openwrt.org/15.05/openwrt.git |
In the shell command window go to the openwrt folder and copy feeds.conf.default file as feeds.conf
|
1 2 |
cd openwrt cp feeds.conf.default feeds.conf |
Add the Mediatek feed for the boards
|
1 |
echo src-git linkit https://github.com/MediaTek-Labs/linkit-smart-7688-feed.git >> feeds.conf |
Update the feeds for the packages
|
1 |
./scripts/feeds update |
Install the packages
|
1 |
./scripts/feeds install -a |
Configure the kernel executing
|
1 |
make menuconfig |
Use the following settings
- Target System: Ralink RT288x/RT3xxx
- Subtarget: MT7688 based boards
- Target Profile: LinkIt7688
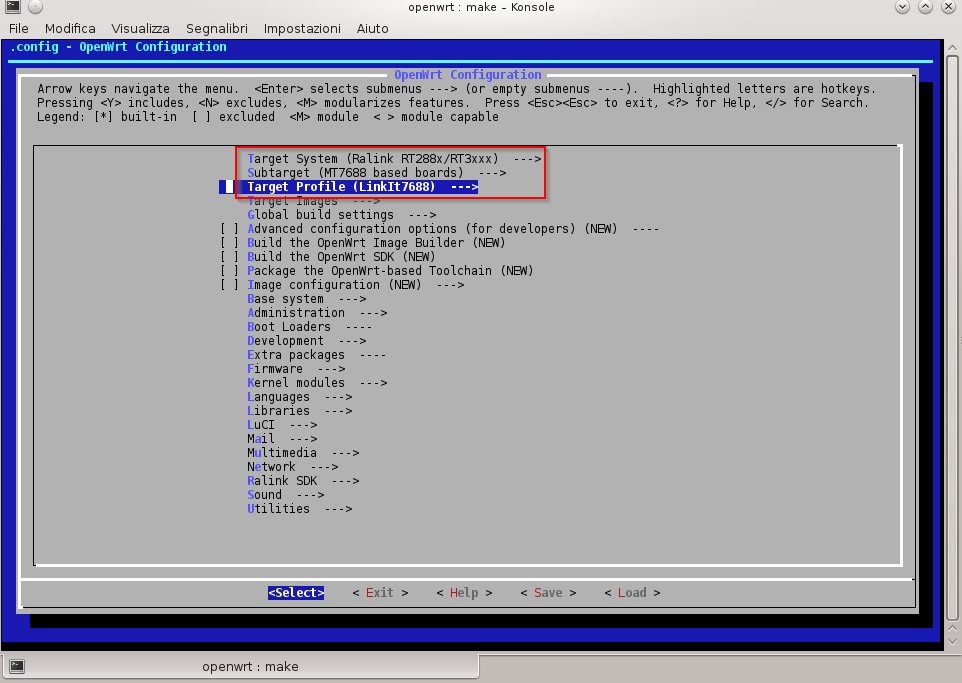 Save and exit.
Run the building
|
1 |
make V=99 |
At a certain point, the building generates an error for the wireless card libraries. Mediatek has not released the wireless card sources, but an sdk with compiled binaries for a kernel version different from the one we are using in the building; the error reported is
|
1 2 3 4 5 6 7 8 9 10 11 12 13 14 |
cp -fpR ./wifi_binary/mt_wifi.ko_3.18.45 /home/sviluppo/Linkit/openwrt/build_dir/target-mipsel_24kec+dsp_uClibc-0.9.33.2/linux-ramips_mt7688/mtk-sdk-wifi-2015-06-01/ipkg-ramips_24kec/mtk-sdk-wifi/lib/modules/3.18.45/mt_wifi.ko cp: cannot stat './wifi_binary/mt_wifi.ko_3.18.45': No such file or directory Makefile:93: recipe for target '/home/sviluppo/Linkit/openwrt/bin/ramips/packages/linkit/mtk-sdk-wifi_2015-06-01-ade8b1b299cbd5748db1acf80dd3e9f567938371_ramips_24kec.ipk' failed make[3]: *** [/home/sviluppo/Linkit/openwrt/bin/ramips/packages/linkit/mtk-sdk-wifi_2015-06-01-ade8b1b299cbd5748db1acf80dd3e9f567938371_ramips_24kec.ipk] Error 1 make[3]: Leaving directory '/home/sviluppo/Linkit/openwrt/feeds/linkit/mtk-sdk-wifi' package/Makefile:191: recipe for target 'package/feeds/linkit/mtk-sdk-wifi/compile' failed make[2]: *** [package/feeds/linkit/mtk-sdk-wifi/compile] Error 2 make[2]: Leaving directory '/home/sviluppo/Linkit/openwrt' package/Makefile:188: recipe for target '/home/sviluppo/Linkit/openwrt/staging_dir/target-mipsel_24kec+dsp_uClibc-0.9.33.2/stamp/.package_compile' failed make[1]: *** [/home/sviluppo/Linkit/openwrt/staging_dir/target-mipsel_24kec+dsp_uClibc-0.9.33.2/stamp/.package_compile] Error 2 make[1]: Leaving directory '/home/sviluppo/Linkit/openwrt' /home/sviluppo/Linkit/openwrt/include/toplevel.mk:181: recipe for target 'world' failed make: *** [world] Error 2 sviluppo@debian:~/Linkit/openwrt$ |
One way to fix the problem is the following.
Go to the /home/sviluppo/Linkit/openwrt/feeds/linkit/mtk-sdk-wifi/wifi_binary/ folder and copy the files for our kernel version
|
1 2 |
cp mt_wifi.ko_3.18.44 mt_wifi.ko_3.18.45 cp mt_wifi.ko_3.18.44_all mt_wifi.ko_3.18.45_all |
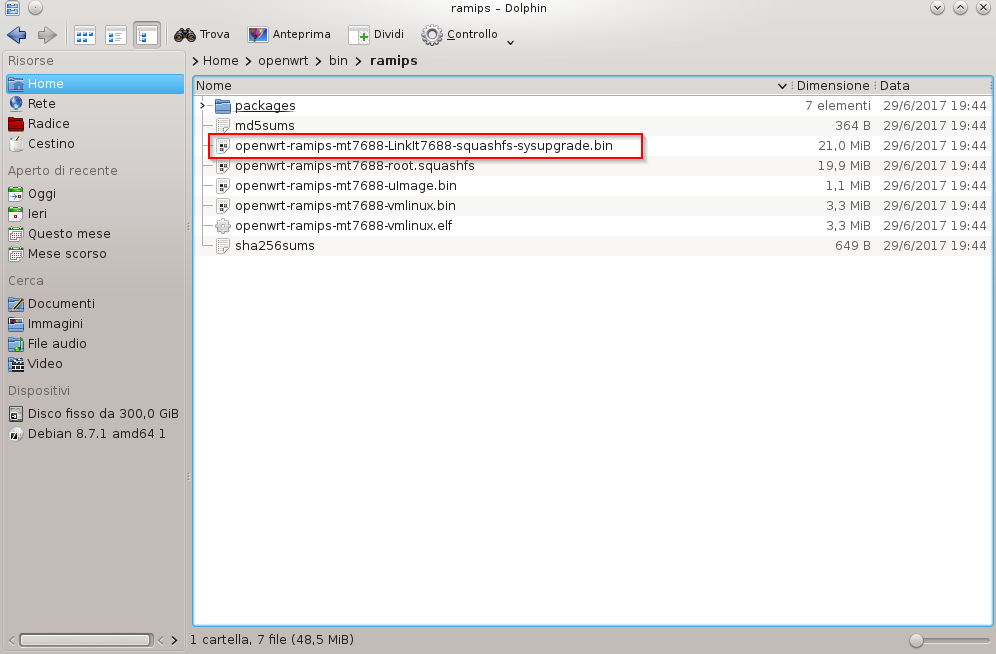
Rerun the building. At the end of the process the generated file is available in the bin/ramips folder
 The built firmware is available here
OpenWrt Linkit 7688 and 7688 Duo Image
WARNING: The image installation on the device is at your own risk. We accept no responsibility if the installation leads to malfunction or block of the device.
If you upgrade the board using an usb flah drive, you need to rename the openwrt-ramips-mt7688-LinkIt7688-squashfs-sysupgrade.bin file in lks7688.img.
The image kernel for this building is 3.18_45; If you want to use a recent kernel, you must use the opensource drivers available for the board; in the case of the Linkit 7688 Duo card, in our possession, we can rebuild the image using the Realtek rt76 drivers for the wireless network adapter and add the additional components for the Atmel MCU using LEDE, an OpenWrt fork
In the next article you will build a LEDE image for the Linkit 7688 Duo board. For the Linkit 7688 board at this time, the mraa libraries, used to interface the periphals, are not yet compatible with the latest version of LEDE and the functionality of the image is limited. There may be also bugs in the wireless card opensource drivers, which hopefully are solved in the refinement of these drivers.
LEDE building for Linkit 7688 Duo